
Can you use a table saw as a jointer? Yes, you can use a table saw as a jointer, but it requires extreme caution and the right accessories. It’s not a direct replacement for a dedicated jointer, but with proper setup and safety measures, you can achieve decent results for edge jointing and lumber jointing. This guide will walk you through the process, focusing on safe jointer use on table saw and how to make your table saw edge jointing efforts successful and secure.
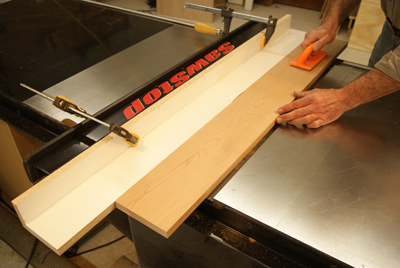
Image Source: www.woodworkersjournal.com
Why Joint Edges?
Before we dive into how to use your table saw like a jointer, let’s briefly touch on why jointing is important. Jointing an edge creates a perfectly straight and square surface. This is crucial for:
- Glue-ups: Straight edges mean tighter, stronger glue joints for projects like tabletops or cabinet carcasses.
- Accurate Cuts: When edges are square, subsequent cuts will be more precise.
- Professional Finish: It gives your woodworking projects a clean, polished look.
The Table Saw Jointer Method: Safety First!
Using a table saw for jointing is inherently more dangerous than using a dedicated jointer. The primary concern is kickback, where the workpiece is suddenly and violently thrown back towards the operator. This is exacerbated when trying to create a perfectly straight edge against the table saw fence. Therefore, safe jointer use on table saw is paramount. Always remember: safety is non-negotiable.
Essential Safety Gear
Before you even think about touching your table saw for jointing, ensure you have:
- Safety Glasses: Always wear them. Always.
- Hearing Protection: Table saws are loud.
- Dust Mask: Wood dust can be harmful.
- Push Sticks and Push Blocks: These are your best friends for keeping hands away from the blade.
- Push Pads: Some jigs utilize these for better grip.
Understanding Kickback
Kickback happens when the blade grabs the wood and throws it back. This can occur if:
- The wood binds against the blade.
- The wood is not held firmly against the fence.
- The wood pinches the blade.
- The blade is not sharp or is misaligned.
When jointing on a table saw, the risk is higher because you’re trying to shave off a thin layer of wood to create a straight edge. Any deviation can cause the wood to bind.
Methods for Table Saw Edge Jointing
There are several ways to adapt your table saw for jointing. Each method has its pros and cons, but all prioritize safety and accuracy. We’ll explore common techniques and accessories, including the table saw jointer jig and table saw fence jointer attachment.
Method 1: The Zero-Clearance Insert and Fence Technique
This is the most basic method and requires no special jigs, but it’s also the riskiest and least accurate. It’s generally not recommended for anything other than rough jointing on non-critical pieces.
How it works:
- Set up your table saw: Ensure the blade is set to a standard 90-degree angle.
- Use a zero-clearance insert: This minimizes the gap around the blade, helping to support the wood and reduce tear-out.
- Position the fence: The fence is moved away from the blade, just enough to allow the widest part of the workpiece to pass by without touching. The goal is to have the blade cut just the high spot on the edge you want to straighten.
- Make the cut: Feed the workpiece, keeping the edge you want to joint firmly against the saw’s tabletop. The fence is only there to guide the workpiece at a consistent distance from the blade.
Why it’s risky:
- No lateral support: The wood is only supported from below.
- High risk of binding: If the wood is slightly twisted or the fence is not perfectly parallel to the blade, the wood can bind.
- Difficult to control: Maintaining consistent pressure against the tabletop is challenging.
This method is not ideal for accurate jointing and is generally discouraged due to safety concerns.
Method 2: The Table Saw Jointer Jig (The Preferred DIY Approach)
This is where making a jointer table saw setup becomes truly effective and safer. A well-built table saw jointer jig acts as a fence that is guaranteed to be parallel to the blade, overcoming the inherent limitations of the table saw’s built-in fence for this specific task.
Building a Basic Table Saw Jointer Jig
A common design involves a piece of plywood or MDF that rides against the table saw’s fence. A block of wood, known as the “fence,” is attached to this base at a precise 90-degree angle to the edge that will run against the saw’s fence.
Materials Needed:
- 1/4″ or 1/2″ plywood or MDF (for the base)
- 3/4″ plywood or MDF (for the fence block)
- Screws
- Wood glue
- Measuring tape and pencil
- Straight edge or metal ruler
Construction Steps:
- Cut the Base: Cut a piece of plywood or MDF to a suitable size. A good starting point is a piece approximately 12″ x 24″. This will provide stability.
- Cut the Fence Block: Cut a strip of 3/4″ plywood or MDF. The length should be at least the width of your table saw insert (e.g., 10-12 inches). The height should be sufficient to provide good support for your workpiece.
- Ensure Squareness: This is CRITICAL. The edge of your fence block that will run against the table saw’s fence MUST be perfectly square to the edge of the fence block that will contact your workpiece. Use a reliable square and test meticulously.
- Attach the Fence Block: Apply wood glue to the edge of the fence block and position it on the base. Ensure the side that will be the “fencing” surface is perfectly perpendicular to the long edge of the base that will run against your table saw fence. Secure with screws from the bottom of the base into the fence block. Pre-drilling is recommended.
- Add Secondary Fence (Optional but Recommended): For even more stability and control, you can add a second, taller fence block. This can run parallel to the first fence block, offset by the width of your table saw fence. This creates a channel for your jig to slide in, preventing it from tipping.
- Test Fit: Place the jig on your table saw. Ensure the edge of the base glides smoothly against the saw’s fence. Check that the fence block is indeed perpendicular to the saw fence.
Using the Table Saw Jointer Jig for Edge Jointing:
- Set Blade Height: Set the table saw blade height so that it extends just slightly above the edge of the workpiece you are jointing. About 1/8″ to 1/4″ is usually sufficient.
- Adjust Fence Position: Position your table saw’s rip fence so that it is a safe distance away from the blade (e.g., 1 inch or more). The table saw jointer jig will now act as your primary guide, running against the rip fence.
- Position the Jig: Place the jig on the table saw. The edge of the jig’s base should be held firmly against your table saw’s rip fence.
- Load the Workpiece: Place the workpiece against the fence block of your jig. The edge you want to joint should be against the fence block.
- Use Push Sticks/Blocks: Use push sticks or push blocks to feed the workpiece through the blade. Keep the workpiece firmly pressed against the fence block of your jig.
- Make the Cut: Slowly and steadily feed the workpiece through the blade. The jig ensures that the edge you are cutting is perfectly parallel to the blade, and thus, perfectly straight.
- Repeat as Necessary: For very warped edges, you may need to make multiple passes, each time taking off a thin shaving.
This DIY jointer table saw method provides a controlled and safer way to achieve straight edges. The jig effectively creates a dedicated jointing surface that’s always parallel to the blade.
Method 3: The Router Table Jointer Conversion
While not strictly using the table saw as a jointer, a router table jointer conversion offers a different approach to jointing edges. This method uses a router and a specific jig that attaches to the router table.
How it works:
- Router Table Setup: You’ll need a sturdy router table with a flat, stable top.
- The Jointer Jig: A specialized jig is used. This jig typically has an adjustable fence that is positioned at 90 degrees to the router table. The workpiece is held against this fence and also against the router table.
- Router Bit: A straight-cutting router bit is used.
- The Cut: The router is turned on, and the workpiece is fed through, with the edge against the jig’s fence and the face against the router table.
Advantages:
- Precise Control: Routers offer excellent control for fine adjustments.
- Dedicated Jointing Surface: The jig provides a stable and accurate reference.
Disadvantages:
- Requires a Router and Table: An additional investment.
- Dust Collection Can Be Tricky: Managing sawdust effectively is important.
This is a viable alternative if you have the equipment, but it’s not how you’d use the table saw itself as a jointer.
Method 4: The Table Saw Fence Jointer Attachment
This is a specialized accessory designed to clamp onto your existing table saw fence. A table saw fence jointer attachment essentially extends your rip fence and provides a dedicated, adjustable surface to run your workpiece against, ensuring it stays parallel to the blade.
How it works:
- Clamping: The attachment clamps securely to your table saw’s rip fence.
- Adjustment: It usually has a mechanism to precisely adjust the distance of its reference surface from the blade, allowing you to control the amount of material removed.
- Usage: You position your workpiece against the attachment’s fence and feed it through the blade, maintaining contact with the table saw’s surface.
Advantages:
- Purpose-Built: Designed for the task.
- Stable and Accurate: Offers good support and alignment.
- Relatively Easy to Use: Once set up, it’s straightforward.
Disadvantages:
- Cost: These attachments can be expensive.
- Compatibility: Ensure it fits your specific table saw fence.
This accessory directly addresses the need for a stable, parallel reference surface when performing edge planing with table saw.
Jointing Wider Boards: Advanced Techniques
For wider boards or when you need to joint an edge that’s already been cut straight but needs to be parallel to the first edge, the basic jig might not be enough. This is where specialized jigs or approaches come in.
The Table Saw Lumber Jointing Jig
A more robust table saw lumber jointing jig often involves a fence that is offset from the saw’s fence, creating a precisely angled cutting channel. This jig usually mounts to the table saw’s miter slots and has an adjustable fence block.
Key Features of a Good Lumber Jointing Jig:
- Sturdy Construction: Made from thick plywood or MDF.
- Accurate Alignment: Designed to ensure the workpiece is presented to the blade at a precise angle.
- Adjustability: Allows for fine-tuning the cut depth and angle.
- Workpiece Support: Provides ample support to prevent rocking or tipping.
Making a More Advanced Table Saw Lumber Jointing Jig:
This usually involves a base that slides into the miter slot. A fence is then attached to this base, set at 90 degrees to the edge of the base that slides in the miter slot. The key here is that the miter slot is guaranteed to be parallel to the blade.
Steps to Consider:
- Miter Slot Base: Create a base that fits snugly into your table saw’s miter slot. This could be a strip of hardwood or MDF.
- Fence Attachment: Attach a fence block to this base. Ensure the fence is perfectly 90 degrees to the edge of the base that sits in the miter slot.
- Adjustable Fence: Consider making the fence adjustable (using slots and screws) so you can fine-tune its position relative to the blade.
- Workpiece Clamp: For wider pieces, you might need a way to clamp the workpiece to the jig to prevent it from shifting.
This setup allows you to achieve parallel edges on wider stock more effectively.
Using a Table Saw Tapering Jig for Jointing
While a table saw tapering jig is primarily designed for cutting angles, the principle of holding a workpiece at a fixed angle to the blade can be adapted for jointing. If you have a tapering jig, you can set it up to hold the workpiece so that its edge is presented to the blade at a 90-degree angle.
How to Adapt:
- Set the Jig: Adjust your tapering jig to hold the workpiece firmly and present the edge to be jointed perfectly perpendicular to the blade.
- Feed Carefully: Use push sticks and maintain firm control as you feed the workpiece.
This method requires a very well-calibrated tapering jig and a careful hand. It’s not the primary function, but it can be a workaround in some situations.
The “Router Table Jointer Conversion” vs. “Table Saw as Jointer”
It’s important to distinguish between using your table saw for jointing and converting your router table.
- Table Saw as Jointer: This involves using the table saw’s ripping capabilities and a jig to create a jointed edge. The blade is the cutting tool.
- Router Table Jointer Conversion: This is about using a router bit on a router table, often with a specialized jig, to achieve a jointed edge. The router bit is the cutting tool.
While both achieve a similar outcome, the mechanics and safety considerations differ. The former focuses on precise fence alignment and safe feeding on the table saw, while the latter relies on the router’s power and the jig’s accuracy.
Edge Planing with Table Saw: Best Practices
When performing edge planing with table saw, think of it as a controlled shaving process.
- Start with a Rough Edge: If the edge is severely warped, you might need to make an initial cut with the rip fence very close to the blade to establish a somewhat straighter surface before using your jointing jig.
- Thin Passes: Always take thin passes. Removing too much material at once increases the risk of binding and kickback. Aim to remove just a shaving of wood.
- Support the Workpiece: Ensure the workpiece is well-supported on the table saw’s surface and against your jig’s fence.
- Keep the Jig Against the Fence: Never let the jig drift away from the table saw’s rip fence. This is your primary safety and accuracy guide.
- Workpiece Control: Always maintain positive control of the workpiece using push sticks and push blocks.
- Listen to Your Saw: If the saw bogs down, you’re trying to remove too much material. Back off, reduce the depth of cut, or take multiple passes.
Table Saw Lumber Jointing Jig vs. Commercial Jointers
It’s crucial to manage expectations. While a well-made table saw lumber jointing jig can produce good results, it’s not a direct substitute for a dedicated jointer.
Comparison:
| Feature | Table Saw as Jointer (with Jig) | Dedicated Jointer |
|---|---|---|
| Primary Use | Rip cutting, crosscutting, dadoing, and can be adapted for jointing. | Specifically designed for jointing edges and faces. |
| Edge Straightness | Can be excellent with a precise jig, but setup is critical. | Generally superior due to precise fence and cutter head. |
| Face Jointing | Not possible. | Essential for flattening faces of lumber. |
| Setup Time | Requires setting up and calibrating a jig. | Relatively quick setup and calibration. |
| Safety | Higher risk if not set up and used perfectly. | Designed with safety in mind, but still requires caution. |
| Cost | Utilizes existing equipment, plus jig material cost. | Significant investment for a quality machine. |
| Footprint | Uses existing table saw footprint. | Requires dedicated space. |
A dedicated jointer offers more control, better face jointing capabilities, and often a higher degree of accuracy out-of-the-box. However, for hobbyists with space or budget constraints, a well-executed DIY jointer table saw setup can be a valuable tool.
Frequently Asked Questions (FAQ)
Q: Can I joint a warped board on a table saw?
A: Yes, but with extreme caution. Start with very thin passes. A jig is highly recommended to ensure the board stays controlled and square to the blade.
Q: How much wood should I remove with each pass when jointing on a table saw?
A: Aim for the thinnest possible shaving. 1/16″ to 1/32″ is ideal. If your saw struggles or the wood binds, reduce the amount.
Q: What’s the most important part of a table saw jointer jig?
A: The accuracy of the fence block being 90 degrees to the base that runs against the table saw’s rip fence. Any inaccuracy here will be transferred to your jointed edge.
Q: Can I use my table saw’s regular rip fence for jointing?
A: It’s not recommended. Table saw rip fences are often not perfectly parallel to the blade over their entire length, and they aren’t designed to be the primary reference surface for this operation. A jig that runs against the fence provides a guaranteed parallel reference.
Q: What kind of blade is best for jointing on a table saw?
A: A sharp, high-quality dado blade or a clean-cutting plywood blade is best. A dull blade will cause tear-out and increase the risk of kickback.
Q: Is it safe to joint edges on a table saw?
A: It can be made safer with the use of a well-constructed table saw jointer jig and strict adherence to safety protocols. However, it is inherently more dangerous than using a dedicated jointer. Always prioritize safety.
Q: What about jointing the face of a board on a table saw?
A: You cannot effectively or safely joint the face of a board on a table saw. This requires a dedicated jointer or a very specialized router setup.
By following these guidelines, you can safely and effectively use your table saw to achieve straight, square edges on your lumber. Remember, patience and precision are key to successful table saw lumber jointing jig applications and overall safe jointer use on table saw.