
Can you grind concrete with an angle grinder? Yes, you can grind concrete with an angle grinder, but it’s crucial to use the right attachments and techniques to achieve a smooth finish and ensure safety. This guide will walk you through the process of concrete grinding using an angle grinder correctly, covering everything from choosing the right tools to performing the actual work safely and effectively.
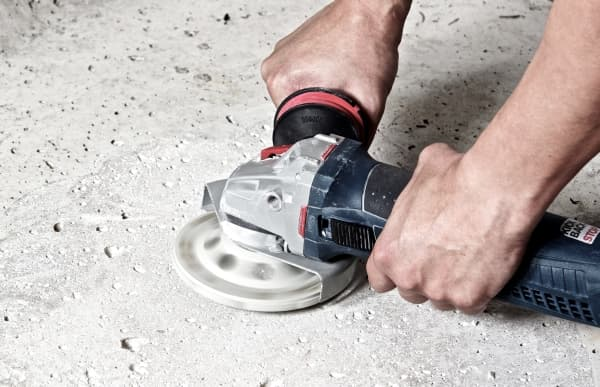
Image Source: binictools.com
Preparing for Concrete Grinding
Before you even think about firing up the angle grinder concrete job, proper preparation is key. This ensures efficiency, safety, and the best possible results. Whether you’re aiming for concrete preparation for a new coating, removing thinset, or general floor grinding, a solid foundation of preparation makes all the difference.
Safety First: Your Protective Gear
Working with concrete and power tools creates dust and debris. Wearing the right safety gear is non-negotiable.
- Safety Glasses or Goggles: Protect your eyes from flying particles.
- Dust Mask or Respirator: Fine concrete dust can be harmful to your lungs. A high-quality respirator rated for silica dust is essential.
- Hearing Protection: Angle grinders are loud. Earplugs or earmuffs will save your hearing.
- Work Gloves: Protect your hands from abrasion and vibrations.
- Sturdy Footwear: Closed-toe shoes, preferably steel-toed, are recommended.
- Long Sleeves and Pants: Protect your skin from dust and accidental contact with the spinning wheel.
Choosing the Right Angle Grinder
Not all angle grinders are created equal. For concrete grinding, you’ll generally want a grinder with more power.
- Power (Amps): A higher amperage grinder offers more torque, which is crucial for tackling tough concrete surfaces. Look for models with at least 7 amps, but 9 amps or more is ideal for serious concrete surfacing.
- Disc Size: Common sizes are 4.5 inches and 6 inches. Larger discs cover more area but can be heavier. For general concrete grinding, a 4.5-inch or 5-inch grinder is often a good balance of power and maneuverability.
- Variable Speed: While not strictly necessary for initial grinding, variable speed can be helpful for concrete polishing at later stages, allowing for finer control.
Selecting the Correct Grinding Disc: The Diamond Cup Wheel
The heart of successful concrete grinding with an angle grinder lies in the attachment. For concrete, you absolutely need a diamond cup wheel.
- What is a Diamond Cup Wheel? A diamond cup wheel is a specialized accessory designed for grinding hard materials like concrete, stone, and tile. It features diamond segments brazed or sintered onto a metal cup. These diamonds are extremely hard and effectively abrade the concrete surface.
- Types of Diamond Cup Wheels:
- Segmented: These wheels have distinct “cups” or segments. They are aggressive and good for rapid material removal, smoothing rough spots, and beveling edges. They also tend to produce more dust.
- Continuous Rim: These wheels have a smooth, unbroken edge. They are better for finer grinding and concrete polishing, producing a smoother finish with less dust. However, they cut slower.
- Turbo/Convex: These wheels have a wavy or convex surface. They offer a balance between segmented and continuous rims, providing good material removal while producing a relatively smooth finish.
Choosing the Right Grit: Diamond cup wheels come in different grits, much like sandpaper.
- Coarse Grits (e.g., 20-40 grit): Used for aggressive removal of high spots, old adhesives, removing thinset, or preparing a surface for a new coating. This is often the starting point for major concrete preparation.
- Medium Grits (e.g., 60-80 grit): Used for smoothing out the marks left by coarse grit wheels and for general concrete surfacing.
- Fine Grits (e.g., 100-200 grit and higher): Used for achieving a smoother finish, often a step towards concrete polishing.
Important Considerations for Diamond Cup Wheels:
- Arbor Size: Ensure the arbor size of the wheel matches the spindle of your angle grinder.
- Maximum RPM: Always check the maximum RPM rating of the wheel and ensure it’s compatible with or lower than your grinder’s maximum RPM. Exceeding this can cause the wheel to shatter.
- Brand and Quality: Investing in a reputable brand will generally yield better performance and longevity.
Dust Collection: A Crucial Element
Concrete grinding generates a significant amount of very fine silica dust. This dust is not only a health hazard but also creates a messy work environment. Effective dust collection is paramount.
- Dust Shrouds: These attach to the angle grinder, surrounding the grinding wheel. They have a port where a vacuum cleaner can be attached. This is the most effective way to contain dust during concrete grinding.
- HEPA Vacuum Cleaners: For effective dust collection, you’ll need a vacuum cleaner with a HEPA filter, capable of handling fine dust. Many industrial vacuums are designed for this purpose.
- Wet Grinding: In some cases, particularly for very fine finishing or when dust control is extremely critical, wet grinding can be an option. This involves spraying water on the surface as you grind. However, this is more complex with an angle grinder and requires specialized diamond cup wheels designed for wet use. It also creates slurry that needs to be managed. For most typical concrete grinding tasks with an angle grinder, dry grinding with a dust shroud is preferred.
Securing the Workspace
- Clear the Area: Remove furniture, vehicles, and anything that could be damaged by dust or that could obstruct your work.
- Tape Off Openings: Seal off doorways and vents with plastic sheeting and painter’s tape to prevent dust from spreading to other parts of the building.
- Ventilation: If working indoors, ensure adequate ventilation, but be mindful of where the dust is going.
The Grinding Process: Step-by-Step
Once you have all your safety gear and tools ready, it’s time to start the concrete grinding. Follow these steps for optimal results.
Step 1: Mount the Diamond Cup Wheel
- Disconnect Power: Always ensure the angle grinder is unplugged or the battery is removed before changing accessories.
- Loosen Flange Nuts: Use the appropriate spanner wrench to loosen the flange nuts holding the existing disc (if any).
- Remove Old Disc: Carefully remove the old disc.
- Install Diamond Cup Wheel: Place the diamond cup wheel onto the grinder’s spindle, ensuring it sits flush against the inner flange.
- Tighten Flange Nuts: Reinstall the outer flange and tighten the flange nuts securely with the spanner wrench. Do not overtighten, but ensure the wheel is snug and won’t wobble.
Step 2: Attach the Dust Shroud (If Using)
- Position Shroud: Slide the dust shroud over the grinder body and the mounted diamond cup wheel.
- Secure Shroud: Most shrouds attach with clamps or screws. Ensure it’s firmly attached and covers the wheel as much as possible while allowing clearance for the concrete surface.
- Connect Vacuum: Attach the hose from your HEPA vacuum cleaner to the port on the dust shroud. Turn on the vacuum.
Step 3: Initial Grinding Technique
- Start Slow: Begin with the grinder off the concrete. Let it reach full speed.
- Gentle Contact: Gently bring the spinning wheel into contact with the concrete surface.
- Controlled Movement: Move the grinder in a steady, sweeping motion across the concrete. Avoid dwelling in one spot, as this can create divots or burn marks.
- Angle of Approach: Hold the grinder at a slight angle to the concrete surface (around 15-30 degrees). This helps to distribute the pressure and prevent gouging. Some professionals find a slight tilt also helps with dust collection.
- Overlap Passes: Overlap each pass by about 50% to ensure an even surface.
- Work in Sections: Break down larger areas into smaller, manageable sections.
- Pressure: Apply consistent, moderate pressure. Let the diamond wheel do the work. Forcing the grinder can overheat the motor and damage the wheel.
Step 4: Managing Heat and Dust
- Overheating: Concrete dust and friction generate heat. If you notice the grinder becoming excessively hot, or if the dust coming from the shroud smells acrid, take a break. Allow the grinder and the wheel to cool.
- Dust Cloud Management: If you’re not using a dust shroud, be prepared for a significant dust cloud. Work in a well-ventilated area or wear a high-grade respirator. For effective dust control, a shroud and vacuum are strongly recommended.
- Cleaning the Wheel: Periodically, the diamond segments can become loaded with concrete dust. Gently tap the wheel against a piece of scrap wood or use a wire brush to clear the debris and expose fresh diamond grit.
Step 5: Progressing Through Grits (For Smoother Finishes)
If your goal is not just rough concrete grinding but a smoother finish, you’ll need to work through progressively finer grit diamond cup wheels.
- Transition: After completing the initial grind with a coarse grit wheel, clean the surface thoroughly to remove loose debris.
- Next Grit: Attach the next finer grit diamond cup wheel.
- Repeat Process: Repeat the grinding process described above, using the same controlled movements and ensuring even coverage.
- Continue: Continue this process, moving to finer grits until you achieve the desired level of smoothness. This is essential for any concrete polishing preparation.
Specific Applications of Angle Grinder Concrete Grinding
The versatility of an angle grinder with a diamond cup wheel allows it to be used for various concrete tasks.
Removing Thinset and Old Adhesives
When renovating a floor, you often need to remove old tile adhesive or thinset.
- Grinding Approach: Use a segmented diamond cup wheel (20-40 grit).
- Technique: Hold the grinder at a slightly steeper angle to get under the adhesive. Work in short, overlapping strokes. The goal is to aggressively scrape away the old material.
- Dust Control: This process creates a lot of dust, so a dust shroud and vacuum are crucial.
Smoothing Uneven Concrete Surfaces
For general concrete surfacing, whether it’s a patio, driveway, or interior floor, an angle grinder can level out high spots and rough patches.
- Grinding Approach: Start with a coarser grit (e.g., 40-60 grit) to remove imperfections and then move to a finer grit (e.g., 80 grit) to smooth the surface.
- Technique: Maintain a consistent angle and pressure across the entire area. Focus on the high spots.
Edge Grinding and Detail Work
While larger floor grinders are ideal for large areas, an angle grinder is excellent for edges and tight spots.
- Grinding Approach: Use a diamond cup wheel suitable for the level of finish required.
- Technique: Work carefully along edges, ensuring you don’t over-grind and create a rounded or undercut edge unless intended. Use a more controlled, deliberate motion.
Concrete Preparation for Coatings
For any type of coating, sealant, or overlay to adhere properly, the concrete surface needs to be clean and free of contaminants.
- Grinding Approach: A medium to coarse grit diamond cup wheel (e.g., 40-80 grit) is typically used for concrete preparation.
- Technique: The goal is to open the pores of the concrete and create a slight profile for the new material to grip. Ensure complete coverage.
Troubleshooting Common Issues
Even with careful preparation, you might encounter problems.
Gouging or Deep Scratches
- Cause: Too much pressure, dwelling too long in one spot, or using a wheel that’s too aggressive for the stage of work.
- Solution: If the gouges are shallow, you can try to blend them with subsequent passes using the same grit. For deep gouges, you might need to fill them with a concrete repair compound after grinding. For future work, ease up on pressure and use more sweeping motions.
Uneven Grinding Pattern
- Cause: Inconsistent pressure, inconsistent movement speed, or not overlapping passes sufficiently.
- Solution: Go over the area again with the same grit wheel, focusing on smoothing out the high and low spots. Ensure consistent pressure and movement.
Diamond Cup Wheel Loading Up
- Cause: The diamond segments become clogged with concrete dust, reducing their effectiveness.
- Solution: Stop the grinder and use a wire brush or tap the wheel against a piece of scrap wood to dislodge the debris and expose fresh diamond.
Excessive Dust Despite Shroud
- Cause: The shroud isn’t properly sealed, the vacuum isn’t powerful enough, or the dust collection bag/filter is full.
- Solution: Check the seal of the shroud against the grinder and the surface. Ensure your vacuum has good suction and a clean filter. Empty the collection bag as needed.
Maintaining Your Angle Grinder and Wheels
Proper maintenance ensures the longevity of your tools and the quality of your work.
Angle Grinder Maintenance
- Cleanliness: Keep the grinder clean, especially the air vents. Dust buildup can cause overheating.
- Cord/Battery: Inspect the power cord or battery for any damage before each use.
- Bearings: Listen for any unusual noises from the grinder; this could indicate worn bearings.
Diamond Cup Wheel Care
- Cleaning: After use, brush off any excess dust and debris from the diamond segments.
- Storage: Store diamond cup wheels in a dry place, away from moisture.
- Inspection: Before each use, inspect the diamond segments for wear or damage. If segments are missing or severely worn, it’s time for a new wheel.
Advanced Techniques: Towards Concrete Polishing
While an angle grinder is primarily a grinding tool, with the right sequence of diamond grits, it can be used to achieve a polished finish, especially on smaller areas or for touch-ups. This process is known as concrete polishing.
- Start with Coarse Grit: Begin with a diamond cup wheel around 40-60 grit to remove imperfections and level the surface.
- Progress Through Grits: Gradually move to finer grits: 80, 120, 200, 400, 800, 1500, and even 3000 grit.
- Cleanliness is Key: Between each grit change, thoroughly clean the concrete surface and the grinder to avoid carrying over coarser grit particles, which would scratch the finer finish.
- Technique for Polishing: Use lighter pressure and slower, overlapping passes as you move to finer grits. The goal is to burnish the surface, not remove material aggressively.
- Water or No Water: Many finer grit polishing steps can be done wet to reduce dust and improve the polish. However, this requires careful management of the slurry. Dry polishing with finer grits is also common, but it’s crucial to manage dust effectively.
- Consider a Concrete Polisher: For larger areas requiring a professional polished finish, a dedicated floor polisher is a much more efficient and effective tool than an angle grinder.
When to Call a Professional
While an angle grinder is a powerful tool for DIY concrete grinding, there are times when professional help is best.
- Very Large Areas: Grinding thousands of square feet is best handled by professional floor grinding equipment.
- Structural Repairs: If you’re dealing with significant cracks or structural issues, consult a structural engineer or a concrete repair specialist.
- High-Gloss Polishing: Achieving a mirror-like, highly reflective polished concrete finish usually requires specialized heavy-duty equipment and expertise.
- Hazardous Materials: If you suspect the concrete contains asbestos or lead paint, hire professionals equipped to handle these hazardous materials safely.
Frequently Asked Questions (FAQ)
Q1: How deep can an angle grinder grind concrete?
An angle grinder with a diamond cup wheel can typically remove very thin layers of concrete, usually fractions of a millimeter to a few millimeters per pass, depending on the grit and pressure. It’s not designed for deep concrete removal or cutting.
Q2: Can I use a regular grinding disc for concrete?
No, absolutely not. Regular grinding discs are designed for metal and will shatter or explode when used on concrete. You must use a diamond cup wheel specifically designed for concrete.
Q3: How often should I change the diamond cup wheel?
This depends heavily on the quality of the wheel, the hardness of the concrete, and the intensity of the work. You’ll know it’s time to change when you notice significantly reduced grinding speed, increased dust, or the diamond segments appear worn down.
Q4: What is the best angle to hold an angle grinder for concrete?
A slight angle, typically around 15-30 degrees to the surface, is generally recommended. This helps with efficient material removal and dust collection, and it prevents the wheel from digging in too aggressively.
Q5: How do I prevent swirl marks when grinding concrete?
Swirl marks are usually caused by inconsistent pressure or movement. Ensure you overlap your passes, maintain a consistent speed and pressure, and consider using a slightly finer grit wheel to blend the surface after initial grinding. Sometimes, a final pass with a lighter touch can help reduce them.
By following these guidelines and prioritizing safety, you can effectively and properly grind concrete with an angle grinder for a variety of projects, from basic concrete preparation to achieving smoother concrete surfacing.