
Can you measure your wrist size without a tape measure? Yes, you absolutely can! Whether you’re buying a bracelet, a watch, or just curious about your measurements, there are several simple and effective ways to get an accurate wrist size using common household items. This guide will walk you through the most popular and easy DIY wrist measurement techniques, transforming everyday objects into a reliable measuring tape substitute.
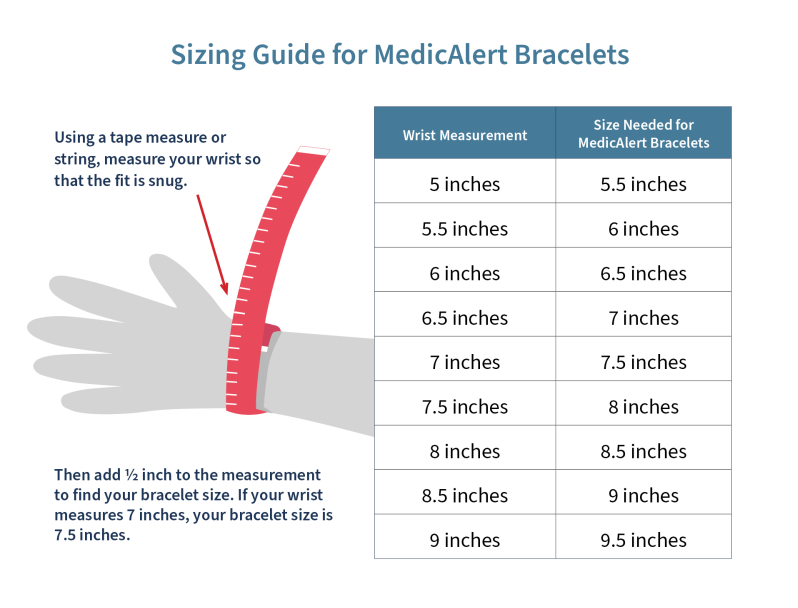
Image Source: blog.medicalert.org
Why Knowing Your Wrist Size Matters
Your wrist size is more than just a number; it’s a key piece of information for several reasons:
- Jewelry Fit: This is perhaps the most common reason. Bracelets and bangles need to fit comfortably without being too tight or too loose. Knowing your wrist size ensures you choose jewelry that looks and feels great.
- Watch Sizing: The lug-to-lug distance of a watch and the length of the strap or bracelet significantly impact how a watch sits on your wrist. A proper fit prevents the watch from feeling bulky or sliding around too much.
- Clothing: Some clothing items, like tailored shirts or specific types of gloves, can also have cuff or wrist measurements that are important for a good fit.
- Personal Health: While not the primary use, sometimes tracking body measurements can be part of a personal wellness journey.
- Gifting: If you’re buying a gift for someone, knowing their wrist size can make your present much more thoughtful and practical.
Common Household Items for Wrist Measurement
You don’t need fancy tools to measure your wrist. Many everyday items can serve as a measuring tape substitute. The key is to find something flexible enough to wrap around your wrist and then transfer that measurement to a rigid ruler.
1. The String Method (Your Go-To Measuring Tape Substitute)
This is arguably the most popular and straightforward method. A piece of string, yarn, thread, or even a thin cord works perfectly.
What You’ll Need:
- A piece of string, yarn, thread, or thin cord
- A pen or marker
- A ruler or a standard measuring tape (for the final step)
Steps:
- Wrap the String: Take your chosen string and wrap it snugly around the part of your wrist where you typically wear a watch or bracelet. Don’t pull too tight; you want a comfortable, snug fit.
- Mark the Overlap: With the string in place, use your pen or marker to make a clear mark on the string where the end of the string overlaps. This mark indicates the circumference of your wrist.
- Straighten and Measure: Carefully remove the string from your wrist. Lay the string flat against your ruler or a standard measuring tape.
- Read the Measurement: Align the starting end of the string with the zero mark on your ruler. Read the measurement at the mark you made. This number is your wrist circumference in inches or centimeters.
Tips for Accuracy with String:
- Use a non-stretchy string for the most accurate results.
- Ensure the string is laid flat against the ruler, without kinks or twists.
- If you’re unsure, measure twice.
2. The Paper Strip Method
Similar to the string method, a strip of paper can also be an effective measuring tape substitute. This is a great option if you have plain paper readily available.
What You’ll Need:
- A strip of paper (about 1 inch or 2-3 cm wide)
- A pen or marker
- Scissors
- A ruler or standard measuring tape
Steps:
- Cut the Paper Strip: Cut a long, thin strip of paper. It should be long enough to wrap around your wrist comfortably.
- Wrap the Strip: Wrap the paper strip around your wrist, just like you would with a string. Make sure it’s snug but not too tight.
- Mark the Overlap: Use your pen or marker to mark the point on the paper strip where the end overlaps.
- Straighten and Measure: Lay the paper strip flat on a hard surface.
- Read the Measurement: Place your ruler next to the paper strip. Align the beginning of the strip (the end that wasn’t marked) with the zero mark on the ruler. Read the measurement where your pen mark falls.
Tips for Accuracy with Paper:
- Use paper that isn’t too flimsy, as it can tear or stretch slightly. Printer paper is a good choice.
- Press firmly with the marker to ensure a clear, visible line.
3. The Yarn or Thread Method
Yarn or thread are excellent choices for an informal measurement because they are flexible and readily available in most homes.
What You’ll Need:
- A length of yarn or thread
- Scissors
- A ruler or standard measuring tape
- A pen or marker (optional, but helpful)
Steps:
- Wrap the Yarn/Thread: Gently wrap the yarn or thread around your wrist at the desired spot. Keep it at a comfortable tightness.
- Mark the Length: You can either hold the yarn or thread in place and note where the end meets the rest of the length, or you can use scissors to snip the yarn or thread at that exact point. If you’re not snipping, use a pen to mark the overlap.
- Measure the Yarn/Thread: Lay the yarn or thread straight along a ruler. If you snipped it, the length from end to cut is your measurement. If you marked it, measure from the starting end to the mark.
Tips for Accuracy with Yarn/Thread:
- Avoid using very fluffy or loosely spun yarn, as it can be difficult to get a precise measurement. A smoother yarn or strong thread is better.
- If using thread, you might need to double it over to make it more visible on the ruler.
4. The Cord Method
Similar to string and yarn, a thin cord can also work well. Think of headphone cords, thin shoelaces, or even dental floss in a pinch.
What You’ll Need:
- A piece of cord
- A ruler or standard measuring tape
- A pen or marker (optional)
Steps:
- Position the Cord: Place the cord around your wrist, ensuring it sits comfortably.
- Mark or Note: Mark the overlap point with a pen, or simply hold the cord firmly at the point where it meets the beginning.
- Measure the Cord: Lay the cord flat on a ruler and measure from the start to your mark or the point you held.
Tips for Accuracy with Cord:
- Ensure the cord isn’t knotted or twisted.
- If the cord is very thin, be extra careful when marking the overlap point.
Converting Your Measurement for Jewelry and Watches
Once you have your wrist measurement, you’ll want to know how to use it.
Bracelet Sizing
Most bracelet sizes are given as a circumference. Here’s a general guide:
| Wrist Size (Inches) | Bracelet Size (Inches) | Bracelet Size (Centimeters) |
|---|---|---|
| 5.5 – 6.0 | 6.5 – 7.0 | 16.5 – 17.8 |
| 6.0 – 6.5 | 7.0 – 7.5 | 17.8 – 19.0 |
| 6.5 – 7.0 | 7.5 – 8.0 | 19.0 – 20.3 |
| 7.0 – 7.5 | 8.0 – 8.5 | 20.3 – 21.6 |
| 7.5 – 8.0 | 8.5 – 9.0 | 21.6 – 22.9 |
- How to Use: Add about 0.5 to 1 inch (1.3 to 2.5 cm) to your measured wrist size for a comfortable bracelet fit. This allows for ease of movement and prevents the bracelet from feeling too tight. If you prefer a looser fit, add more. For bangles, you might need a slightly larger measurement as they don’t flex like a chain or beaded bracelet.
Watch Strap Sizing
Watch strap and bracelet sizing can be a bit more nuanced. It often depends on the watch case size and the style of the strap.
- Leather Straps: Usually, you’ll find pre-set lengths. You’ll want your wrist measurement to fall within the range of the holes on the strap. The total length of the strap and buckle combined is often listed. A good rule of thumb is that your measured wrist size should fall comfortably on the middle holes of the strap.
- Metal Bracelets: These are often adjustable. The total length of the bracelet is provided, and you can usually remove or add links. Your wrist size will determine how many links you need. Many jewelers or watch shops can resize metal bracelets for you.
- Lug-to-Lug Measurement: While not directly related to your wrist circumference, the lug-to-lug distance of a watch case is important. A watch with a lug-to-lug measurement that is significantly wider than your wrist can look disproportionate. Aim for a lug-to-lug measurement that is roughly 75-80% of your wrist’s flat width (not circumference).
Factors Affecting Wrist Size and Measurement
Your wrist size can fluctuate slightly due to several factors:
- Time of Day: Wrists can swell slightly throughout the day, especially with heat or after physical activity. Measuring in the morning might give you a slightly smaller reading than in the afternoon. For most jewelry purposes, an afternoon measurement is often preferred for comfort.
- Temperature: Cold can make your wrists contract, while heat can cause them to expand.
- Activity Level: Vigorous exercise can temporarily increase blood flow and cause minor swelling.
- Water Retention: Diet and hydration levels can influence fluid retention, which can affect your measurements.
- Bone Structure: The prominence of your wrist bones can affect how a bracelet or watch sits.
Tips for the Most Accurate Informal Measurement
Even without a tape measure, you can achieve a highly accurate wrist size.
- Choose a Non-Stretchy Material: String, thread, or paper are generally preferred over elastic materials that could stretch and give a false reading.
- Consistent Pressure: Apply the same level of snugness each time you measure. Don’t pull too tight, but ensure the material is snug against your skin.
- Measure in the Right Spot: Most people measure where they wear their watch or a bracelet. For general purposes, measure the widest part of your wrist bone.
- Use a Clear Mark: Make a distinct mark on your measuring material. A thick marker or a small snip is better than a faint pencil line.
- Read the Ruler Carefully: Ensure the zero mark is aligned correctly and read the measurement precisely at your mark.
- Measure Multiple Times: If you are unsure, repeat the measurement with the same method or try a different method to see if you get a consistent result. This helps confirm your accurate wrist size.
Comparing Methods: Which is Best?
All the methods described – string, paper strip, yarn, thread, and cord – are effective when done carefully. The “best” method often comes down to personal preference and what materials you have on hand.
- String/Yarn/Thread: These are generally the most flexible and forgiving materials, making them excellent for wrapping around the wrist contour.
- Paper Strip: This is very accessible but can be slightly less flexible than string or yarn, especially around the curve of the wrist. However, it’s easy to mark and read on a ruler.
The critical step for all these informal measurement techniques is the transfer of the measurement to a rigid ruler. This is where the final accuracy is determined.
Frequently Asked Questions (FAQ)
What is the best way to measure my wrist without a tape measure?
The most straightforward and effective ways are using a piece of string, yarn, thread, or a paper strip. Wrap the material snugly around your wrist, mark the overlap point, and then measure the length of the material from the start to your mark using a ruler.
Can I use dental floss to measure my wrist?
Yes, you can use dental floss. It’s a thin and readily available measuring tape substitute. Just ensure it’s not stretched and mark the overlap clearly before measuring it against a ruler.
How much bigger should a bracelet be than my wrist size?
Generally, you should add 0.5 to 1 inch (approximately 1.3 to 2.5 cm) to your measured wrist circumference for a comfortable bracelet fit. If you prefer a looser fit, add a bit more.
How do I know if a watch strap will fit?
Watch strap fit depends on the strap’s length and the number of adjustment holes. Your measured wrist size should comfortably fall within the range of the holes on the strap. It’s also good to consider the watch case’s lug-to-lug measurement for overall proportionality.
Is it okay to measure my wrist at different times of the day?
Your wrist size can fluctuate slightly due to temperature, activity, and hydration. For jewelry purchases, it’s often best to measure in the afternoon or evening when your wrists might be slightly more swollen for a comfortable fit. If you’re getting a very precise fit like a custom-made watch strap, consider measuring at different times to ensure consistency.
My measured wrist size is 7 inches. What bracelet size should I get?
For a 7-inch wrist, aim for a bracelet that is 7.5 to 8 inches long for a comfortable fit. This allows for a little extra room.
What if my “string” or “paper strip” measurement doesn’t match when I do it again?
Minor discrepancies can happen with DIY wrist measurement. Ensure you are using the same pressure and marking the overlap precisely. Using a non-stretchy material and a firm ruler will minimize errors. If you get a result that is significantly different, try measuring again or using a different method to confirm.
By following these simple methods, you can easily and accurately determine your wrist size without the need for a special measuring tool. Whether you’re looking for the perfect bracelet or a new watch, knowing your precise measurements will ensure a perfect fit.