
Can you hang a completed jigsaw puzzle? Yes, you absolutely can hang a completed jigsaw puzzle! Many puzzle enthusiasts enjoy preserving their hard work and showcasing it as wall art. This guide will walk you through the best methods for puzzle mounting and ensuring your Jigsaw puzzle preservation is a success.
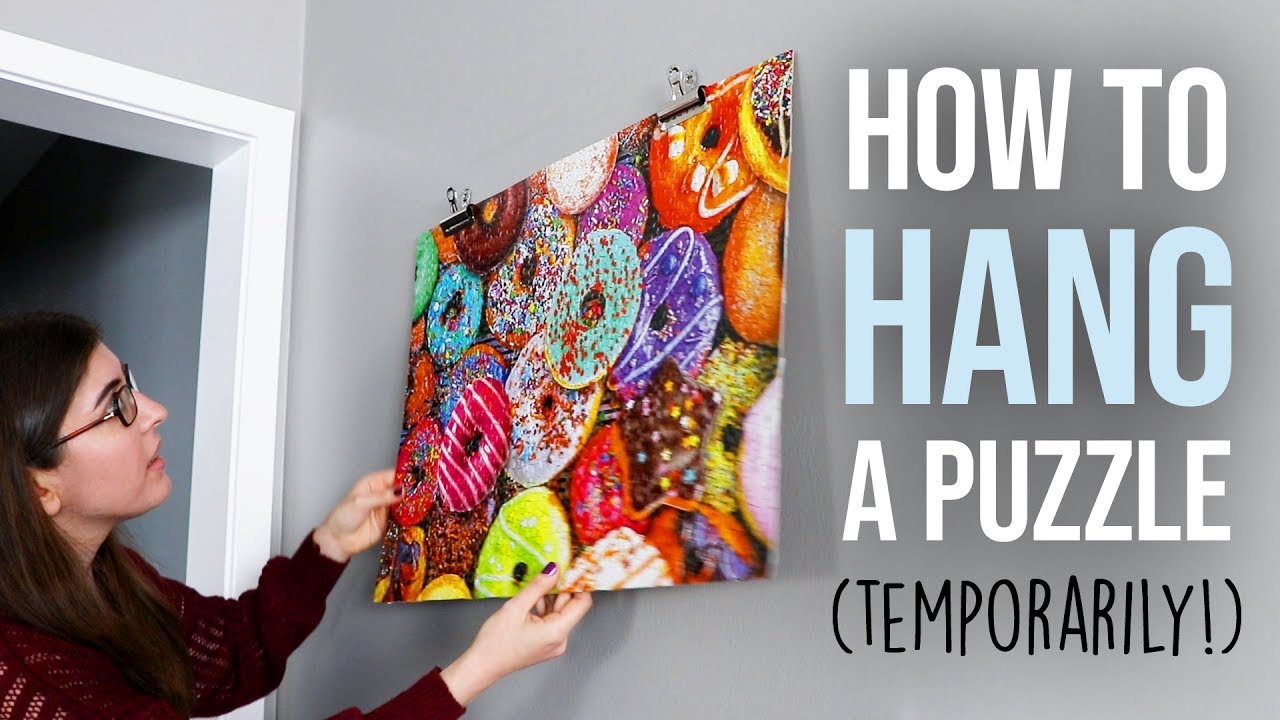
Image Source: i.ytimg.com
Why Display Your Puzzle?
Completing a jigsaw puzzle can be a deeply satisfying experience. It requires patience, focus, and a bit of spatial reasoning. Once all those pieces click into place, you’re left with a beautiful image, a testament to your dedication. Simply taking it apart and returning it to the box can feel like a missed opportunity. Displaying your puzzle allows you to:
- Showcase your accomplishment: It’s a unique and personal piece of art that tells a story of your effort.
- Add personality to your space: A framed puzzle can be a conversation starter and enhance your home décor.
- Preserve a memory: Many puzzles depict special places, events, or images meaningful to you.
- Enjoy the artwork: Some jigsaw puzzles feature stunning artwork that deserves to be seen beyond the puzzle box.
Preparing Your Puzzle for Display: The Crucial First Steps
Before you can even think about how to hang a jigsaw puzzle, careful preparation is key. This phase ensures your puzzle stays together and looks its best for display.
Choosing the Right Puzzle Board
A sturdy puzzle board is your best friend during the assembly and mounting process. It provides a stable surface, preventing pieces from shifting or falling off. There are several types of puzzle boards to consider:
- Felt or Flocked Boards: These offer a soft surface that helps keep pieces in place. They are often portable, allowing you to move your puzzle easily.
- Cardboard or MDF Boards: These are typically more rigid and can serve as a base for gluing and framing. Some come with a non-slip surface.
- Puzzle Mats: These rollable mats are excellent for storing unfinished puzzles, but they can also be used as a temporary surface for assembly and then carefully transferred to a permanent backing.
Securing the Pieces: Puzzle Adhesive Explained
Once your puzzle is complete, you need a way to hold it all together. This is where puzzle adhesive comes in. The goal is to create a strong bond between the pieces without damaging the puzzle image.
Puzzle Glue vs. Puzzle Saver
- Puzzle Glue: This is a liquid adhesive specifically designed for jigsaw puzzles. It’s usually applied to the front of the puzzle, seeping into the cracks between pieces to form a solid layer. Most puzzle glues dry clear and can even add a subtle sheen to your puzzle.
- Puzzle Saver: A puzzle saver is a type of adhesive sheet or spray that adheres to the back of the puzzle. This is a less common method for display-ready mounting but can be useful for temporary holds or if you’re particularly worried about altering the front image. For display purposes, puzzle glue applied to the front is generally preferred for a smoother finish.
Applying Puzzle Adhesive: Step-by-Step
Applying puzzle glue requires a steady hand and a bit of patience. Follow these steps for the best results:
- Ensure the Puzzle is Complete and Clean: Make sure all pieces are firmly in place. Gently brush away any dust or debris from the surface.
- Protect Your Work Surface: Lay down newspaper or a drop cloth to catch any excess glue.
- Apply the Glue:
- Liquid Glue: Pour a small amount of puzzle glue onto the center of the puzzle. Use a foam brush or a sturdy piece of cardboard to gently spread the glue evenly across the entire surface. Ensure the glue gets into the gaps between the pieces. Avoid using too much, as it can drip or create a messy finish.
- Spray Adhesive: If using a spray, follow the manufacturer’s instructions carefully. Typically, you’ll hold the can a specific distance from the puzzle and apply a thin, even coat.
- Allow for Drying: Let the first coat dry completely. This can take several hours, depending on the type of glue and humidity.
- Apply a Second Coat (Optional but Recommended): For extra durability, apply a second coat of puzzle glue after the first has dried. This reinforces the bond and can enhance the color vibrancy of the puzzle image.
- Let it Cure: Allow the puzzle to cure fully according to the adhesive’s instructions, which can sometimes be 24 hours or more.
Mounting Your Puzzle: Bringing Your Artwork to Life
Once the glue is completely dry and your puzzle is a solid unit, it’s time for puzzle mounting. This is the process of attaching your secured puzzle to a backing or preparing it for framing.
Method 1: Gluing to a Backing Board
This is a popular method for creating a sturdy, ready-to-hang piece.
Materials Needed:
- Completed and glued puzzle
- Sturdy backing board (MDF, foam board, or thick cardboard) – cut to the exact size of your puzzle.
- More puzzle glue or a suitable spray adhesive
- Brayer or a smooth, hard object (like a credit card)
- Newspaper or drop cloth
Steps:
- Prepare the Backing Board: Ensure the backing board is clean and free of dust.
- Apply Adhesive to the Backing:
- Puzzle Glue: Spread a thin, even layer of puzzle glue onto the backing board.
- Spray Adhesive: Apply a light, even coat of spray adhesive to the backing board.
- Position the Puzzle: Carefully flip your glued puzzle over onto the prepared backing board. Start from one edge and gently roll it down to avoid trapping air bubbles.
- Smooth and Secure: Use a brayer or a smooth, hard object to firmly press the puzzle onto the backing board. Work from the center outwards, ensuring good contact and removing any air pockets.
- Dry Thoroughly: Allow the adhesive to dry completely. This might take several hours.
Method 2: Using Puzzle Mount Boards
Some companies offer specialized puzzle mount boards that are adhesive-backed. You simply peel off the backing and press your puzzle onto them. These are convenient but might offer less long-term durability than traditional gluing methods.
Method 3: Framing Directly
If you plan to frame your puzzle, you might be able to skip a separate mounting board and go straight to the frame. However, many framers still recommend mounting the puzzle to a backing board first for added stability and to prevent bowing within the frame.
Puzzle Framing: The Finishing Touch
Puzzle framing is the ultimate step in creating a polished puzzle display. A good frame protects your puzzle from dust and damage, and it elevates your artwork to a professional level.
Choosing the Right Frame
Consider these factors when selecting a frame:
- Size: Ensure the frame’s opening matches the dimensions of your mounted puzzle.
- Style: Choose a frame that complements the artwork of your puzzle and your home décor.
- Depth: If your puzzle has a thick layer of glue or is mounted on a substantial board, you’ll need a frame with sufficient depth.
- Matting (Optional): A mat can add a professional look and create a visual buffer between the puzzle and the frame. If you use a mat, ensure it’s acid-free to prevent damage to your puzzle over time.
Framing Methods
- DIY Framing: You can purchase pre-made frames or custom cut framing materials from a craft store. This requires some basic framing skills.
- Professional Framing: For the best results, especially for valuable or complex puzzles, consider professional framing services. They have the expertise and tools to create a perfect, museum-quality display.
What to Look for in a Professional Framer:
- Experience with Puzzles: They should be comfortable handling and framing jigsaw puzzles.
- Quality Materials: They should offer a range of high-quality framing materials, including UV-protective glass or acrylic.
- Acid-Free Materials: Crucial for long-term Jigsaw puzzle preservation.
Using a Puzzle Hanging Kit
Once your puzzle is framed, you’ll need a way to hang it. Most frames come with hanging hardware, but you might need a specific puzzle hanging kit if you opt for frameless display or if the frame’s hardware isn’t suitable. These kits typically include:
- Picture wire or cord
- D-rings or screw eyes
- Wall anchors and screws
Attaching Hanging Hardware:
- For Framed Puzzles: If your frame doesn’t have hanging hardware, carefully screw D-rings into the sides of the frame. Thread picture wire through the D-rings, ensuring it’s taut but not too tight.
- For Frameless Puzzles (Mounted on a Board): You can attach D-rings directly to the backing board on either side of the puzzle, near the top edge. Ensure the screws are short enough not to poke through the front of the puzzle.
Alternative Puzzle Display Ideas
While framing is the most common method, here are a few other creative ways to showcase your completed puzzles:
1. Puzzle Display Boards with Clips
These are decorative boards, often made of wood or metal, with clips or slots to hold individual puzzle pieces or small groups of pieces. This is a more casual and changeable display.
2. Puzzle Collage
If you’ve completed several puzzles, consider creating a collage. Mount smaller puzzles onto a larger backing board or directly onto the wall in a grid pattern.
3. Puzzle Ornaments
Smaller puzzles or even individual puzzle pieces can be turned into charming ornaments by gluing them and drilling small holes for hanging.
4. Puzzle Coasters
Cut larger, well-glued puzzles into smaller squares or circles to create unique coasters. Seal them with a clear, waterproof sealant for durability.
Preserving Your Puzzle’s Quality: Long-Term Care
To ensure your Jigsaw puzzle preservation is successful for years to come, consider these tips:
- Avoid Direct Sunlight: Like any artwork, direct sunlight can fade the colors of your puzzle over time.
- Control Humidity: High humidity can warp cardboard puzzles. Try to maintain a stable, moderate humidity level in the room where your puzzle is displayed.
- Clean Gently: If your puzzle gets dusty, use a soft, dry brush or a microfiber cloth to gently wipe the surface. Avoid harsh cleaning chemicals.
- Handle with Care: Even when framed, avoid touching the puzzle surface directly.
Troubleshooting Common Puzzle Mounting Issues
- Bubbles Under the Glue: If you notice bubbles after applying the glue, try to gently press them out with a brayer or credit card before the glue dries completely. If they are persistent, you might be able to carefully prick them with a fine needle and press flat.
- Uneven Glue Application: This can lead to a patchy or streaky appearance. For future puzzles, practice your spreading technique on a scrap piece.
- Puzzle Pieces Peeling Off: This usually means the adhesive wasn’t strong enough or wasn’t applied evenly. You might need to carefully lift the edge and reapply a small amount of glue.
- Warping: If your puzzle or backing board warps, it could be due to moisture or uneven pressure during drying. Ensure your working environment is dry and that you apply even pressure when mounting.
Frequently Asked Questions (FAQ)
Q: What is the best glue for jigsaw puzzles?
A: The best glue for jigsaw puzzles is typically a specialized puzzle glue designed for this purpose. Brands like Mod Podge, Ravensburger Puzzle Conserver, and Buffalo Games Puzzle Conserver are popular choices. They dry clear and create a strong bond.
Q: Can I use regular craft glue or school glue?
A: While you can use regular craft glue or school glue in a pinch, it’s not ideal for permanent display. These glues may not dry completely clear, can cause warping, or may not create a strong enough bond for long-term preservation. Specialized puzzle glue is formulated to prevent these issues.
Q: How many coats of puzzle glue should I use?
A: At least one coat is necessary, but two coats are highly recommended for maximum durability and a smoother finish. Allow each coat to dry completely before applying the next.
Q: Can I frame a puzzle without gluing it?
A: It’s not recommended to frame a puzzle without securing it in some way. The pieces will shift and fall apart. Gluing or using a puzzle adhesive is essential.
Q: How do I make sure my puzzle is perfectly flat?
A: Using a sturdy puzzle board during assembly and applying even pressure with a brayer when mounting to a backing board are crucial steps for ensuring your puzzle remains flat. Allow it to dry under a flat, heavy object if you suspect any warping.
Q: My puzzle has a glossy finish. Will puzzle glue change that?
A: Most puzzle glues dry to a matte or satin finish. Some may add a slight sheen. If you prefer a high-gloss finish, you might need to apply a separate clear gloss sealant after the puzzle glue has fully cured. Always test on a scrap piece first.
Q: How long does puzzle glue take to dry?
A: Drying times vary by brand and product. Generally, the first coat takes a few hours, and a full cure can take 24 hours or more. Always refer to the manufacturer’s instructions on the puzzle adhesive packaging.
Q: Can I use a puzzle saver spray instead of glue?
A: Puzzle saver sprays are typically applied to the back of the puzzle and are more for temporary hold or to reinforce pieces without altering the front surface. For a smooth, permanent display, puzzle glue applied to the front is the preferred method.
By following these detailed steps and utilizing the right materials, you can transform your completed jigsaw puzzles into beautiful, lasting pieces of art that you can proudly hang and enjoy for years to come.