
A crosscut sled is a table saw jig that helps you make perfectly square cuts on your lumber. Can you make a crosscut sled yourself? Absolutely! This DIY project is a cornerstone of any woodworking workshop, allowing for precise cuts that even the most advanced table saw users appreciate. Who needs a pricey accessory when you can build one yourself? Let’s dive into making your own table saw jig, a versatile miter sled that will revolutionize your lumber cutting.
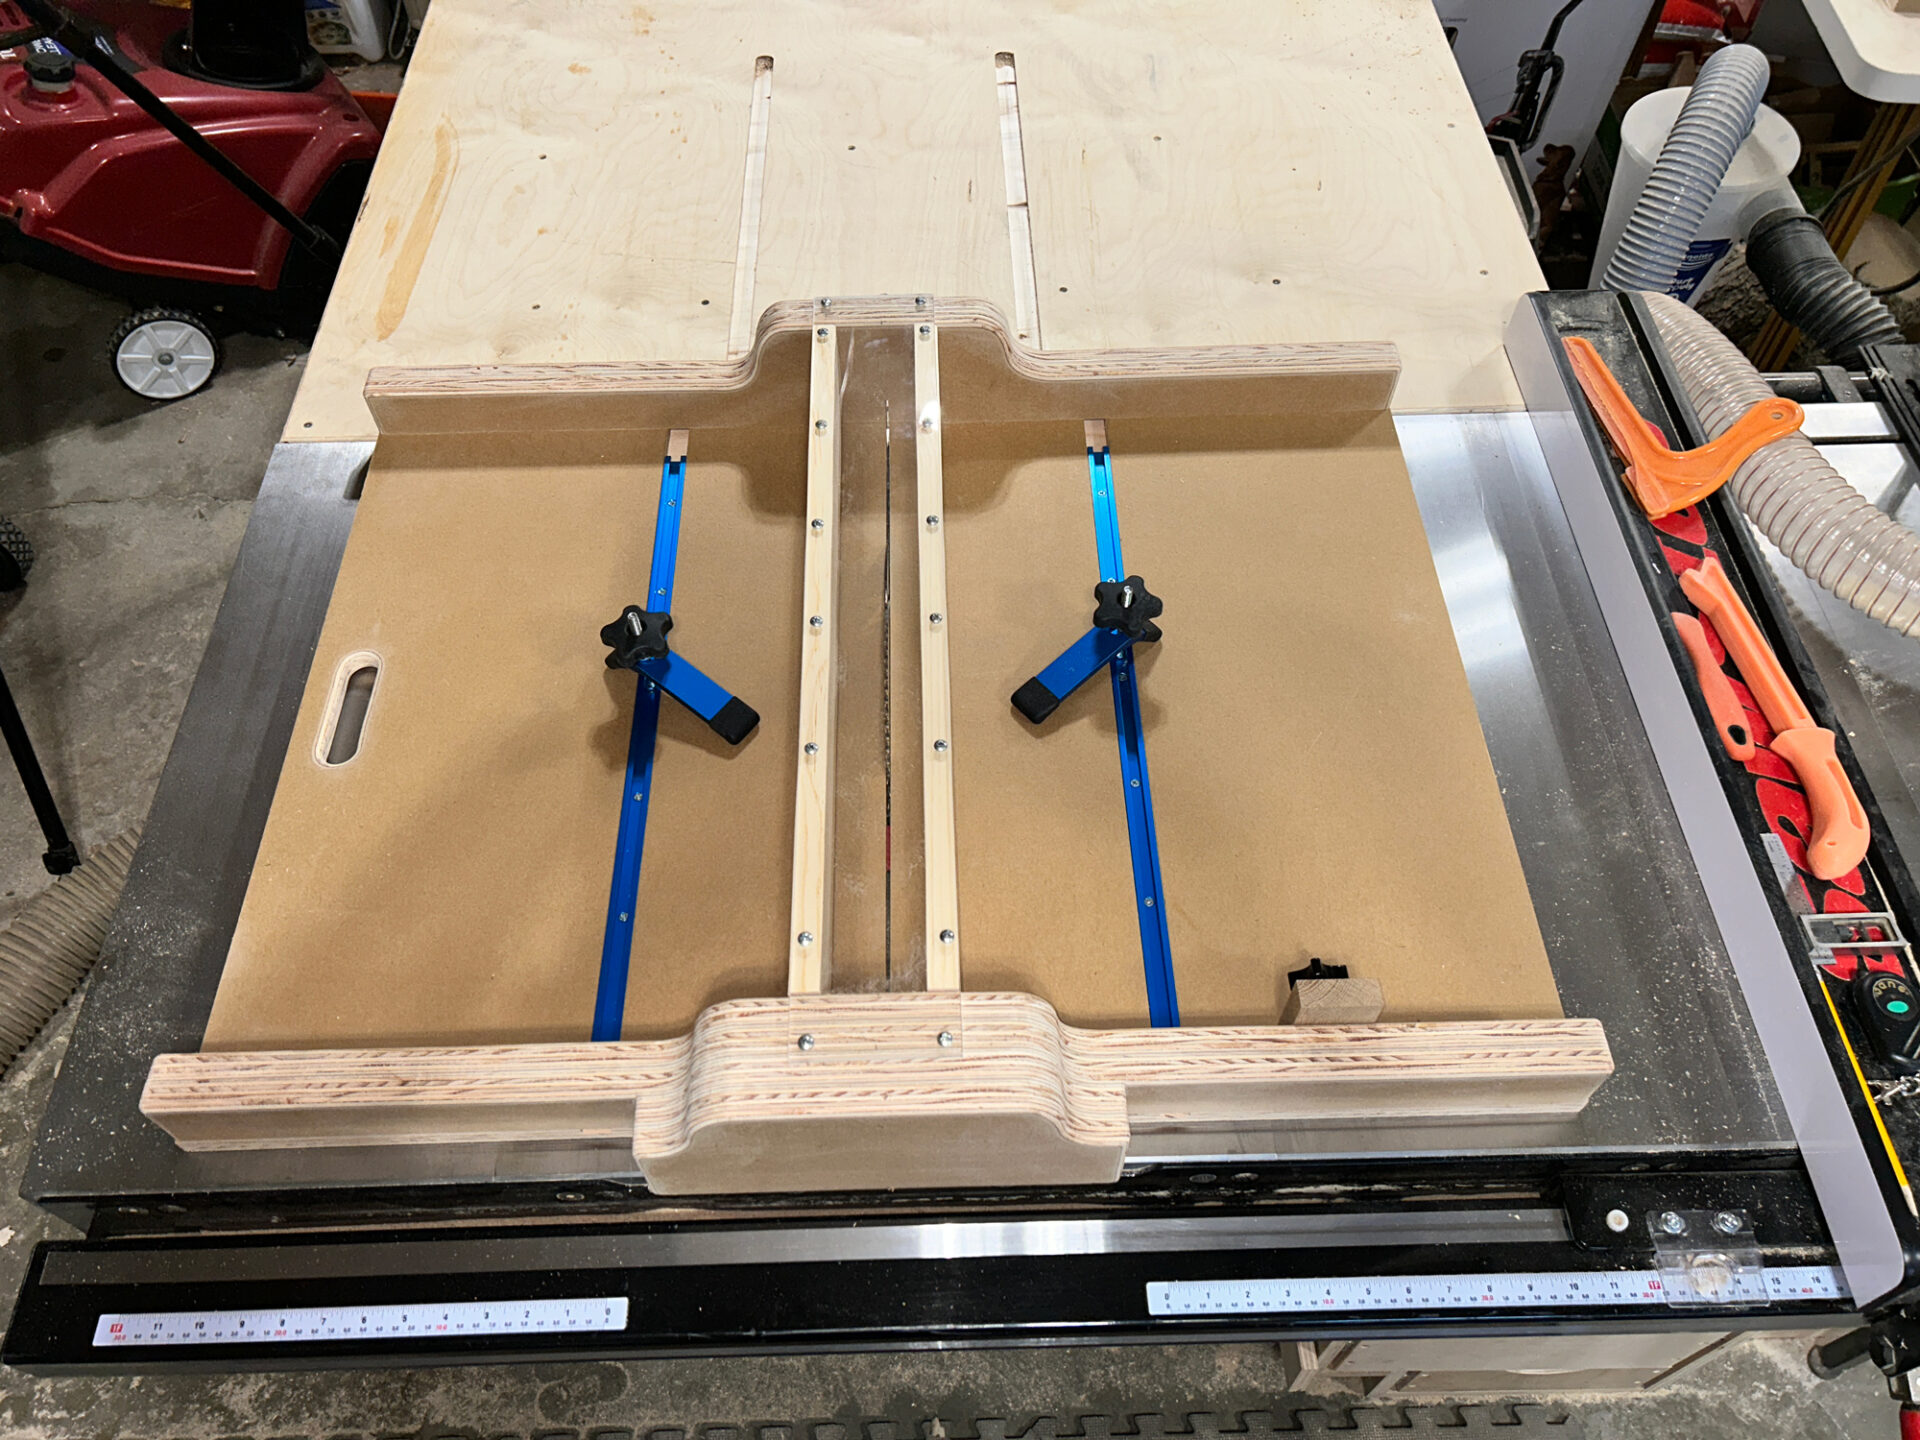
Image Source: www.sawstop.com
Why Build a Crosscut Sled?
If you’re looking for precise cuts on your table saw, a crosscut sled is essential. It provides a stable platform and a reliable fence for making repeatable, square crosscuts. This woodworking jig eliminates the guesswork associated with freehand cuts or even the limitations of a standard miter gauge. For accurate lumber cutting, especially for projects requiring many identical pieces, a crosscut sled is invaluable. It’s also a fundamental step towards making more advanced table saw jigs, like a dado sled.
Benefits of a DIY Crosscut Sled
- Accuracy: Achieve perfectly square cuts every time.
- Repeatability: Make identical cuts on multiple pieces of wood.
- Safety: Provides a safer way to make crosscuts compared to freehand.
- Cost-Effective: Significantly cheaper than buying a commercial sled.
- Versatility: Can be adapted for various cutting tasks.
Gathering Your Materials
Before starting, it’s crucial to gather all the necessary materials. This ensures a smooth building process.
Essential Materials List
- Plywood: ¾-inch Baltic birch plywood is ideal for the base and fence due to its stability and flatness. You’ll need at least one 4×4 foot sheet.
- Hardwood: A piece of hardwood (like oak or maple) for the runners that slide in the table saw miter slots. Aim for a size that fits snugly.
- Wood Glue: A strong wood glue is critical for durability.
- Screws: Wood screws of appropriate length for attaching the fence and runners.
- Sandpaper: Various grits for smoothing edges and surfaces.
Tools You’ll Need
- Table Saw: The star of the show!
- Circular Saw or Jigsaw: For initial cutting of larger plywood pieces if needed.
- Clamps: Essential for holding pieces together while gluing.
- Measuring Tape: For accurate measurements.
- Pencil: For marking cuts.
- Combination Square or Speed Square: To ensure 90-degree angles.
- Drill and Drill Bits: For pilot holes and driving screws.
- Router (Optional): For creating a cleaner dado groove or for flush trimming.
- Safety Glasses: Always wear eye protection.
- Hearing Protection: Table saws can be loud.
Planning Your Table Saw Sled Plans
Good table saw sled plans are the foundation of a successful build. While there are many variations, a basic design consists of a base, a fence, and runners.
Design Considerations
- Base Size: The base should be large enough to support your workpiece securely. A common size is around 18 inches wide by 24 inches long.
- Fence Height: The fence should be tall enough to provide stability for your lumber but not so tall that it interferes with your table saw’s blade guard. Typically, 3-4 inches is sufficient.
- Runner Fit: The runners that slide into the table saw’s miter slots must be a snug, but not too tight, fit. They should slide smoothly without any side-to-side wobble.
- Blade Kerf: You’ll need to cut a “kerf” into the sled base with your table saw blade to ensure the sled is perfectly aligned with the blade.
Understanding the Components
- Base: This is the main platform of your sled. It should be made from flat, stable material.
- Fence: This is the guiding piece that attaches to the base. It must be perfectly square to the runners.
- Runners: These are thin strips of material that fit into your table saw’s miter slots. They guide the sled across the table.
Step-by-Step Construction Guide
Let’s get building! This guide provides a clear path to creating your own DIY sled.
Step 1: Prepare the Plywood Base
- Cut the Base: Cut a piece of ¾-inch plywood to your desired dimensions for the base. For instance, 18 inches by 24 inches. Ensure the cuts are as square as possible.
- Select Your Miter Slots: Identify which miter slot on your table saw will be used for the sled’s guide. This is crucial for alignment.
Step 2: Create the Runners
- Cut Runner Stock: Cut strips of wood that are slightly narrower than the width of your table saw’s miter slots and long enough to extend across your table saw’s bed. For example, if your miter slots are 3/8 inch wide, cut your hardwood to about 0.370 inches.
- Test the Fit: Test the fit of your runners in the miter slot. They should slide smoothly but without play. You may need to plane or sand them down to achieve this perfect fit.
- Attach Runners to Base:
- Lay your plywood base flat.
- Position the runners on the underside of the base. They should be parallel to each other and run the length of the base.
- Ensure the runners are precisely aligned with the edges of the miter slots when the base is placed on the table saw. You can use a combination square to ensure the runner is parallel to the edge of the base.
- Apply wood glue generously to the top of the runners.
- Clamp the runners securely to the underside of the base.
- Drill pilot holes through the base into the runners to prevent splitting.
- Drive screws through the base into the runners to reinforce the glue joint. Allow the glue to dry completely.
Step 3: Attach the Fence
- Cut the Fence: Cut a piece of ¾-inch plywood for the fence. The length should be the same as the base’s width (e.g., 18 inches). The height should be around 3-4 inches.
- Square the Fence: This is the most critical step for accuracy.
- Place the sled base on your table saw with the runners in the miter slots.
- Position the fence piece along one edge of the base.
- Use a good quality combination square or speed square to ensure the fence is perfectly 90 degrees to the fence edge of the base.
- Temporarily clamp the fence in place.
- Glue and Screw the Fence:
- Apply wood glue to the edge of the base where the fence will be attached.
- Drill pilot holes through the fence into the base.
- Drive screws through the fence into the base to secure it firmly. Ensure your screws don’t go all the way through the base.
- Double-check that the fence remains perfectly square as you drive the screws.
Step 4: Cut the Blade Kerf
This step makes your sled accurate.
- Align the Sled: Place the sled on your table saw, with the runners in the miter slots.
- Raise the Blade: Raise the table saw blade so it’s just slightly above the surface of the sled’s base.
- Make the Cut:
- Carefully push the sled through the blade. The blade will cut a narrow kerf (the path of the blade) into the sled’s base and the fence.
- This kerf is now perfectly aligned with your table saw blade.
- Important: Do not move the sled once the kerf is cut. Any future cuts you make with this sled should start with the wood butting up against this kerf.
Step 5: Finishing Touches and Refinements
- Flush Trim (Optional but Recommended): If you have a router, you can use a flush trim bit to trim the fence so it’s perfectly flush with the sled’s base on the opposite side of the kerf. This makes it easier to align your workpiece.
- Smooth Edges: Sand all edges of the sled to remove any splinters or rough spots.
- Add Hold-Downs (Optional): For extra safety and better control, you can add hold-down clamps or a toggle clamp to your sled to secure the workpiece while cutting.
- Add a Stop Block (Optional): For repetitive cuts, you can attach an adjustable stop block to the fence.
Using Your New Crosscut Sled
Now that you have your table saw jig ready, let’s talk about how to use it effectively.
Making Accurate Crosscuts
- Position Your Workpiece: Place the lumber you want to cut on the sled’s base. Align the cut line with the blade kerf you made.
- Secure the Workpiece: Ensure the lumber is held firmly against the fence. If your workpiece is narrow, you might want to use a clamp or a secondary piece of wood to hold it against the fence for added safety.
- Make the Cut: Gently push the sled through the table saw blade. Keep steady pressure against the fence throughout the cut.
- Remove Workpiece: Once the cut is complete, turn off the saw and wait for the blade to stop. Then, remove the cut piece and the sled.
Advanced Techniques with Your Miter Sled
- Repeatable Cuts: Use the fence as a reference. Make your first cut, then move your workpiece along the fence to make subsequent identical cuts. You can even add a stop block for precision.
- Cutting Smaller Pieces: The sled provides a safe way to cut small pieces of lumber that would be dangerous to cut with just a miter gauge.
- Angles: With a slight modification or by adding an adjustable angle guide, you can use your sled to make angled cuts.
Troubleshooting Common Issues
Even with careful construction, you might encounter a few hiccups.
Runner Wobble
- Problem: The runners are too loose in the miter slots.
- Solution: Remove the runners and add a thin strip of veneer or a few layers of packing tape to one side of the runner until it fits snugly. Alternatively, you can plane or sand the runner down slightly on the opposite side.
Fence Not Square
- Problem: The fence is not perfectly 90 degrees to the runners.
- Solution: This is best addressed during construction. If it’s slightly off, you might need to re-glue or re-screw the fence. For minor adjustments, you can sometimes shim the fence with thin material.
Blade Rubbing the Sled
- Problem: The initial kerf cut was not done correctly, or the sled has shifted.
- Solution: If the sled is off-square, you might need to create a new kerf with a fresh alignment. Ensure the runners are securely attached and have no play.
Variations and Upgrades
Once you’ve mastered the basic crosscut sled, you can explore modifications.
Adding a Stop Block
A simple wooden block with a T-track and a knob can be attached to the fence, allowing for quick and precise adjustments for repetitive cuts.
Creating a Dado Sled
A dado sled is a specialized jig for cutting dado grooves. While similar in principle, it typically features a wider base and a groove designed to accommodate a dado blade set. The construction principles are largely the same, focusing on a perfectly square fence relative to the blade’s path.
Multi-Fence Sleds
For even greater versatility, you can build sleds with multiple fences to handle different types of cuts or to accommodate wider workpieces.
Safety First!
Always prioritize safety in your workshop projects.
- Wear Safety Glasses: Protect your eyes from flying debris.
- Use Hearing Protection: Table saws are loud.
- Keep Hands Away from the Blade: Use push sticks and push blocks.
- Ensure a Clean Workspace: Remove clutter to prevent trips and falls.
- Know Your Machine: Read and follow your table saw’s manual.
Conclusion
Building your own crosscut sled is a rewarding and practical woodworking project. It’s a fundamental table saw jig that will significantly improve the accuracy and efficiency of your lumber cutting. With this DIY sled, you’ll be able to make precise cuts that elevate the quality of all your workshop projects. Remember to take your time, measure twice, and cut once!
Frequently Asked Questions (FAQ)
Q1: What is the best material for the runners of a crosscut sled?
A1: Hardwood is generally preferred for the runners because it’s dense and can be planed or sanded to a very precise fit within the table saw’s miter slots. You want a snug fit that allows smooth movement without any wobble.
Q2: Can I use MDF for the base of my crosscut sled?
A2: While MDF can be used, it’s generally not recommended for the base of a crosscut sled. MDF is susceptible to moisture and can warp, which will affect the accuracy of your cuts. High-quality ¾-inch Baltic birch plywood is a much more stable and preferable option for the base.
Q3: How do I ensure my fence is perfectly square to the runners?
A3: This is the most critical step for accuracy. Use a high-quality combination square or speed square. Lay the fence material along the edge of the base and use the square to get a perfect 90-degree angle. Clamp it securely in place before gluing and screwing. It’s also helpful to use a digital angle gauge if you have one.
Q4: What is the purpose of cutting a blade kerf into the sled?
A4: The blade kerf ensures that your sled is perfectly aligned with your table saw blade. When you make a cut with the sled, the blade cuts into both the fence and the base, creating a precise channel. Subsequent cuts should be made with the workpiece butting up against this kerf, guaranteeing the cut is square to the fence and therefore square to the blade.
Q5: My runners feel a bit loose in the miter slots. What can I do?
A5: If your runners are too loose, you have a few options. You can try adding a thin strip of veneer, a few layers of masking tape, or even a piece of paper to the side of the runner to tighten the fit. Alternatively, you can remove the runner and carefully plane or sand one edge down until it fits snugly. The goal is smooth travel without any side-to-side play.
Q6: Can I use this sled to make angled cuts?
A6: The basic crosscut sled as described is designed for 90-degree cuts. To make angled cuts, you would typically need to build a separate miter sled or add a pivoting fence system to your existing sled.
Q7: How can I make repetitive cuts of the same length with my sled?
A7: You can attach a stop block to the fence of your sled. This stop block can be a simple piece of wood clamped in place, or a more sophisticated setup using T-track and a knob for easy adjustment. Ensure the stop block is also perfectly square to the fence.