
Can you fix hammer toes with tape? Yes, in some cases, taping can help alleviate pain and improve the alignment of hammer toes, especially when used consistently as part of a management plan. This guide will explore how to use tape effectively for hammer toe correction, providing a practical and accessible approach for those seeking relief.
Hammer toes are a common foot condition where one or more of your toes bend into an abnormal, downward-pointing position. This can lead to pain, discomfort, and even difficulty walking. While surgery is an option for severe cases, many people look for less invasive methods to manage their hammer toes. Taping your toes is a simple, DIY approach that can offer significant foot pain relief tape and support. This method, often referred to as hammer toe taping, aims to realign the toe and reduce pressure points.
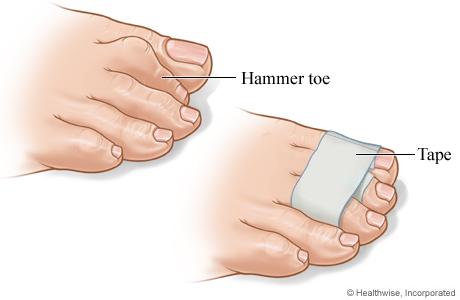
Image Source: content.ca.healthwise.net
Deciphering Hammer Toes and Taping
Before we dive into the how-to, let’s clarify what hammer toes are. This condition typically affects the smaller toes, particularly the second, third, or fourth toe. The abnormality occurs at the middle joint of the toe, causing it to bend downwards. Over time, this can become a fixed deformity.
Several factors can contribute to hammer toes:
- Footwear: Wearing shoes that are too short, too narrow, or have high heels can force your toes into a bent position.
- Muscle Imbalance: Weakness or imbalance in the muscles that control your toes can cause them to contract and bend.
- Arthritis: Conditions like osteoarthritis or rheumatoid arthritis can affect the joints in your toes.
- Injuries: A stubbed toe or other foot trauma can sometimes lead to hammer toes.
- Genetics: Some people may be genetically predisposed to developing this condition.
Taping offers a way to provide external support and gently encourage the toe back into a straighter position. It’s a method that allows you to experiment with different techniques to find what works best for your specific foot.
The Principles Behind Taping Crooked Toes
The effectiveness of taping for hammer toes lies in its ability to:
- Support the joints: By applying tape strategically, you can provide gentle support to the bent joints, preventing them from buckling further.
- Reduce pressure: Hammer toes can rub against the inside of your shoes, causing corns, calluses, and pain. Taping can create a smoother surface and redistribute pressure.
- Improve alignment: Consistent taping can help train the toe to rest in a straighter position, potentially slowing down the progression of the deformity.
- Increase awareness: The sensation of the tape can remind you to avoid certain footwear or movements that aggravate the condition.
It’s important to note that taping is often most effective for flexible hammer toes, where the toe can still be straightened manually. For rigid hammer toes, where the toe is permanently fixed in a bent position, taping might offer some comfort but is less likely to correct the deformity itself.
Gathering Your Supplies for DIY Hammer Toe Correction
You don’t need much to get started with DIY hammer toe correction. Here’s what you’ll typically need:
- Athletic Tape: This is usually a strong, adhesive tape designed for sports. Look for breathable, skin-friendly options. Standard athletic tape works well for hammer toe taping.
- Medical Tape or Underwrap: Sometimes, it’s beneficial to put a layer of softer tape or a thin foam underwrap on your skin first to protect it from irritation from the athletic tape.
- Scissors: Sharp scissors are essential for cutting the tape cleanly.
- Optional: Cotton Padding or Moleskin: For extra cushioning over pressure points or corns, you can use small pieces of cotton padding or moleskin.
When choosing tape, consider its adhesive quality, flexibility, and whether it’s waterproof. For taping crooked toes, you want a tape that will stay in place through daily activities.
Techniques for Hammer Toe Taping
There are several ways to tape your toes to address hammer toe. The best method often depends on which toe is affected and the severity of the bend.
Technique 1: The Basic Toe Straightener
This is a common and effective method for straighten bent toes.
- Prepare your foot: Ensure your foot is clean and dry. If you have any open sores or infections, do not tape.
- Start the tape: Take a strip of athletic tape, about 6-8 inches long.
- Anchor the tape: Place the middle of the tape on the underside of your foot, just behind the ball of the foot, extending forward.
- Wrap around the affected toe: Bring the tape up and over the top of your longest toe (the second toe if the second toe is the hammer toe). Then, bring the tape down and under the affected hammer toe.
- Pull gently: As you bring the tape back towards the underside of your foot, pull gently to create a slight upward pressure on the hammer toe. The goal is to gently lift the bent toe.
- Secure the tape: Bring the two ends of the tape together on the underside of your foot and press them down firmly. You can overlap them for extra security.
- Second strip (optional but recommended): For added support and to prevent the first strip from peeling, take another strip of tape. Anchor this strip on the top of your foot, near your ankle. Bring it down over the side of the foot, cross it over the top of your affected toe, and wrap it around the toe. Then, bring it back across the top of your foot on the opposite side and secure it. This creates a criss-cross pattern for better stability.
- Check for comfort: The tape should feel snug but not constricting. Your toe should feel supported, not numb or tingly. If you experience any discomfort, loosen or remove the tape.
This technique is a fundamental approach for hammer toe taping and can provide immediate foot pain relief tape.
Technique 2: The Toe Buddy System
This method involves taping the affected toe to an adjacent, straighter toe for support.
- Prepare your foot: Clean and dry your foot.
- Pad between toes (optional): Place a small piece of cotton or moleskin between the affected toe and the toe next to it. This helps prevent skin irritation.
- First strip: Take a strip of tape, about 4-5 inches long. Place the middle of the tape on the underside of the affected hammer toe.
- Wrap around both toes: Bring the tape up and over the top of the hammer toe, then down between the toes, and then up and over the top of the adjacent toe.
- Continue wrapping: Bring the tape down the side of the adjacent toe, under the foot, and back up to the top of the hammer toe to complete a loop. You can make a couple of loops for better security.
- Secure: Ensure the ends of the tape are smooth and adhere well to the skin.
This “buddy system” provides a splint-like effect, helping to keep the bent toe aligned. It’s an effective way of taping crooked toes by leveraging the stability of a neighboring digit.
Technique 3: Addressing the Mallet Toe
While often grouped with hammer toes, a mallet toe involves the bend at the joint closest to the toenail. For mallet toe taping, the approach is similar but focuses on the very tip of the toe.
- Prepare your foot: Clean and dry.
- Start at the tip: Take a short strip of tape. Place one end on the tip of the affected toe.
- Gently pull back: Pull the tape gently, trying to straighten the very end of the toe.
- Wrap around the toe: Wrap the tape around the toe a couple of times to secure it. Ensure the tape isn’t too tight on the tip, as this can cut off circulation.
- Add support (optional): You can add a longer piece of tape that anchors at the base of the toe, goes over the top, loops around the tip, and then comes back down to the base, similar to the basic straightener technique but focusing on the distal joint.
This technique directly targets the bent tip, aiming to provide a gentle correction for mallet toe taping.
Technique 4: Using Tape for Arch Support and Plantar Fasciitis Tape
While not directly for hammer toes, tape can also be used to support the arch, which can indirectly affect toe alignment and overall foot health. If you experience plantar fasciitis tape or need arch support tape, consider this:
- Start at the heel: Place one end of a strip of athletic tape on the underside of your heel.
- Across the arch: Bring the tape across the arch of your foot, providing gentle upward support.
- Around the forefoot: Wrap the tape around the ball of your foot.
- Back to the heel: Bring the tape back to the starting point on the heel.
- Repeat: You can use multiple strips to build up support.
This can help stabilize the foot, which may improve the mechanics of your gait and reduce strain on your toes.
Technique 5: The Bunion Taping Technique (for context)
Although this focuses on bunions, the principles of using tape to realign and support joints are transferable. A common bunion taping technique involves wrapping tape around the forefoot to pull the big toe away from the other toes. This highlights how strategic taping can influence toe positioning. While not a direct hammer toe solution, it demonstrates the versatility of tape in foot care.
How to Maximize the Benefits of Taping
Simply taping your toes once won’t solve the problem. Consistent application is key.
- Daily Application: Ideally, apply the tape each morning and remove it at night.
- Skin Care: Give your skin a break between taping sessions. If you notice redness, itching, or blistering, discontinue taping and consult a healthcare professional.
- Proper Footwear: This is crucial. Avoid shoes that are too tight or have high heels. Opt for wide-toed shoes that allow your toes to spread out naturally. Wearing shoes with good support can also help.
- Stretching and Exercises: Gentle toe stretching exercises can complement taping. Your doctor or a podiatrist can recommend specific exercises.
- Listen to Your Body: If taping causes increased pain or discomfort, stop. It’s not meant to be painful.
Toe straightener tape works best when combined with these other strategies.
When Taping Might Not Be Enough
While taping can be a valuable tool for managing hammer toes, it’s not a cure-all. You should consult a healthcare professional, such as a podiatrist or orthopedic specialist, if:
- Pain is severe: If your pain is intense or prevents you from walking normally.
- The toe is rigid: If you cannot manually straighten the bent toe.
- Skin problems develop: If you experience persistent blisters, sores, or signs of infection.
- Taping doesn’t help: If you’ve been taping consistently for several weeks and see no improvement or your condition worsens.
- You have diabetes or poor circulation: If you have these conditions, you need to be extra cautious with taping and any home treatment, as minor skin irritations can lead to more serious problems. Always consult your doctor first.
A professional can diagnose the exact cause of your hammer toe and recommend the most appropriate treatment plan, which might include custom orthotics, padding, physical therapy, or in some cases, surgery.
Frequently Asked Questions (FAQ)
Q1: How long should I leave the tape on?
A1: It’s generally recommended to leave the tape on for about 12-18 hours, or throughout the day. Remove it at night to allow your skin to breathe and recover.
Q2: Can taping cause damage to my toes?
A2: If applied correctly and not too tightly, taping should not cause damage. However, if the tape is too constricting, it can restrict circulation, leading to numbness, tingling, or even skin damage. Always ensure the tape is snug but not cutting off blood flow.
Q3: Will this tape work for permanently bent toes?
A3: Taping is most effective for flexible hammer toes. If the toe is permanently rigid, taping may provide some comfort by offloading pressure but is unlikely to straighten the toe.
Q4: What kind of tape is best for taping crooked toes?
A4: Athletic tape or sports tape is generally recommended due to its strength and adhesive properties. Look for breathable options. Some people also use kinesiology tape, which is more flexible.
Q5: Can I tape multiple toes at once?
A5: Yes, you can tape multiple affected toes simultaneously, but ensure each toe has enough space and isn’t being overly compressed. Applying tape to too many toes at once might make it difficult to get the positioning right.
Q6: How often should I tape my hammer toes?
A6: For best results, try to tape your toes daily. Consistency is key to helping to realign the toe and manage pain.
Q7: Is there a specific tape that acts as a toe straightener tape?
A7: While there isn’t a specific product called “toe straightener tape,” athletic tape used with the techniques described acts as a functional toe straightener by providing support and realignment.
Q8: Can taping help with mallet toe?
A8: Yes, specific taping techniques focused on the tip of the toe can help manage mallet toes by providing support to the bent joint. This is referred to as mallet toe taping.
Q9: My doctor mentioned bunion taping technique. How does that relate?
A9: The bunion taping technique shows how tape can be used to gently realign toes by applying opposing forces. While the specific application differs, the principle of using tape for support and alignment is similar to hammer toe taping.
Q10: I also have plantar fasciitis. Can this tape help with that?
A10: While the primary focus here is hammer toes, some taping methods can provide arch support tape and alleviate symptoms of plantar fasciitis tape. Ensuring proper foot alignment and support can have a positive ripple effect on the entire foot.
By understanding these techniques and consistently applying them, you can effectively use tape as part of your strategy to manage hammer toes and find much-needed foot pain relief tape. Remember to always prioritize comfort and consult with a healthcare professional for personalized advice.