
Can you fix a double-tapped circuit breaker yourself? Yes, you can fix a double-tapped circuit breaker yourself if you follow safety precautions and understand the process. However, if you’re uncomfortable with electrical work or unsure about any step, it’s always best to call a qualified electrician.
A “double-tapped” circuit breaker is a common electrical issue that can cause problems in your home. It happens when two wires are connected to a single terminal on a circuit breaker. While it might seem like a minor oversight, this practice is a fire hazard and can lead to malfunctioning electrical systems. This guide will walk you through how to fix double-tapped circuit breakers safely and effectively. We’ll cover what causes this problem, how to identify it, and the steps involved in correcting it. We’ll also touch on related topics like resetting tripped breaker, what to do when your breaker keeps tripping, and general circuit breaker maintenance.
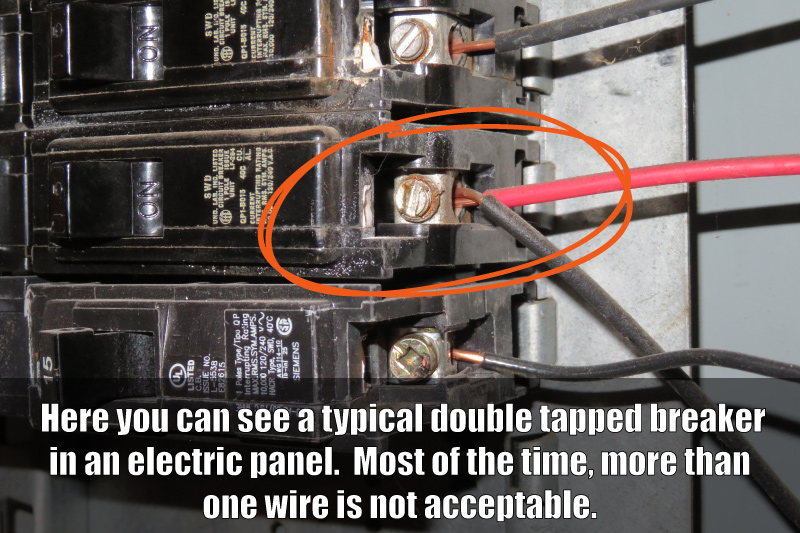
Image Source: abihomeservices.com
What Exactly is a Double-Tapped Circuit Breaker?
In a typical electrical panel, each circuit breaker is designed to handle the electrical load for a specific circuit in your home. This includes lights, outlets, and appliances. Each breaker has a terminal where a single wire from your home’s wiring connects. This wire carries electricity to the devices on that circuit.
When a circuit breaker is “double-tapped,” it means two separate wires have been connected to that single terminal. This is usually done by twisting two wires together and then inserting them into the same terminal. This is a dangerous practice for several reasons, which we will explore shortly.
Why is Double Tapping a Problem?
Double tapping a circuit breaker creates several safety and functional issues:
Safety Hazards
- Fire Risk: The primary concern with double-tapped breakers is the increased risk of fire. When two wires are crammed into one terminal, the contact area is reduced. This leads to poor electrical connection. Poor connections generate excessive heat due to electrical resistance. Over time, this heat can melt wire insulation, ignite nearby combustible materials (like wood framing or dust), and start a fire.
- Overheating: Even without an immediate fire, the terminal and wires can overheat. This can damage the breaker itself, the wires, and the electrical panel.
- Short Circuits and Arcing: The loose connection created by double tapping can lead to intermittent contact, causing sparks (arcing) within the electrical panel. Arcing is a significant fire hazard and can also damage electrical components.
Functional Issues
- Unreliable Circuit Protection: A double-tapped breaker may not function correctly as a safety device. It might fail to trip when there’s an overload or short circuit, leaving your appliances and wiring vulnerable to damage.
- Intermittent Power: You might experience flickering lights or appliances that unexpectedly shut off. This is because the loose connection is causing an unstable flow of electricity.
- Difficulty in Troubleshooting: When a circuit breaker trips, it’s supposed to isolate a problem on that specific circuit. If two circuits are linked through a double-tapped breaker, it becomes much harder to pinpoint the source of the problem. You might be resetting tripped breaker only for it to trip again due to issues on either of the circuits connected to it.
Identifying a Double-Tapped Circuit Breaker
Identifying a double-tapped circuit breaker requires careful inspection of your electrical panel. Here’s how to do it:
Step 1: Safety First!
Before you even open your electrical panel, ensure you prioritize safety.
- Turn off the main breaker: This is crucial. Locate the main breaker, usually the largest one at the top or side of your panel, and switch it to the “OFF” position. This cuts off all power to the panel, making it safe to work inside.
- Use a voltage tester: Even with the main breaker off, it’s wise to have a non-contact voltage tester. You can use this to double-check that no power is reaching the panel.
Step 2: Open the Panel Cover
Most electrical panels have a metal cover secured by screws. Carefully remove these screws and lift off the cover. Be mindful of any sharp edges.
Step 3: Visual Inspection
Look closely at each circuit breaker. Each breaker should have only one wire connected to its terminal. The terminal is the screw on the side of the breaker where the wire is attached.
- Look for two wires: Pay close attention to any breaker where you see two wires entering the same terminal. They might be twisted together before being inserted, or one might be wrapped around the screw alongside another wire.
- Check for loose wires: While inspecting, also look for any wires that appear loose or not securely fastened. A loose breaker connection can cause similar issues to double tapping.
Step 4: Consult Your Panel Diagram
Most electrical panels have a diagram or “legend” on the inside of the cover or near the breakers. This diagram indicates which breaker controls which circuit in your home. This can help you if you’re trying to determine if a breaker is handling more than it should, especially if you’re identifying overloaded circuit scenarios.
How to Fix a Double-Tapped Circuit Breaker
Once you’ve identified a double-tapped breaker, the process to fix it involves separating the wires onto their own dedicated breakers. This is not a simple “fix” in the sense of manipulating the existing breaker; it usually requires rewiring.
What You’ll Need
- Screwdriver set: Phillips and flathead screwdrivers, particularly those insulated for electrical work.
- Wire strippers/cutters: To strip wire insulation and cut wires cleanly.
- Wire connectors (wire nuts): Appropriate sizes for the wires you are working with.
- New circuit breaker (if needed): If the existing breaker is damaged or if you need to split a circuit. Ensure it’s the correct amperage and type for your panel.
- Non-contact voltage tester: To confirm power is off.
- Pliers: Needle-nose pliers are useful for manipulating wires.
- Electrical tape: For added insulation if needed.
- Safety glasses: To protect your eyes.
- Gloves: Insulated electrical gloves for added safety.
Step-by-Step Correction Process
Disclaimer: Working with electricity can be dangerous. If you are not completely confident in your abilities, hire a qualified electrician. This guide is for informational purposes only.
Step 1: Confirm Power is Off
Reiterate the importance: Ensure the main breaker is off and use your voltage tester to confirm no power is present in the panel.
Step 2: Remove the Double-Tapped Wire(s)
- Loosen the terminal screw: Use the appropriate screwdriver to loosen the screw on the terminal where the two wires are connected.
- Carefully remove the wires: Gently pull the wires out of the terminal. If they are tightly twisted, you might need pliers to help separate them.
Step 3: Prepare the Wires
- Inspect the wires: Check the insulation on both wires for any signs of damage, melting, or scorching. If there is damage, you’ll need to cut back the damaged section and re-strip the wire.
- Strip insulation (if necessary): If the wire ends are damaged or need to be re-stripped, use wire strippers to remove about 1/2 to 3/4 inch of insulation from the end of each wire. Ensure you don’t nick the copper conductor.
Step 4: Connect Wires to Separate Terminals
This is the core of fixing the double-tap. The goal is to have each wire connected to its own dedicated breaker terminal.
-
Option A: Separate Circuits on Different Breakers: If the two wires belonged to different circuits that were incorrectly combined, you’ll need to connect each wire to a separate, functional breaker.
- Identify an unused breaker slot in your panel.
- Ensure the new breaker you choose has the same amperage rating as the circuit it will serve and is compatible with your panel brand.
- Connect the first wire to its original breaker (or a new one if the original was compromised).
- Connect the second wire to a different, available breaker slot.
- Crucially, you must determine what each of these wires powers. If they power different rooms or different types of appliances, they must be on separate breakers to ensure proper circuit breaker maintenance and safety. This might involve some troubleshooting electrical issues to identify which wire belongs to which circuit.
-
Option B: Splitting a Single Circuit: If both wires were intended to be on the same circuit but were double-tapped for convenience or due to a lack of available slots, you need to create a proper connection point outside the breaker.
- Do NOT connect both wires to the same terminal on a new breaker. Each breaker terminal is only rated for one wire.
- Instead, you will use a wire connector (wire nut) to join the two wires together. Then, run a new wire (a “pigtail”) from this connection point to the terminal of the breaker.
- Steps for splitting:
- Twist the ends of the two wires together securely using a wire nut of the appropriate size.
- Take a new piece of wire (the pigtail), matching the gauge and type of the existing wires. Strip about 1/2 inch of insulation from one end.
- Connect this pigtail to the wire nut containing the two wires you just joined. Ensure it’s a solid connection.
- Strip about 1/2 inch of insulation from the other end of the pigtail.
- Connect this pigtail to the terminal of the circuit breaker.
- This method ensures that the breaker terminal only has one wire connected, while the two circuit wires are properly joined and protected by the breaker.
Step 5: Secure the Wires
- Ensure the screw on the breaker terminal is snug but not overly tight. You don’t want to overtighten and strip the threads or damage the wire.
- Gently tug on each wire to make sure it’s securely fastened.
Step 6: Reassemble and Test
- Carefully tuck the wires back into the panel, ensuring they don’t cross over or get pinched.
- Replace the panel cover and secure it with the screws.
- Turn the main breaker back on.
- Test the circuits that were affected by the double-tapped breaker. Check lights and outlets to ensure power is restored and working correctly.
When to Call a Professional Electrician
While it’s possible to fix a double-tapped breaker yourself, there are situations where it’s best to call a professional:
- Unfamiliarity with Electrical Work: If you lack experience with electrical wiring or feel nervous about any part of the process, a professional electrician is your safest bet.
- Damaged Panel or Wiring: If you notice signs of significant damage, such as melted insulation, scorch marks, or a damaged panel, do not attempt to fix it yourself. This indicates a more serious problem that requires expert attention.
- Multiple Double-Tapped Breakers: If you find more than one double-tapped breaker, it might suggest a systemic issue with the original wiring or an amateur installation, warranting a professional inspection.
- No Spare Breaker Slots: If you don’t have empty slots in your panel to split circuits onto separate breakers, a professional might need to install a sub-panel or upgrade your existing panel.
- Specific Breaker Types: If you have specialized breakers like GFCI breaker reset types or AFCI breakers, and you’re unsure how they function or are installed, it’s best to consult an electrician.
- Troubleshooting Complex Issues: If you’re facing persistent problems like your breaker keeps tripping even after addressing the double-tap, a deeper investigation into electrical panel troubleshooting might be necessary.
Related Electrical Panel Topics
How to Reset a Circuit Breaker
When a circuit breaker trips, it’s because it has detected an overload or a short circuit. To reset it:
- Locate the Tripped Breaker: The breaker handle will be in the “OFF” position or in a middle position between “ON” and “OFF.”
- Push the Handle Firmly to “OFF”: This ensures the breaker mechanism is fully reset.
- Push the Handle Firmly to “ON”: The breaker should now be reset.
If the breaker trips again immediately, it indicates a persistent problem. You need to investigate further, possibly by identifying overloaded circuit conditions or other troubleshooting electrical issues.
GFCI Breaker Reset
Ground Fault Circuit Interrupter (GFCI) breakers are designed to protect against electric shock, especially in areas like bathrooms, kitchens, and outdoors. They monitor the flow of electricity and will trip if they detect an imbalance that could indicate a shock hazard.
To reset a GFCI breaker:
- Locate the GFCI breaker: It will usually have a “TEST” and “RESET” button on the front.
- Press the “RESET” button firmly: If it doesn’t reset, you may need to first push the breaker handle to the “OFF” position and then back to the “ON” position before pressing “RESET.”
- Test the GFCI: After resetting, press the “TEST” button. The breaker should trip. Then, press “RESET” again to restore power. If the GFCI breaker continues to trip, there’s likely a ground fault somewhere on the circuit.
Circuit Breaker Maintenance
Regular circuit breaker maintenance is key to ensuring your electrical system’s safety and efficiency. This includes:
- Periodic Inspections: Visually inspect your panel for any signs of corrosion, damage, or loose connections at least once a year.
- Test GFCIs: Test GFCI outlets and breakers monthly using the test/reset buttons.
- Test Breakers: While not a standard homeowner task, electricians may periodically exercise breakers to ensure they are not seized.
- Labeling: Ensure all breakers are clearly and accurately labeled. This is vital for effective electrical panel troubleshooting.
Breaker Replacement
If a circuit breaker is faulty, old, or damaged, it may need to be replaced. This is a job that often requires professional assistance, especially if the new breaker needs to be of a different amperage or type. A faulty breaker can be a reason why your breaker keeps tripping. Breaker replacement should always be done with the power off and with a breaker that is compatible with your panel brand and series.
Frequently Asked Questions (FAQ)
Q1: Can I just remove one of the wires from the double-tapped breaker?
A1: No, you cannot simply remove a wire. You need to ensure that the wire you remove is properly terminated and connected to its intended breaker, or if it’s part of a circuit that needs to be split, that it’s done so safely with proper wire connectors and a dedicated breaker.
Q2: How do I know if my breaker is double-tapped?
A2: You’ll need to open your electrical panel (after turning off the main breaker and ensuring the power is off) and visually inspect each breaker. A double-tapped breaker will have two wires connected to a single terminal screw on the side of the breaker.
Q3: Is double tapping a code violation?
A3: Yes, connecting two wires to a single breaker terminal is a violation of the National Electrical Code (NEC) and local building codes. It is considered a fire hazard.
Q4: My breaker keeps tripping, and I found it was double-tapped. After fixing it, it still trips. What should I do?
A4: If your breaker continues to trip after you’ve corrected the double-tap, there’s likely another underlying issue. This could be an overloaded circuit, a faulty appliance connected to the circuit, or a problem with the breaker itself or the wiring. You will need to do more troubleshooting electrical issues or call an electrician.
Q5: What if I don’t have enough breaker slots to separate the double-tapped wires?
A5: If you find yourself in this situation, it indicates that your electrical panel may be full or inadequately sized for your home’s needs. You will need to consult with a qualified electrician. They can assess your situation and recommend solutions, which might include installing a sub-panel or upgrading your main electrical panel.
Q6: Can I use a larger breaker to fix an overloaded circuit?
A6: Absolutely not. Never replace a breaker with one of a higher amperage rating than what the circuit wiring is designed to handle. This is extremely dangerous and a serious fire hazard. If a circuit is consistently overloading, the cause needs to be identified and addressed, not masked with a larger breaker. This relates to proper circuit breaker maintenance.
By addressing double-tapped circuit breakers promptly and safely, you can significantly reduce the risk of electrical fires and ensure your home’s electrical system operates reliably. Always prioritize safety and don’t hesitate to call a professional if you have any doubts.