
Image Source: blog.jamesallen.com
How To Find Ring Size With Tape Measure Easily: A DIY Guide
Can you find your ring size with a tape measure? Yes, absolutely! Using a tape measure is a straightforward and effective way to determine your ring size at home without needing a special sizer. This guide will walk you through the simple steps to accurately measure your finger and convert that measurement into a ring size, empowering you to find the perfect fit for any ring.
The Importance of Accurate Ring Sizing
Finding the right ring size is crucial for both comfort and security. A ring that’s too tight can be painful and difficult to remove, while one that’s too loose risks slipping off and getting lost. While professional jewelers have specialized tools for precise measurement, you can achieve remarkably accurate results with common household items. This DIY approach is perfect for when you’re shopping online, surprising someone with a gift, or simply want to know your size for future reference.
Why Choose a Tape Measure for DIY Ring Sizing?
1. Accessibility: Most households have a tape measure readily available. This means you can embark on your DIY ring sizing journey without any extra trips to the store.
2. Simplicity: The process is uncomplicated and can be done in a few minutes. You don’t need advanced skills or complex instructions.
3. Cost-Effective: It’s a free method! You save money by avoiding the purchase of a dedicated ring sizer.
4. Convenience: You can measure for rings at home at any time, fitting it into your schedule.
5. Accuracy Potential: With a little care and attention to detail, you can achieve a highly accurate ring size with tape.
What You’ll Need for Home Ring Measurement
Gathering your materials beforehand ensures a smooth and efficient process. Here’s what you’ll need:
- A Flexible Tape Measure: A fabric or plastic tailor’s tape measure is ideal. Metal retractable tape measures can work, but be cautious as they are less flexible and can be trickier to wrap around your finger precisely.
- A Pen or Pencil: To mark the tape measure.
- A Mirror: To help you see what you’re doing clearly, especially when measuring your dominant hand.
- A Ruler or Straight Edge: For more precise reading of the tape measure.
- A Ring Size Chart Tape Measure Conversion Table: This will be your key to translating your measurement into a standard ring size. You can easily find these online.
Step-by-Step Guide: How to Measure Your Finger Circumference
The core of DIY ring sizing is accurately measuring your finger. Follow these steps carefully:
Step 1: Choose the Right Finger and Knuckle
- Which finger? Rings are typically worn on the ring finger of the left hand, but you might be sizing for a different finger or hand. Make sure you’re measuring the correct finger.
- The knuckle is key. Your knuckle is usually wider than the base of your finger. Your ring needs to be able to slide over your knuckle comfortably. Therefore, you must measure finger circumference at the widest part of your knuckle. If your knuckle is significantly larger than the base of your finger, you might need to take two measurements and consider the larger one.
Step 2: Wrap the Tape Measure Around Your Finger
- Start at the base: Place the end of the tape measure at the base of your finger, on the side where the ring will be.
- Wrap snugly, but not too tight: Gently wrap the tape measure around your finger, making sure it lies flat and follows the natural curve of your finger. It should feel snug, similar to how you want the ring to fit – not so tight that it cuts off circulation, but not so loose that it can easily slide off.
- Go over the knuckle: Ensure the tape measure goes over the widest part of your knuckle. This is the crucial point for a comfortable fit.
Step 3: Mark the Measurement
- Align the ends: Once the tape measure is comfortably wrapped around your finger and knuckle, bring the end of the tape measure back to the starting point.
- Mark the overlap: Use your pen or pencil to make a clear mark on the tape measure at the point where the end of the tape measure meets the rest of the tape. This mark indicates the total circumference of your finger.
Step 4: Read the Measurement
- Lay flat: Carefully remove the tape measure from your finger. Lay it flat on a surface.
- Use a ruler: Place a ruler or straight edge along the tape measure, aligning the zero mark with the starting end of the tape.
- Read the mark: Look at where your pen mark falls on the ruler or the tape measure itself. You are looking for the measurement in millimeters (mm) or inches. Millimeters are generally preferred for tape measure ring conversion as most international ring size charts use millimeter measurements.
Step 5: Note Down Your Measurement
- Write down the measurement accurately. For example, you might have a measurement of 58 mm or 2.3 inches.
Converting Your Measurement to a Ring Size
Now that you have your finger’s circumference, it’s time to use a ring size chart tape measure to find your actual ring size.
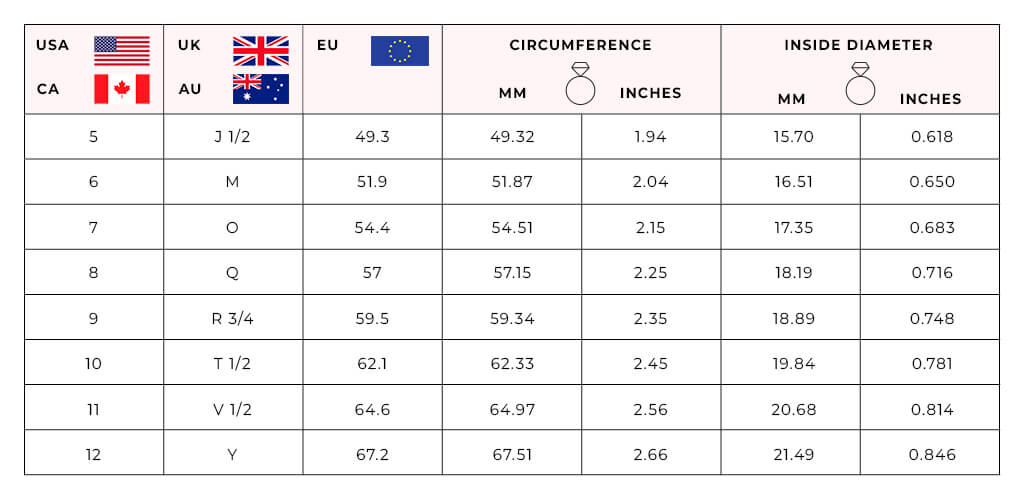
Using a Ring Size Chart Tape Measure
These charts typically have three columns:
- Circumference (mm): This column shows the finger circumference in millimeters.
- Diameter (mm): This column shows the finger’s diameter in millimeters.
- US Ring Size: This is the standard ring size in the United States.
- UK/Australia Ring Size: This is the standard ring size in the UK and Australia, which is based on a letter.
- European Ring Size: This is the standard ring size in Europe, often based on circumference in millimeters.
How to Use the Chart:
- Locate your measurement: Find your measured circumference (in millimeters) in the corresponding column of the ring size chart tape measure.
- Find the corresponding size: Look across to the other columns to see your US, UK/Australia, and European ring sizes.
Example: If your finger measured 58 mm in circumference:
- You would look for 58 mm in the circumference column.
- The chart might show that 58 mm corresponds to a US size 8.5, a UK size R, or a European size 18.5.
Important Considerations for Accurate Ring Size with Tape:
- Time of Day: Your fingers can swell or shrink slightly throughout the day due to temperature, activity, and fluid retention. For the most accurate ring size with tape, measure your finger at the end of the day when your fingers are typically at their largest.
- Temperature: Cold weather can make your fingers slightly smaller, while hot weather can make them swell. Try to measure in a comfortable, neutral temperature.
- Multiple Measurements: It’s a good idea to measure your finger a couple of times throughout the day and on different days to ensure consistency and get the most reliable result. This is a key aspect of home ring measurement.
- Dominant Hand: Your dominant hand’s fingers are usually slightly larger. If you’re unsure which hand you want the ring for, consider measuring both.
- The Knuckle Factor: If your knuckle is significantly larger than the base of your finger, remember that the tape measure should have comfortably passed over the knuckle. If your measurement was taken solely at the base, the ring might not fit over the knuckle.
Alternative DIY Ring Sizing Methods (When Tape Isn’t Perfect)
While a tape measure is excellent, sometimes you might need or prefer other methods to find ring size without sizer.
Method 1: Using a Strip of Paper
This is a classic DIY ring sizing technique that works similarly to the tape measure.
- What you need: A strip of paper (about 1/4 inch or 6 mm wide), a pen, scissors, and a ruler.
- How to do it:
- Cut a thin strip of paper, about 4-5 inches long.
- Wrap the paper strip snugly around the base of your finger, ensuring it goes over the knuckle.
- Mark where the paper overlaps with your pen.
- Lay the paper strip flat and measure the length from the end to the mark in millimeters using your ruler.
- Use a ring size chart tape measure conversion table to find your ring size based on this circumference.
Method 2: Using an Existing Ring
If you have a ring that already fits the desired finger well, you can use it to determine your size.
- What you need: The well-fitting ring, a ruler or caliper, and a ring size chart tape measure.
- How to do it:
- Place the ring on a flat surface.
- Using a ruler or calipers, measure the inside diameter of the ring in millimeters. Be as precise as possible.
- Consult a ring size chart tape measure that includes diameter measurements. Match your measured inside diameter to the closest diameter on the chart to find your ring size.
Understanding Different Ring Size Systems
It’s important to note that ring sizes can vary slightly by region. The most common systems you’ll encounter are:
- US System: This is the most widely used system in North America. Sizes are typically whole numbers, halves, and sometimes quarters (e.g., 6, 6.5, 7).
- UK/Australia System: This system uses letters (e.g., E, F, G).
- European System: This system is based on the internal circumference of the ring in millimeters (e.g., 48, 50, 52).
When you find your measurement using the tape measure, make sure to use a conversion chart that clearly indicates which system it represents. This helps avoid confusion when you ask, “What size ring is this?“
Common Pitfalls to Avoid in Home Ring Measurement
Even with simple tools, mistakes can happen. Be mindful of these common errors:
- Too Loose: Wrapping the tape measure too loosely will result in a larger size than you need. Remember the “snug but not tight” rule.
- Too Tight: Wrapping too tightly will give you a smaller size. This is especially problematic if it constricts blood flow.
- Ignoring the Knuckle: Not accounting for the knuckle’s width is perhaps the most frequent mistake. If the tape measure doesn’t go over the knuckle comfortably, the ring won’t either.
- Inconsistent Measurements: Not measuring at the same time of day or in similar temperature conditions can lead to variations.
- Using the Wrong Chart: Ensure your conversion chart is up-to-date and accurate. Different charts might have slight variations.
- Misreading the Tape: Double-check your measurement reading, especially if using a metal tape measure.
When to Seek Professional Help for Sizing
While DIY ring sizing is effective, there are times when consulting a professional jeweler is best:
- High-Value Rings: If you’re purchasing a very expensive ring, a jeweler’s precise tools and expertise can provide extra peace of mind.
- Unusual Finger Shapes: If your fingers have very prominent knuckles or an unusual shape, a jeweler can better assess the fit.
- Complex Ring Designs: Wide bands or rings with intricate patterns might fit differently than simple bands, and a jeweler can offer tailored advice.
- For a Gift: If you’re buying a ring for someone else and want to be absolutely certain, a jeweler can help you discreetly obtain their size.
Frequently Asked Questions About Using a Tape Measure for Ring Size
Q1: How accurate is using a tape measure for ring size?
A: With careful measurement and attention to detail, using a tape measure can be very accurate for DIY ring sizing. It’s a reliable method for home ring measurement and allows you to find ring size without sizer.
Q2: What if my finger size changes throughout the day?
A: This is common! Measure your finger at the end of the day when it’s typically at its largest. It’s also advisable to take a few measurements over a couple of days to get the best average.
Q3: Can I use a string instead of a tape measure?
A: Yes, you can use a piece of string or even a thin strip of paper. The principle is the same: wrap it snugly around your finger, mark the overlap, and then measure the length of the string/paper with a ruler. This is another excellent way to measure finger circumference.
Q4: My knuckles are much wider than my finger. How do I account for this?
A: Ensure the tape measure (or string/paper) goes comfortably over the widest part of your knuckle. When converting, use the measurement that accounts for your knuckle’s width to ensure the ring can be slipped on and off easily.
Q5: What is the difference between diameter and circumference for ring sizes?
A: Circumference is the distance around your finger, while diameter is the distance straight across the widest part of your finger (passing through the center). Most tape measure ring conversion charts will use circumference in millimeters as the primary measurement.
Q6: How do I know if my measurement is correct?
A: If you measure your finger multiple times and get very similar results, it’s a good indication of accuracy. Also, compare your measurement to the typical range of ring sizes for your gender – extreme outliers might warrant re-measuring.
Q7: I measured my finger and got 60mm. What size is that?
A: To answer “What size ring is this?” precisely, you’d need to consult a ring size chart tape measure. However, 60mm circumference typically corresponds to a US size 9, a UK size S, or a European size 59. Always check a chart for the definitive answer.
By following this comprehensive guide, you’re well-equipped to accurately measure for rings at home using a simple tape measure. Happy sizing!