
Can I measure my wrist without a tape measure? Absolutely! You can get a quick and accurate wrist measurement using common household items. This guide will show you how.
When you need to know your wrist size, whether it’s for buying a watch, a bracelet, or even checking the fit of a glove, a tape measure is the go-to tool. But what if you don’t have one handy? Don’t worry! There are several simple and effective ways to get an accurate wrist measurement using readily available materials. This post will guide you through these methods, ensuring you can get the perfect fit every time, even without a specialized measuring tool.
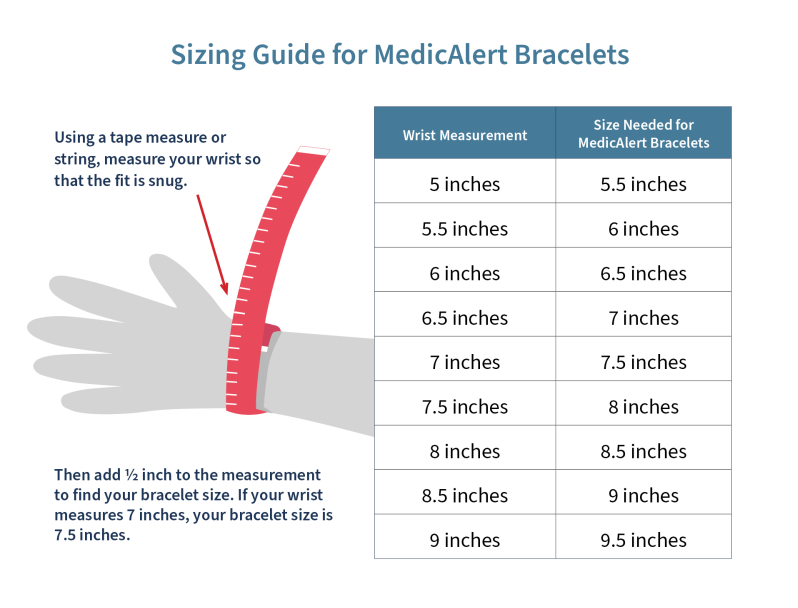
Image Source: blog.medicalert.org
The Importance of Knowing Your Wrist Size
Knowing your wrist size is crucial for several reasons:
- Jewelry Fit: From bracelets to bangles, the correct size ensures comfort and prevents items from slipping off or feeling too tight.
- Watch Sizing: The lug-to-lug distance and the strap size are directly related to your wrist circumference. Getting this right makes a watch look and feel perfect.
- Glove Fit: For sports, work, or fashion, properly sized gloves offer better dexterity and comfort.
- Clothing Adjustments: Sometimes, understanding your wrist size can help when estimating sleeve length on custom or tailored clothing.
Method 1: The String Measurement
This is perhaps the most popular and straightforward method for determining your wrist size when a tape measure is unavailable.
What You’ll Need:
- A piece of string, thread, or even dental floss.
- A ruler or a standard measuring device.
- Scissors.
Step-by-Step Guide:
- Wrap the String: Take your chosen string and wrap it snugly around the part of your wrist where you typically wear a watch or bracelet. It should be firm but not so tight that it cuts off circulation. Make sure the string lies flat against your skin.
- Mark the Overlap: Once the string is in place, use your fingers to pinch and mark the exact point where the string overlaps to complete the circle around your wrist.
- Straighten and Mark: Carefully remove the string from your wrist, keeping your fingers on the marked overlap point. Lay the string flat on a surface.
- Measure the String: Use your ruler to measure the length of the string from the end up to the mark you made. This length is your wrist circumference.
- Record the Measurement: Note down the measurement. It’s usually best to measure in centimeters or inches, depending on the sizing conventions you’re following. This string measurement will be your key to finding the right fit.
Tips for Accuracy with String Measurement:
- Tension is Key: Ensure consistent tension when wrapping the string. Too loose, and your measurement will be too large; too tight, and it will be too small.
- Smooth Surface: Lay the string on a flat surface for the string to ruler measurement to avoid any kinks or curves skewing the result.
- Multiple Readings: If you’re unsure, repeat the process a couple of times to ensure consistency.
Method 2: The Paper Strip Measurement
Similar to the string method, using a strip of paper is another excellent way to get a precise wrist measurement. This method is particularly useful if you don’t have any string readily available.
What You’ll Need:
- A strip of paper (around 1 inch wide and 6-8 inches long is ideal). A receipt, a piece of printer paper, or even a paper bag strip can work.
- A ruler.
- Scissors or a way to cut the paper.
- Tape or a paperclip (optional, to secure the strip).
Step-by-Step Guide:
- Prepare the Paper Strip: If your paper is wider than necessary, cut it into a strip about an inch wide. Ensure the edges are relatively straight.
- Wrap the Paper: Wrap the paper strip around your wrist, just as you would the string. Aim for a snug but comfortable fit.
- Mark the Overlap: Pinch the paper at the point where the end of the strip meets the rest of it, forming a complete circle around your wrist.
- Secure and Mark (Optional): You can use a small piece of tape or a paperclip to temporarily hold the paper in place while you mark.
- Lay Flat and Measure: Remove the paper strip from your wrist. Lay it flat on a table. Use your ruler to measure the length of the paper from one end up to the mark you made. This paper strip measurement represents your wrist circumference.
- Record Your Size: Write down the measurement.
Considerations for Paper Strip Measurement:
- Paper Thickness: Thicker paper might add a slight bulk. For maximum accuracy, use a relatively thin but strong paper.
- Avoiding Creases: Try to keep the paper strip as flat as possible when wrapping and measuring to avoid inaccurate readings from creases. This paper strip to ruler transfer needs care.
Method 3: Thread Measurement for Precise Sizing
Thread, especially fine thread, can be incredibly useful for getting a very precise measurement. It’s often thinner than string, allowing for a snugger fit without added bulk.
What You’ll Need:
- A length of thread (embroidery thread, sewing thread, or even sturdy yarn).
- A ruler.
- Scissors.
Step-by-Step Guide:
- Wrap the Thread: Gently wrap the thread around your wrist. Ensure it lies flat and is snug, but not tight.
- Mark the Thread: Carefully pinch where the thread overlaps.
- Straighten and Measure: Remove the thread, keeping your pinch. Lay it flat.
- Use the Ruler: Measure the length of the thread from its end to your marked point using a ruler. This thread measurement is your accurate wrist size.
- Note the Result: Record this measurement for future reference.
Why Thread Works Well:
- Minimal Bulk: Thread’s thinness means it conforms closely to your wrist’s shape, minimizing measurement errors.
- Flexibility: It’s flexible enough to get into the natural contours of your wrist.
Method 4: Dental Floss Wrist Size
You might be surprised, but dental floss can also be a reliable tool for measuring your wrist! It’s readily available in most bathrooms and is typically strong and thin.
What You’ll Need:
- A length of dental floss.
- A ruler.
- Scissors.
Step-by-Step Guide:
- Wrap the Floss: Take a piece of dental floss and wrap it around your wrist, aiming for a comfortable, snug fit.
- Mark the End: Pinch the floss at the point where the end meets the rest of the strand.
- Measure: Lay the floss straight and measure the length from the end to your pinch mark using a ruler. This dental floss wrist size calculation is now complete.
- Record: Write down the measurement.
Using Dental Floss Effectively:
- Waxed vs. Unwaxed: It generally doesn’t matter if the floss is waxed or unwaxed, as the difference in thickness is minimal for this purpose.
- Cleanliness: Ensure the floss is clean before use.
Method 5: Comparing to a Known Object
Sometimes, you can estimate your wrist size by comparing it to an object whose dimensions you know or can easily measure. This is a more approximate method but can be helpful in a pinch.
What You’ll Need:
- An object with a known size (e.g., a credit card, a standard coin, a piece of paper).
- A ruler (to verify the object’s size if unsure).
How to Do It:
- Find a Reference Object: Look for common items. For instance, a standard credit card is about 8.5 cm long.
- Compare: Place the object next to your wrist and try to visually estimate how many times the object’s length would fit around your wrist.
- Calculate: If a credit card is 8.5 cm, and you estimate your wrist is about 1.5 credit card lengths, your wrist would be roughly 8.5 cm * 1.5 = 12.75 cm.
- Refine with Ruler: Use a ruler to measure the known object accurately if you aren’t 100% sure of its dimensions. This comparing to known object method relies on good estimation.
Limitations of Comparing to Known Objects:
- Less Accurate: This method is less precise than direct measurement with string or paper.
- Requires Estimation: Relies heavily on your ability to visually estimate proportions.
Method 6: Belt Loop Sizing
While not a direct wrist measurement, you might be able to use the sizing of a belt loop as a rough guide if you’re trying to size something that attaches similarly, like a watch strap that uses a buckle and loop system.
How to Apply:
- Assess Belt Loop: Consider the typical size and spacing of belt loops on your trousers.
- Relate to Wrist: Think about how a watch strap would fit. The buckle side and the side with the holes would need to accommodate your wrist. The loop part of the belt (where the end tucks in) is roughly the circumference of your waist at that point.
- Estimate: This is highly indirect. If you know you wear a belt at a certain waist size, and your wrist is significantly smaller, you can infer a rough relationship. However, this is not recommended for precise sizing.
Why this is a Less Reliable Method:
- Indirect: It’s not measuring your wrist directly.
- Variable Sizing: Belt loops and buckle mechanisms vary greatly between garments.
- Waist vs. Wrist: There’s no direct correlation between waist size and wrist size.
Method 7: Makeshift Measuring Tools – The Paperclip or Binder Clip Technique
If you have very little to work with, even small items can help.
What You’ll Need:
- A paperclip or a small binder clip.
- A ruler.
- Possibly a pen to mark the clip.
How to Do It:
- Use as a Marker: Open up a paperclip to create a straight wire, or use a binder clip.
- Position: Place the paperclip or binder clip against your wrist at the point where you want to measure.
- Mark: Use a pen to mark the precise point on the paperclip/clip that aligns with the end of your wrist or the overlap point if you’re using it to mark another item.
- Measure the Tool: Lay the paperclip or binder clip flat and measure the distance from one end to your mark using a ruler. This essentially turns the clip into a temporary ruler. This is one of the more creative makeshift measuring tools.
Considerations for Makeshift Tools:
- Precision: These methods are less precise due to the nature of the tools.
- Combined Methods: You might combine this with a thread or paper strip, using the clip to help hold the thread in place while you mark.
Converting Your Measurement
Once you have your measurement in centimeters or inches, you’ll likely need to convert it to standard bracelet or watch strap sizes.
General Bracelet Sizing (for Women):
- Small: 6.5 – 7 inches (approx. 16.5 – 18 cm)
- Medium: 7 – 7.5 inches (approx. 18 – 19 cm)
- Large: 7.5 – 8 inches (approx. 19 – 20.5 cm)
General Bracelet Sizing (for Men):
- Small: 7 – 7.5 inches (approx. 18 – 19 cm)
- Medium: 7.5 – 8 inches (approx. 19 – 20.5 cm)
- Large: 8 – 8.5 inches (approx. 20.5 – 21.5 cm)
Watch Strap Sizing:
Watch strap sizing often refers to the width of the strap at the lugs (where it attaches to the watch case) and the length of the two strap pieces. The length of the strap pieces is usually standardized for small, medium, and large wrists, but your wrist measurement is key to determining which length works best.
Important Note:
Always check the specific sizing guide provided by the manufacturer of the jewelry or watch you are interested in, as sizing can vary slightly between brands.
Frequently Asked Questions (FAQ)
Q: How snug should the string or paper be when measuring my wrist?
A: The string or paper should be snug enough to lie flat against your skin without any slack, but not so tight that it pinches or feels uncomfortable. Imagine how you’d want a watch strap or bracelet to feel – firm but not constricting.
Q: What if my wrist measurement falls between two standard sizes?
A: If your measurement is right on the cusp, consider the type of jewelry or watch you’re buying. For bracelets, if you prefer a looser fit, size up. For watches, if you prefer a snug fit or have smaller wrists that might make the watch face look disproportionately large, consider sizing down if the measurement is very close.
Q: Should I measure the bony part of my wrist or the narrower part?
A: Typically, you measure your wrist circumference at the point where you would wear a watch or bracelet. This is usually just below the wrist bone on the side closest to your hand. Ensure you wrap the measuring tool around the widest part of this area.
Q: Can I use a measuring tape app on my phone?
A: Some smartphone apps claim to measure using your phone’s camera and AR technology. While convenient, their accuracy can vary significantly depending on lighting, phone model, and how you hold the phone. The physical methods described above are generally more reliable for precise measurements.
Q: How do I measure for a bangle?
A: For a bangle, you need to measure the widest part of your hand. Make a fist and place the string or paper strip around the knuckles on the widest part of your fist. Then measure that length. This ensures the bangle can pass over your hand.
By using these simple, accessible methods, you can accurately measure your wrist without the need for a tape measure. Whether you’re picking out a new accessory or ensuring a perfect fit for an existing one, these techniques will serve you well. Happy measuring!