
Image Source: i.ytimg.com
How To Replace Scroll Saw Blade Safely
Replacing a scroll saw blade can be done quickly and safely by following a few simple steps. The process typically involves releasing tension, removing the old blade, installing the new blade, and re-tensioning. This guide will walk you through each stage, ensuring a smooth and secure blade change.
Scroll saws are fantastic tools for intricate woodworking, allowing crafters to cut curves, patterns, and detailed designs with precision. However, like any tool that uses sharp blades, keeping them in good working order is crucial for both safety and performance. A dull or improperly installed blade can lead to frustration, poor cuts, and even accidents. This comprehensive guide will delve into the nuances of scroll saw blade changing, covering everything from selecting the right blade to ensuring a safe and effective scroll saw blade installation. We’ll demystify the scroll saw blade removal process, discuss various scroll saw blade types, help you identify the best scroll saw blade for your needs, and explain the importance of proper scroll saw blade tension. We’ll even touch on techniques for changing scroll saw blade without wrench for those times when that’s the only option.
Preparing for Blade Change
Before you even think about touching the blade, safety must be your top priority. This means unplugging the saw from the power source. Think of it like this: you wouldn’t change a tire with the car still running, right? The same applies to your scroll saw. Always ensure the power is disconnected to prevent accidental starts.
Gathering Your Supplies
Having the right tools and materials readily available makes the entire process much smoother. Here’s what you’ll typically need:
- New Scroll Saw Blade: Make sure it’s the correct type and size for your saw and your project. We’ll cover blade types later.
- Safety Glasses: Essential for protecting your eyes from flying debris.
- Gloves (Optional but Recommended): To protect your hands from the sharp blade and keep the new blade clean.
- Small Brush or Compressed Air: For cleaning dust and debris from the blade holders.
- Rag: For wiping down the saw.
- Owner’s Manual: Your saw’s manual is the ultimate guide and might have specific instructions for your model.
Inspecting the New Blade
Before you even install a new blade, take a moment to inspect it. Look for any bent teeth, nicks, or manufacturing defects. A damaged blade won’t cut well and can be a safety hazard. Ensure the teeth are sharp and uniform. A sharp blade is key to clean cuts and less effort.
Step-by-Step Guide to Replacing Your Scroll Saw Blade
The process of scroll saw blade changing can seem daunting at first, but by breaking it down into manageable steps, it becomes quite straightforward.
Step 1: Releasing Blade Tension
Most scroll saws have a tensioning mechanism that holds the blade taut during operation. To safely remove the old blade, you need to release this tension.
- Locate the Tension Lever/Knob: This is usually found at the top of the saw arm, near the upper blade holder. It might be a lever you pull down or a knob you turn.
- Apply Pressure: Gently pull the lever down or turn the knob to loosen the tension. You should see the blade become visibly slack.
- Hold the Lever/Knob: Keep it in the loosened position while you proceed to the next step.
Why is tension important? Properly tensioned blades reduce scroll saw blade wobble, leading to more accurate cuts and a smoother operation. Too little tension and the blade will wander; too much and it can break.
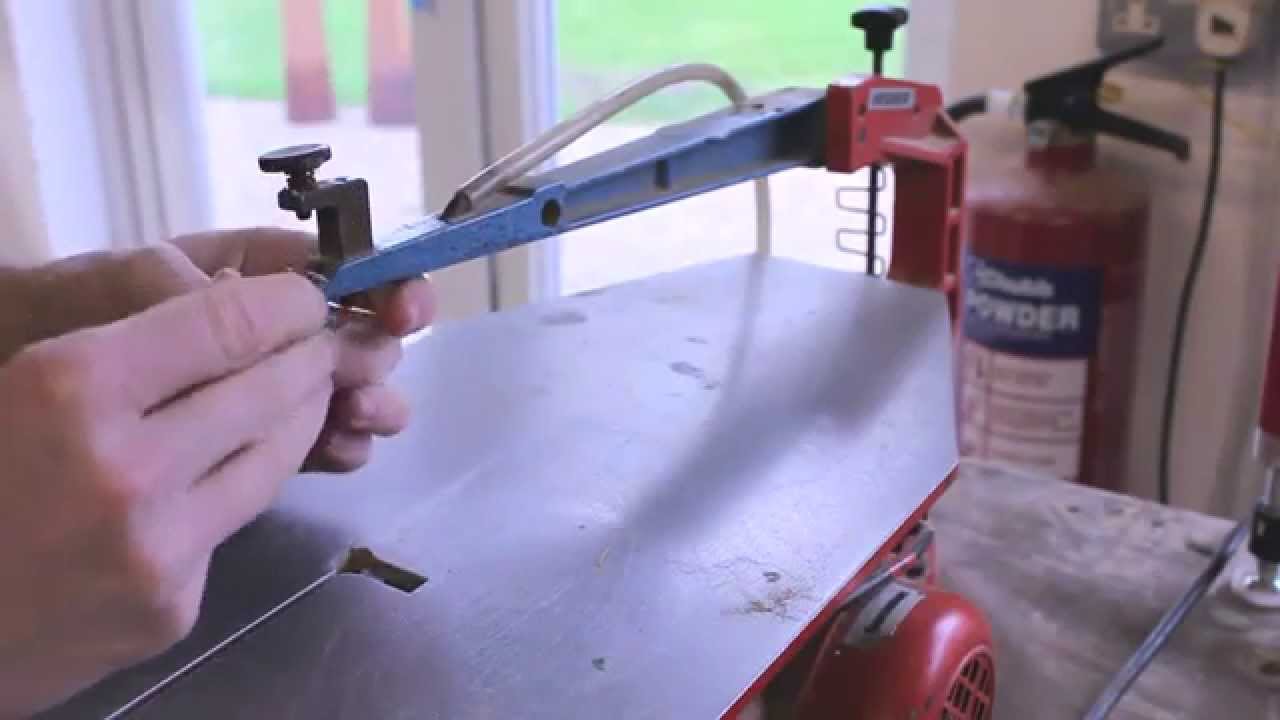
Step 2: Removing the Old Scroll Saw Blade
Once the tension is released, removing the blade is usually the easiest part.
- Access the Blade Holders: The blade is held in place by two holders, one at the top and one at the bottom of the saw. The design of these holders can vary between models.
- Upper Blade Holder: With the tension released, the upper part of the blade will be loose. Carefully maneuver the blade out of the upper holder. Some holders have a small slot or clamp that you might need to slightly open.
- Lower Blade Holder: Most scroll saws have a scroll saw blade holder at the bottom that can be accessed from the front or underneath the saw table. Look for a screw or a quick-release mechanism that secures the blade’s lower end.
- Screw-Type Holders: Use a screwdriver or sometimes a specialized wrench (often included with the saw) to loosen the screw that holds the blade. Turn it counter-clockwise.
- Quick-Release Holders: These are more common on newer saws and allow you to simply pull a lever or a small pin to release the blade without tools.
Tip for changing scroll saw blade without wrench: If your saw has a quick-release lower holder, you won’t need any tools for removal. If it has a screw that requires a specific wrench and you can’t find it, sometimes a flathead screwdriver with the correct tip size can work, but be very careful not to strip the screw head.
- Careful Removal: Once loosened, the old blade should slide out of both holders. Be mindful of the sharp teeth. It’s often best to grip the blade in the middle rather than the ends to avoid accidental cuts.
Step 3: Cleaning the Blade Holders
Before installing the new blade, it’s a good time to clean out any sawdust or debris that might have accumulated in the blade holders.
- Use a Brush or Air: A small brush, a blast of compressed air, or even a toothpick can be used to gently dislodge any trapped particles.
- Wipe Down: Use a clean rag to wipe away any remaining dust. This ensures a clean fit for the new blade and prevents potential issues.
Step 4: Installing the New Scroll Saw Blade
This is where scroll saw blade installation takes place. It’s crucial to get this right for optimal performance and safety.
- Blade Orientation: Scroll saw blades have a specific orientation. The teeth should always point downwards. When looking at the blade, the sharp edges of the teeth should face the direction of the cut, which is away from the operator.
- Attaching the Lower Blade:
- Insert the lower end of the new blade into the lower scroll saw blade holder.
- Ensure the blade is seated correctly in the holder’s groove or slot.
- If you have a screw-type holder, thread the screw back in and tighten it just enough to hold the blade in place. Don’t overtighten yet. If you have a quick-release, ensure it clicks or locks into place securely.
- Attaching the Upper Blade:
- With the lower blade secured, carefully guide the upper end of the blade into the upper blade holder.
- This can be a bit trickier as you’ll need to manipulate the blade to fit into the holder while the tension is still released.
- Make sure the blade sits flush within the holder.
Tip for changing scroll saw blade without wrench (installation): If your saw has screw-type holders and you’re doing a blade change without the specific wrench, use a screwdriver that fits snugly. For installation, tighten it enough to hold the blade, and then you’ll rely on the tensioning mechanism to secure it further.
Step 5: Adjusting Scroll Saw Blade Tension
This is arguably the most critical step for a good cut and to prevent blade breakage. Proper scroll saw blade tension is key.
- Gradually Increase Tension: Slowly apply tension using the lever or knob.
- Listen and Feel: As you increase tension, listen for a subtle “ting” sound, similar to lightly flicking a guitar string. This indicates the blade is taut but not overstretched. You should also feel resistance build as you tighten.
- Check for Wobble: Gently try to move the blade side-to-side with your finger. There should be very little to no sideways movement. Excessive scroll saw blade wobble means the tension is too low.
- Avoid Overtightening: Overtightening can lead to premature blade breakage or damage to the saw’s tensioning mechanism. It’s better to err on the side of slightly less tension and test.
How to test tension? Once you think you have the tension right, try wiggling the blade gently with your finger. It should feel tight and springy, with minimal side-to-side play. If it feels loose or floppy, increase the tension slightly. If it feels extremely rigid and doesn’t budge, you might have over-tensioned it.
Step 6: Final Check and Test Cut
- Secure Everything: Double-check that the blade is firmly seated in both holders and that any screws or levers are secure.
- Plug In and Test: Reconnect the power to your scroll saw.
- Run the Saw: Turn on the saw at a low speed and let the blade spin freely for a few seconds. Listen for any unusual noises or vibrations.
- Make a Test Cut: Cut a scrap piece of the material you’ll be working with. Observe the cut quality. If it’s rough, wandering, or the blade seems to be binding, you may need to adjust the tension or check the blade installation again.
Understanding Scroll Saw Blades
Choosing the right blade is as important as knowing how to change it. The variety of scroll saw blade types can be overwhelming, but they are designed for specific tasks and materials.
Types of Scroll Saw Blades
Scroll saw blades are typically categorized by their tooth configuration, size, and how they attach (often called “pin-end” and “plain-end” or “universal”). Most modern scroll saws use plain-end blades that are held by clamps, but some older models might use pin-end blades.
Here’s a breakdown of common blade types:
- Plain-End Blades: These are the most common and have a flat end. They are held by blade clamps in the saw’s holders.
- Pin-End Blades: These have a small pin at each end, which fits into specific holders. They are generally not recommended for most modern saws.
Blade Characteristics and Their Impact:
- Tooth Count (TPI – Teeth Per Inch):
- High TPI (e.g., 15-32 TPI): Blades with more teeth per inch have smaller teeth and provide finer, cleaner cuts. They are ideal for hardwoods, thin materials, and detailed work where a smooth finish is paramount. However, they cut slower.
- Low TPI (e.g., 7-12 TPI): Blades with fewer teeth per inch have larger teeth and cut faster. They are good for general-purpose cutting, softer woods, and thicker materials where speed is more important than a super-fine finish.
- Tooth Set: This refers to how the teeth are angled.
- Regular Set: Teeth are evenly spaced. Good for general use.
- Raker Set: Every few teeth are straight, followed by a set tooth that clears sawdust. This helps prevent clogging and speeds up cutting, especially in thicker materials.
- Double Tooth Set: Alternating groups of teeth are set in opposite directions. This provides a very smooth finish and reduces tear-out, making it excellent for detailed scroll work.
- Blade Width:
- Narrower Blades: Excellent for tight curves and intricate patterns.
- Wider Blades: Better for straight cuts or gentle curves.
- Blade Material: Most blades are made of high-speed steel (HSS) or carbon steel. HSS blades are generally more durable and hold their sharpness longer, especially when cutting harder materials.
Selecting the Best Scroll Saw Blade
The best scroll saw blade is the one that suits your material and the type of cut you need to make.
- For intricate detail in hardwood: Look for a high TPI, double-tooth set blade with a narrow width.
- For general cutting in pine or plywood: A medium TPI, regular or raker set blade of moderate width will work well.
- For cutting thicker softwoods: A low TPI, raker set blade will provide faster material removal and less clogging.
- For cutting plastics or metals: You will need specialized blades designed for these materials, often with very fine teeth and made of HSS. Always check your saw’s manual for maximum material thickness and types recommended.
Key to a sharp blade: A sharp blade makes all the difference. If you find yourself pushing hard or the blade is burning the wood, it’s time for a new one. Don’t underestimate the importance of scroll saw blade sharpness.
Troubleshooting Common Issues
Even with careful attention, you might encounter a few hiccups during blade changes.
Blade Wobble
If you notice scroll saw blade wobble after installation and tensioning, it can be due to a few things:
- Insufficient Tension: The most common cause. Revisit Step 5 and increase tension gradually.
- Loose Blade Holder: Ensure the screws or clamps in the scroll saw blade holder are tightened properly.
- Bent Blade: While you should inspect new blades, sometimes a blade can be slightly bent. Try a different blade to see if the issue persists.
- Worn Bearings: Less commonly, worn bearings in the saw’s mechanism can cause wobble. This is a more serious issue requiring professional attention or repair.
Blade Breakage
Breaking blades can be frustrating and expensive. Here’s why it might happen:
- Overtightening: As mentioned, too much tension is a primary culprit.
- Forcing the Cut: Trying to cut too fast or forcing the material against a dull blade puts undue stress on the blade. Let the blade do the work.
- Tight Turns: Making extremely sharp turns with a blade that is too wide for the curve can cause it to bind and snap. Use a narrower blade for tight curves.
- Worn Blades: A blade that has lost its scroll saw blade sharpness will often break because it requires more force to cut, leading to stress.
- Improper Installation: A blade not seated correctly in the holders can put uneven stress on it.
Frequently Asked Questions (FAQ)
Q1: How often should I change my scroll saw blade?
A1: There’s no set schedule. Change your blade when you notice a decline in cut quality, increased effort required to push the material, burning of the wood, or if the blade feels dull to the touch (carefully!). For frequent users, this might be daily; for occasional users, it could be months.
Q2: Can I use a generic blade in my scroll saw?
A2: While some generic blades might fit, it’s always best to use blades specifically designed for scroll saws and compatible with your saw model. Using the wrong type can lead to poor performance, damage to the saw, or safety hazards.
Q3: What’s the difference between pin-end and plain-end blades?
A3: Pin-end blades have small pins at each end that lock into specialized holders. Plain-end blades have flat ends and are held by clamps. Most modern scroll saws use plain-end blades.
Q4: How do I know if the blade tension is correct?
A4: The blade should be taut enough that it doesn’t wobble excessively side-to-side, but not so tight that it feels rigid and is prone to snapping. A slight “zing” or “ting” when flicked gently is often a good indicator of proper tension.
Q5: My saw came with a small wrench. Do I always need it for blade changes?
A5: Not necessarily. Many modern saws feature quick-release blade holders, allowing you to change blades without tools. However, if your saw uses screw-type holders, you will need the appropriate wrench or screwdriver for tightening and loosening. This is where the skill of changing scroll saw blade without wrench might be tested with a suitable alternative tool, but always use caution.
By following these detailed steps and tips, you can confidently and safely change your scroll saw blades, ensuring your projects are completed with precision and ease. Remember, a sharp blade and proper technique are your best allies in scroll saw work.