
Can I use a table saw as a jointer? Yes, you can use a table saw as a jointer, but it requires specific jigs and careful setup for safety and accuracy. A table saw can be a versatile tool for woodworking, and with the right attachments, it can perform joinery tasks that are typically done on a dedicated jointer. This guide will walk you through the process of using your table saw for joinery, focusing on creating perfectly straight and square edges.
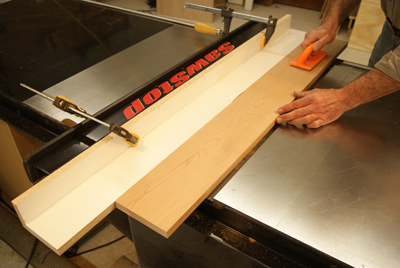
Image Source: www.woodworkersjournal.com
Making a Jointer from a Table Saw: The Basics
While a table saw isn’t a true jointer, it can effectively achieve similar results for edge jointing. The primary goal is to create a perfectly straight edge on a piece of wood that can then be used as a reference against the rip fence for subsequent cuts. This is crucial for creating strong and stable glued joints. The key to success lies in using a specialized jig.
Why Edge Jointing is Important
Edge jointing ensures that two pieces of wood will meet flush and create a strong bond when glued. An unjointed edge will have a slight curve or taper, leading to gaps in your glue-ups. These gaps weaken the joint and can be visually unappealing. Using a table saw to achieve a square edge is a common and effective method, especially for woodworkers who don’t have a dedicated jointer.
The Essential Tool: The Table Saw Jointer Jig
The cornerstone of using a table saw for joinery is a table saw jointer jig. This jig provides a stable, reference surface that allows you to present the workpiece at a precise 90-degree angle to the blade. Without a proper jig, it’s nearly impossible to get accurate results.
Types of Table Saw Jointer Jigs
There are several designs for a table saw edge jointing jig, each with its own advantages:
- Simple Plywood Jig: This is the most basic and easiest to build. It typically consists of a piece of plywood with a miter slot runner attached. A fence or guide is then attached to the plywood at a precise 90-degree angle to the blade. The workpiece rests against this fence and slides along the miter slot runner.
- Adjustable Plywood Jig: Similar to the simple jig, but with added adjustability to fine-tune the 90-degree angle. This can be useful for slight adjustments if your table saw’s miter slots aren’t perfectly parallel to the blade.
- Router Fence Jointer Jig: This design leverages your table saw’s existing table saw router fence jointer capabilities. It typically involves an auxiliary fence that attaches to your router fence, with a precisely cut slot for the workpiece to register against. This can offer excellent stability.
- Shop-Made Sliding Jig: More advanced jigs might incorporate sled-like designs that slide on the table saw’s surface or within the miter slots, offering superior stability and control.
Building Your Own Table Saw Jointer Jig (DIY Table Saw Jointer)
Creating a DIY table saw jointer involves several key steps to ensure accuracy.
Materials You’ll Need:
- A piece of flat, stable plywood (¾ inch Baltic birch is ideal)
- A miter slot runner (metal or plastic, available at woodworking stores)
- Wood screws or bolts for assembly
- A ruler or measuring tape
- A combination square or machinist’s square
- Wood glue
- Optional: Clamps, sandpaper, a drill
Construction Steps:
- Prepare the Base: Cut a piece of plywood to a suitable size. It should be long enough to extend beyond the blade and wide enough for stability. Ensure the edge that will run in the miter slot is perfectly straight.
- Attach the Miter Slot Runner: Align the miter slot runner precisely with one edge of the plywood base. This edge will act as your reference in the miter slot. Secure it firmly with screws. Test the fit in your table saw’s miter slot. It should slide smoothly but without excessive play.
- Create the Fence: Cut another piece of wood to serve as the fence. This fence needs to be perfectly square to the edge of the plywood base that will ride against the blade. This is the most critical step.
- Squaring the Fence: Use a high-quality square to ensure the fence is at a precise 90-degree angle to the base. You can also use a known straight edge or a dial indicator for extreme accuracy.
- Attachment: Glue and screw or bolt the fence to the plywood base. Ensure the screws don’t protrude into the path of the blade.
- Test and Refine: Place the jig in the table saw’s miter slot. With the blade raised, check that the fence is perfectly parallel to the blade. You can do this by measuring the distance from the fence to the blade at the front and back. They should be identical. Make any necessary adjustments by shimming or planing.
Using Your Table Saw Jointer Jig: Step-by-Step
Once your table saw edge jointing jig is built and verified for accuracy, you can begin edge jointing.
Preparation:
- Blade Selection: Use a sharp, full-kerf blade. A blade with more teeth can leave a smoother finish, but a good quality 40-tooth or 60-tooth combination blade is usually sufficient. Avoid dado blades or blades with large chip-out tendencies.
- Blade Height: Set the blade so that it extends just slightly above the workpiece. A general rule is to have the blade teeth extend about ¼ inch above the surface of the wood. This minimizes the chance of kickback.
- Jig Placement: Insert your table saw jointer jig into the miter slot closest to the blade. Ensure it is firmly seated and doesn’t wobble.
- Workpiece Preparation: Identify the edge you need to joint. If you’re jointing one edge to make it square to a face, ensure that face is flat against the fence of your jig.
The Jointing Process:
- Position the Workpiece: Place the workpiece against the fence of your jig. The edge to be jointed should be presented to the blade. The face of the workpiece opposite the edge you’re jointing should be pressed firmly against the jig’s fence.
- Start the Cut: Turn on the table saw and allow the blade to reach full speed.
- Feed the Workpiece: Gently feed the workpiece into the blade. Keep constant downward pressure on the workpiece and firm pressure against the jig’s fence.
- Support the Workpiece: Ensure both ends of the workpiece are supported. Your jig should extend far enough to provide support, and you may need to use a push stick to support the outfeed end.
- Complete the Pass: Push the workpiece completely through the blade. Do not stop mid-cut.
- Check the Edge: Turn off the saw. Remove the workpiece and check the newly jointed edge with a straight edge or square. It should be perfectly straight and at a 90-degree angle to the face that was against the jig’s fence.
- Repeat if Necessary: If the edge isn’t perfectly jointed, you can make another pass with the jig. For subsequent passes on the same edge, you might need to adjust the blade height or slightly advance the workpiece to remove only a thin shaving.
Safety First: Using Your Table Saw for Joinery
Safety is paramount when using table saw for joinery. Table saws are powerful tools, and improper use can lead to serious injury.
Key Safety Precautions:
- Always use a blade guard and riving knife if possible. While they may need to be removed or adjusted for some jig configurations, their absence increases risk.
- Use push sticks and push blocks to keep your hands away from the blade.
- Never reach over the blade.
- Ensure your workpiece is securely held against the jig’s fence and the jig is stable in the miter slot.
- Wear safety glasses at all times. Hearing protection is also recommended.
- Keep your work area clean and free of debris.
- Never attempt to joint a piece that is too small to be safely handled. The minimum size depends on your jig and safety practices, but generally, if you can’t comfortably maintain control with push sticks, don’t do it.
- Avoid freehand cutting. Always use a jig or the rip fence for support.
- Check your jig and setup before each cut. Ensure everything is square and secure.
The Table Saw Ripping Fence Jointer Method
Another approach for using table saw for joinery involves the table saw ripping fence jointer. This method uses the table saw’s rip fence as the primary guide.
How it Works
This method requires an auxiliary fence or jig that attaches to the rip fence, extending it outwards. The workpiece is then held against this auxiliary fence, and the blade is set to shave off the unwanted edge.
Building an Auxiliary Fence for the Rip Fence:
- Material: A piece of flat MDF or plywood is ideal.
- Attachment: Create a way to firmly attach this auxiliary fence to your existing rip fence. This could involve clamps, bolts, or a custom bracket system. The critical element is that the auxiliary fence must be perfectly parallel to the blade.
- Edge Guidance: You might need to add a small guide on the auxiliary fence to help register the workpiece, similar to a jig.
The Process:
- Set Up: Attach your auxiliary fence to the rip fence. Ensure it is parallel to the blade. Set the blade height as described earlier.
- Position Workpiece: Place the workpiece against the auxiliary fence, with the edge to be jointed against the blade. The face of the workpiece should be pressed against the auxiliary fence.
- Make the Cut: Feed the workpiece through the blade, maintaining pressure against the auxiliary fence.
Considerations:
- Accuracy: This method relies heavily on the rip fence’s parallelism to the blade and the accuracy of your auxiliary fence attachment.
- Support: You need to ensure the workpiece is adequately supported throughout the cut, especially on longer pieces.
Creating a Perfect Edge on Table Saw: Advanced Techniques and Considerations
Creating a perfect edge on table saw goes beyond just building a jig. It involves understanding the nuances of the tool and your materials.
Featherboards and Hold-Downs
For extra stability and to prevent the workpiece from lifting off the jig or fence, consider using featherboards.
- Featherboards: These are strips of wood or plastic with angled “feathers” that apply lateral pressure to the workpiece, holding it firmly against the fence. They can be attached to the table saw’s surface or to a separate jig.
- Hold-Downs: Devices that apply downward pressure to the workpiece can also be beneficial, especially when jointing slightly warped boards.
Table Saw Router Fence Jointer Integration
If your table saw has a robust table saw router fence jointer system, you can adapt your jig or create a dedicated attachment that utilizes its precision. Some systems allow for precise fence adjustments, which can be leveraged to achieve perfect 90-degree angles.
Table Saw to Edge Jointer Conversion: What to Know
While this article focuses on using existing table saws, it’s worth noting that some advanced woodworkers create dedicated table saw to edge jointer conversion setups. These often involve mounting the saw’s motor and blade to a custom base with a long, precisely machined infeed and outfeed table, effectively creating a standalone edge jointer. This is a significant undertaking and requires advanced fabrication skills.
Ensuring Squareness: The Table Saw Jig for Square Edges
A well-constructed table saw jig for square edges is the ultimate goal. Here’s how to verify you’re achieving it:
- Combination Square: The most basic tool. Hold it against the jointed edge and the face of the workpiece. Look for any light showing through.
- Machinist’s Square: Offers higher precision than a combination square.
- Dial Indicator: For ultimate accuracy, a dial indicator mounted to the table saw or a jig can measure any deviation from perfect 90 degrees.
The Joys of Jointing with Your Table Saw
Mastering the art of making a jointer from a table saw opens up a world of possibilities for precise joinery. Whether you’re building furniture, cabinets, or other woodworking projects, having the ability to create perfectly square edges will elevate the quality of your work. Remember, practice and attention to detail are key.
Frequently Asked Questions (FAQ)
Q1: Can I really get jointer-quality edges with a table saw?
A1: Yes, with the right jig and careful setup, you can achieve edges that are perfectly straight and square, suitable for strong glue joints. While it might not be identical to a dedicated jointer, the results can be excellent for most woodworking applications.
Q2: What is the best type of blade for edge jointing on a table saw?
A2: A sharp, full-kerf blade with a moderate number of teeth (40-60) is generally recommended. Avoid blades designed for ripping through thick hardwoods or those that leave a very coarse finish.
Q3: How do I know if my jig is perfectly square?
A3: Use a high-quality combination square or machinist’s square to check the angle between the fence of your jig and the blade’s path. Measure the distance from the fence to the blade at both the front and back of the blade; these measurements should be identical.
Q4: Is it safe to joint small pieces of wood with a table saw jig?
A4: Safety is paramount. If a piece of wood is too small to be safely held and controlled with push sticks and firm pressure against the jig, it’s best not to joint it. Always prioritize keeping your hands away from the blade.
Q5: Can I use a router table with a special jig instead of a table saw?
A5: Yes, you can also create jigs for router tables to perform edge jointing. The principles are similar – creating a fence that is precisely 90 degrees to the router bit’s cutting path. Many woodworkers find router tables to be an excellent alternative for edge jointing.