
Can you accurately determine your ring size using a tape measure? Yes, you can! Finding your ring size with a tape measure is a straightforward and accessible method. This guide will walk you through the process, ensuring you get an accurate measurement for your perfect fit, whether you’re shopping online or need to know your size for a special occasion. We’ll cover everything from the basic steps to advanced tips for getting the most precise reading.
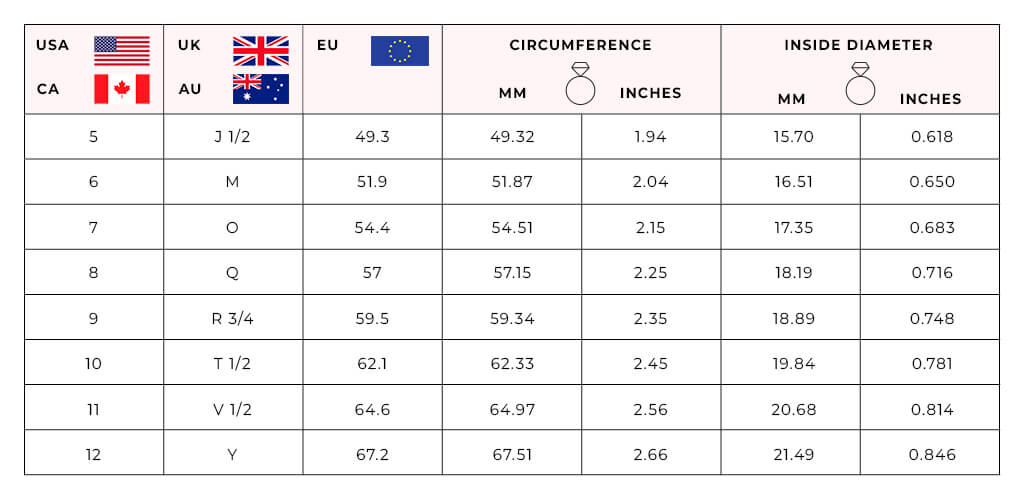
Image Source: blog.jamesallen.com
The Convenience of DIY Ring Sizing
In a world where online shopping offers endless choices, knowing your precise ring size is crucial. It eliminates the guesswork and the disappointment of receiving a ring that doesn’t fit. While jewelry stores have professional tools for measuring finger size, you can achieve remarkably accurate results right at home with common household items. The most accessible and often overlooked tool for this task is a simple tape measure. This article focuses on how to measure ring size at home using a tape measure, providing a reliable DIY ring measurement tape method.
Why Accurate Ring Sizing Matters
A ring that’s too tight can be uncomfortable and even cause swelling, while a ring that’s too loose risks being lost. The right fit ensures comfort, security, and the longevity of your jewelry. Fathoming finger circumference for rings is the first step to a perfect purchase.
Gathering Your Tools: What You’ll Need
To successfully measure your ring size with a tape measure, you’ll need a few essential items:
- A Flexible Tape Measure: This is the star of our DIY operation. A tailor’s tape measure or a flexible measuring tape that you might use for sewing is ideal. If you don’t have a flexible tape measure, a thin strip of paper or string can also work, but a tape measure offers a more direct reading.
- A Pen or Marker: To mark your measurement.
- A Ruler or Another Tape Measure: To accurately read the measurement if your flexible tape measure doesn’t have clear markings.
- A Ring Size Chart: You’ll need a chart to convert your measurement into a standard ring size. These are readily available online.
Choosing the Right Tape Measure
The key is using a flexible tape measure. A rigid metal tape measure won’t contour to your finger properly. The best way to measure ring size tape is with one that’s designed to be adaptable and bendable.
Step-by-Step Guide: Measuring Your Finger
This section details the practical steps for using your tape measure to determine your ring size. Follow these instructions carefully for the most accurate results.
Step 1: Prepare Your Finger
Ensure your finger is at a normal temperature. Fingers can swell or shrink slightly with temperature changes. Avoid measuring when your hands are very hot or very cold.
Step 2: Wrap the Tape Measure
Gently wrap the flexible tape measure around the base of the finger where you intend to wear the ring.
- Make sure the tape is snug but not too tight. It should feel comfortable, similar to how you’d want a ring to feel.
- The tape should lie flat against your skin, without any twists or kinks.
- Pay attention to the knuckle. If your knuckle is significantly larger than the base of your finger, you’ll need to measure around the knuckle as well. The ring needs to pass over the knuckle to be put on.
Step 3: Mark the Measurement
Once the tape measure is comfortably in place, use your pen or marker to make a clear mark on the tape measure where the end meets the rest of the tape. This mark indicates the circumference of your finger at that point.
Step 4: Read the Measurement
Carefully remove the tape measure from your finger. Lay it flat and use a ruler or another tape measure to read the exact measurement in millimeters (mm) at the mark you made.
- Focus on Millimeters: Most international ring size charts use millimeters for circumference. Ensure your measurement is precise.
Step 5: Consider the Knuckle (If Applicable)
If your knuckle is larger than the base of your finger, repeat steps 2-4, wrapping the tape measure around the widest part of your knuckle. You’ll want to use the larger measurement to ensure the ring can pass over your knuckle.
Converting Your Measurement to a Ring Size
Now that you have your finger’s circumference in millimeters, you need to convert this into a standard ring size. This is where a printable ring size chart tape measure equivalent comes into play.
How to Use a Ring Size Chart
- Find a Reliable Chart: Search online for “ring size chart” or “ring size conversion chart.” Reputable jewelers often provide these on their websites.
- Locate Your Measurement: Look for the column that lists finger circumference in millimeters.
- Find Your Size: Match your measured circumference to the corresponding ring size. Remember, different countries have different sizing systems (e.g., US, UK, European). Most charts will provide conversions for multiple systems.
Example:
If your measurement is 54 mm, you would look for 54 mm on the chart. It might correspond to a US size 7, a UK size O, or a European size 54.
Understanding Finger Circumference for Rings
The circumference is the total distance around your finger. This measurement directly translates to the inner circumference of a ring. By measuring this accurately, you are essentially determining the required inner diameter and circumference for a comfortable fit.
Alternative Methods If You Don’t Have a Flexible Tape Measure
While a flexible tape measure is ideal, you can still achieve an accurate ring size measurement using other common items. These methods rely on the principle of measuring your finger and then converting that measurement.
Using a Strip of Paper or String
- Cut a Strip: Cut a thin strip of paper or use a piece of string.
- Wrap It: Wrap the paper or string around your finger, just like you would with the tape measure. Ensure it’s snug but comfortable.
- Mark the Overlap: Mark where the end of the paper/string overlaps.
- Measure the Length: Lay the paper/string flat and measure the length from the end to the mark in millimeters using a ruler or a standard tape measure.
- Consult a Chart: Use this measurement on a ring size chart.
- Note: Paper can stretch, and string can be tricky to keep taut, so this method might be slightly less accurate than using a flexible tape measure, but it’s a good alternative.
Using an Existing Ring
If you have a ring that fits the finger you want to measure perfectly, you can use it to find your size:
- Place the Ring on a Tape Measure: Lay the ring flat on your flexible tape measure or place the tape measure across the widest inside diameter of the ring.
- Measure the Inside Diameter: Measure the distance across the inside of the ring from one edge to the other.
- Convert Diameter to Circumference: Multiply the diameter by pi (approximately 3.14). This gives you the inner circumference.
- Formula: Circumference = Diameter × π
- Use a Ring Size Chart: Consult a ring size chart to convert the circumference to a ring size.
Example:
If the inside diameter of a well-fitting ring is 17 mm, the circumference would be 17 mm × 3.14 = 53.38 mm. You would then find the closest size on the chart.
Tips for Achieving Accurate Ring Sizing With a Tape Measure
Getting the ring size tape measure measurement right involves a few extra considerations. Here are some tips for ensuring you have an accurate ring sizing tape experience:
Measure Multiple Times
Don’t rely on a single measurement. Measure your finger several times throughout the day, and on different days if possible. This helps account for natural fluctuations in finger size.
Consider Your Knuckle Size
As mentioned earlier, if your knuckle is significantly larger than the base of your finger, you must account for it. Measure both the base of the finger and the knuckle, and use the larger measurement when consulting the ring size chart. The ring needs to fit over the knuckle comfortably.
Finger Width Matters
Wider rings tend to fit tighter than narrower rings of the same size. If you are measuring for a wide band (e.g., 6mm or more), consider sizing up a quarter or half size.
Temperature and Hydration
- Temperature: Fingers can swell in heat and shrink in cold. Measure your finger at a comfortable room temperature. Avoid measuring immediately after strenuous exercise or prolonged exposure to hot or cold weather.
- Hydration: Being well-hydrated can affect finger size. Avoid measuring right after consuming a lot of fluids or salty foods, which can cause temporary swelling.
Joint Considerations
If you have arthritis or other conditions that affect your joints, measure carefully to ensure the tape measure goes over any bumps or larger joints smoothly.
Which Finger Are You Measuring?
Remember that fingers on your dominant hand are often slightly larger than those on your non-dominant hand. Also, your ring finger might be a different size than your middle finger. Be specific about which finger you are measuring.
Converting Tape Measurement to Ring Size: A Deeper Dive
The process of converting tape measurement to ring size is straightforward, but it’s essential to be precise.
The Role of the Ring Size Chart
A printable ring size chart tape measure conversion is the bridge between your raw measurement and the standard sizing you see in stores. These charts are standardized based on the inner circumference of rings.
Understanding Different Sizing Systems
- US Sizing: Uses numbers like 6, 7, 8, etc.
- UK Sizing: Uses letters like L, M, N, etc.
- European Sizing: Uses millimeters directly as the size (e.g., 54, 56, 58).
When you get your measurement in millimeters, you’ll need to look at the corresponding sizes on the chart for the system you are using. For example, if your finger circumference is 56mm, this might translate to a US size 7.5, a UK size P, or a European size 56.
What is a Standard Ring Size?
There isn’t a single “standard” ring size for everyone, as finger sizes vary greatly. However, for women, sizes 6-8 are most common, and for men, sizes 9-11 are most common in the US. The key is finding your standard size.
How to Measure Ring Size at Home Accurately
By following these steps and tips, you can confidently measure your ring size at home. The goal is to get a DIY ring measurement tape result that closely matches what a jeweler would find.
Common Pitfalls and How to Avoid Them
Even with a tape measure, mistakes can happen. Here are some common errors to watch out for:
- Measuring Too Tightly: This will result in a ring that’s too small. Remember, the ring needs to slide on comfortably.
- Measuring Too Loosely: This can lead to a ring that’s too big and might fall off.
- Ignoring the Knuckle: Not measuring the knuckle can prevent a ring from fitting at all, even if the base measurement is correct.
- Inconsistent Temperature: Measuring when your fingers are very hot or cold can skew the results.
- Using a Stretched Paper Strip: If using paper, ensure it hasn’t been stretched or pulled out of shape.
The Best Way to Measure Ring Size Tape Approach
The best way to measure ring size tape involves meticulous attention to detail:
1. Use a flexible tape measure.
2. Ensure a comfortable, not tight, fit.
3. Measure the knuckle if it’s larger.
4. Take multiple measurements.
5. Use a reliable conversion chart.
FAQs: Your Ring Sizing Questions Answered
Here are some frequently asked questions about measuring ring size with a tape measure:
Q1: Can I use a standard ruler instead of a tape measure?
A1: You can use a standard ruler if you are measuring a piece of paper or string that you’ve used to wrap your finger. However, a flexible tape measure is preferred as it can directly wrap around your finger.
Q2: What is the best time of day to measure my ring size?
A2: The best time is generally in the middle of the day, when your fingers are at a normal temperature and hydration level. Avoid mornings (fingers may be slightly swollen) or evenings (fingers might be slightly shrunken due to cooler temperatures).
Q3: My fingers change size. How do I account for this?
A3: Measure your finger at different times of the day and on different days. If there’s a significant difference, consider the larger measurement or consult a jeweler.
Q4: Do I need to measure the same finger on both hands?
A4: Yes, if you plan to wear rings on different fingers. Fingers on your dominant hand are often slightly larger.
Q5: How do I measure for a wide band ring?
A5: Wider bands fit tighter than narrow bands. For bands 6mm or wider, consider going up a quarter to half a size from your standard measurement.
Q6: What if my measurement falls between two sizes on the chart?
A6: It’s generally safer to go up to the next size, especially for wider bands. A slightly looser ring can often be resized down more easily than a too-tight ring can be resized up.
Conclusion: Your Perfectly Sized Ring Awaits
By utilizing a simple tape measure, you can confidently determine your ring size at home. This DIY ring measurement tape method empowers you to shop for rings with certainty, ensuring a comfortable and secure fit for your precious jewelry. Remember to be patient, measure carefully, and consult reliable conversion charts. With these steps, you’re well on your way to finding the perfect fit for your next beautiful ring!