
Can you sharpen a Stihl chainsaw at home? Yes, you absolutely can sharpen a Stihl chainsaw at home with the right tools and a bit of practice. Learning how to sharpen your Stihl chainsaw chain is a crucial part of Stihl chainsaw maintenance sharpening. A sharp chain cuts efficiently, reduces strain on your saw, and is much safer to use. This comprehensive Stihl chainsaw sharpening guide will walk you through the process, ensuring you achieve optimal cutting performance. We’ll cover everything from choosing the correct Stihl file size to the proper Stihl chainsaw sharpening technique.
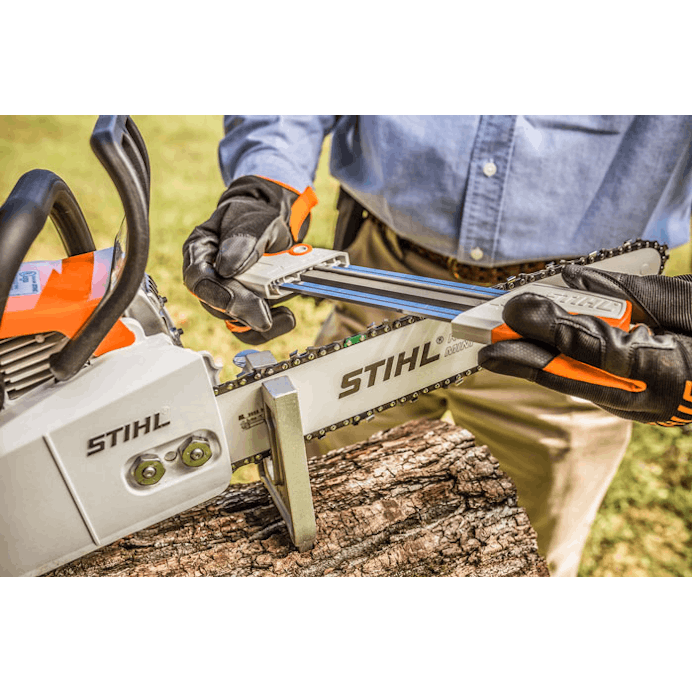
Image Source: stihlusa-images.imgix.net
Why Sharpening Your Stihl Chainsaw is Important
A dull chainsaw chain is more than just frustrating; it’s a safety hazard. When your chain is dull, it forces the saw to work harder, leading to:
- Increased Effort: You’ll find yourself pushing down on the saw, which is dangerous. A sharp chain bites into the wood and pulls itself through.
- Poor Cutting Performance: Instead of clean cuts, you’ll get sawdust instead of wood chips. The saw will wander, and you won’t be able to cut straight.
- Overheating: The engine and clutch have to work overtime to drive a dull chain, leading to premature wear and potential damage.
- Chain Damage: A dull chain can lead to skipping teeth, improper chain tension, and even premature chain replacement.
- Increased Risk of Kickback: Kickback happens when the moving chain is suddenly stopped by an obstruction. A sharp chain is less likely to snag and cause kickback.
When to Sharpen Your Stihl Chainsaw
Knowing when to sharpen is key to effective Stihl chainsaw maintenance sharpening. Look for these signs:
- Sawdust Type: Instead of fine wood chips, you’re producing a fine powder.
- Saw Wandering: The chain doesn’t cut straight; it pulls to one side.
- Requires Force: You have to push down on the saw to make it cut.
- Burning Smell: The chain and bar may start to smell like burning wood.
- Rough Vibration: The saw feels rougher to operate than usual.
- Sawdust Behind the Bar: If you see a lot of fine dust accumulating behind the guide bar, it means the chain isn’t cutting efficiently.
What You’ll Need for Stihl Chainsaw Sharpening
To get started with sharpening Stihl chainsaw teeth, you’ll need a few essential tools. Having the right equipment ensures you get the best way to sharpen Stihl chainsaw.
Essential Tools for Hand Sharpening
- Round File: This is the primary tool. The correct Stihl file size is crucial.
- File Guide: This helps you maintain the correct angle and depth.
- Depth Gauge File (Flat File): Used to adjust the depth gauges (or rakers).
- Depth Gauge Tool: A guide to set the depth gauge height correctly.
- Chainsaw File Holder (Handle): A sturdy handle for your round file.
- Gloves: For safety and a better grip.
- Safety Glasses: Protect your eyes from metal filings.
- Bench Vise or Clamp: To hold the guide bar securely.
- Rag: For cleaning.
Understanding Stihl File Size
Choosing the correct Stihl file size is paramount for proper Stihl chainsaw sharpening. The file diameter must match the pitch of your chainsaw chain. The pitch is the distance between the drive links. You can usually find the pitch stamped on your guide bar or in your Stihl chainsaw manual.
Common Stihl chain pitches and their corresponding file sizes:
| Chain Pitch | Recommended File Diameter |
|---|---|
| 3/8″ LP | 5/32″ (4.0 mm) |
| .325″ | 5/32″ (4.0 mm) |
| 3/8″ | 13/64″ (5.2 mm) |
| .404″ | 7/32″ (5.5 mm) |
Always check your Stihl chainsaw’s manual or the side of the guide bar for the exact chain pitch and recommended file size. Using the wrong file size will not sharpen the teeth correctly and could damage them.
How to Sharpen a Stihl Chainsaw Chain: Step-by-Step Guide
This guide focuses on hand sharpening Stihl chainsaw, the most common method for on-site sharpening.
Step 1: Secure the Chainsaw
Place your Stihl chainsaw on a stable surface. Use a bench vise or clamps to firmly secure the guide bar. Make sure the chain can move freely but the saw itself is immobile. This is vital for safe and accurate sharpening.
Step 2: Engage the Chain Brake
Always engage the chain brake before you begin sharpening. This prevents accidental chain movement.
Step 3: Identify the Starting Point
Look for an “めます” (masu) mark or a short tooth. This is usually the first tooth to sharpen, or you can choose any tooth to start with and then return to it last. Many professionals prefer to start with a tooth that has a visible “ません” (masen) mark.
Step 4: Set Up Your File and Guide
Place the round file into your file holder. Position the file guide on the top of the guide bar, aligning the guide’s markings with the top of the cutting tooth. The file guide should sit flush against the top plate of the tooth. Ensure the file is centered within the gullet of the tooth.
Step 5: The Proper Stihl Chainsaw Sharpening Technique
This is where the magic happens. Proper technique ensures each tooth is sharpened to the correct angle and depth.
Sharpening Stihl Chainsaw Teeth
- Angle: Most Stihl chains require a 25-30 degree sharpening angle. Your file guide will typically have markings for this. Many guides have a notch indicating the 25-degree angle. Look for the angle marking on your file guide.
- File Placement: Place the file in the gullet (the curved part) of the cutting tooth. It should be parallel to the cutting edge.
- Filing Motion: Apply firm, even pressure and file from the back of the tooth towards the front. Use smooth, forward strokes.
- Number of Strokes: Most teeth will need about 3-5 strokes. The goal is to remove just enough metal to create a sharp edge. You’ll hear a crisp filing sound when you’re doing it right.
- Consistency: The key is consistency. Ensure every tooth is filed with the same number of strokes and the same pressure.
Sharpening Direction
- Right-Hand Teeth: File from left to right.
- Left-Hand Teeth: File from right to left.
You will need to flip the chainsaw or move to the other side to sharpen the teeth on the opposite side of the chain. Always work your way around the entire chain, sharpening every other tooth on one side, then returning to sharpen the teeth you skipped on the other side.
Common Pitfalls to Avoid:
- Don’t Over-File: Removing too much metal will shorten the life of your chain.
- Don’t Under-File: Not enough filing will leave the teeth dull.
- Inconsistent Angles: This leads to uneven cutting and chain damage.
- Not Filing Every Tooth: Every cutting tooth needs to be sharpened.
Step 6: Check and Adjust the Depth Gauges (Rakers)
The depth gauges, also known as rakers, are the small metal pieces in front of each cutting tooth. They control how much wood the cutter removes. If they are too high, the chain won’t cut deeply. If they are too low, the chain will cut too aggressively and can cause excessive wear or even damage.
Adjusting Depth Gauges:
- Use a Depth Gauge Tool: Stihl offers specialized depth gauge tools that fit over the cutting tooth and guide bar. These tools have a slot that shows if the depth gauge needs to be lowered.
- Position the Tool: Place the depth gauge tool over the guide bar so that the depth gauge protuberance fits into the tool’s slot.
- Filing the Depth Gauge: If the depth gauge sticks up through the slot, it needs to be filed down. Use a flat file or the specialized depth gauge file. File the top of the depth gauge down until it is flush with the tool’s guide.
- Angle the File: File the depth gauge at a slight angle, sloping downwards towards the front of the chain. This helps improve chip flow. Refer to your Stihl chainsaw manual for the specific angle, usually around 10 degrees.
- Check All Depth Gauges: Repeat this process for every depth gauge on the chain. It’s important that all depth gauges are set to the same height for an even cut.
Important Note: You only file the depth gauge. Do not file the cutting tooth itself. The depth gauge tool is designed to prevent you from filing the cutting tooth.
Step 7: Final Check and Cleaning
Once you’ve sharpened all the teeth and adjusted the depth gauges, disengage the chain brake. Rotate the chain by hand to ensure it moves smoothly. Wipe down the chain and bar with a clean rag to remove any metal filings or debris.
Sharpening with an Electric Sharpener
An electric sharpener Stihl chainsaw can be a great option for those who sharpen frequently or want a consistent, factory-like edge.
How Electric Sharpeners Work
Electric sharpeners use a grinding wheel that spins at high speed. You set the angle and depth using adjustable guides, and the wheel grinds the cutting edge of the tooth.
Benefits of Electric Sharpening:
- Speed and Efficiency: Much faster than hand sharpening.
- Consistency: Provides a very uniform grind on each tooth.
- Less Physical Effort: Requires less manual dexterity and strength.
Considerations for Electric Sharpening:
- Initial Cost: Electric sharpeners are more expensive than a hand file and guide.
- Risk of Overheating: It’s possible to overheat and damage the chain if you apply too much pressure or grind for too long on one tooth.
- Angle Adjustment: Ensure the sharpener can accurately replicate the correct Stihl sharpening angles.
Using an Electric Sharpener Stihl Chainsaw:
- Secure the Chainsaw: Clamp the guide bar firmly in a vise.
- Set the Sharpener: Adjust the angle guides on the electric sharpener to match the recommended Stihl angle (usually 25-30 degrees).
- Position the Grinding Wheel: Place the grinding wheel into the gullet of the first tooth you want to sharpen.
- Sharpen Each Tooth: Turn on the sharpener and move it smoothly across the cutting edge. Use light pressure and make a few passes. The goal is to remove just enough metal to achieve a sharp edge.
- Work Systematically: Sharpen all teeth on one side, then adjust the sharpener for the opposite angle and repeat for the other side.
- Depth Gauges: You will still need to manually adjust the depth gauges with a file and depth gauge tool after using an electric sharpener.
Stihl Chainsaw Maintenance Sharpening Tips for Longevity
Proper Stihl chainsaw maintenance sharpening involves more than just filing. Here are some extra tips:
- Keep Your Tools Clean: Clean your files and guides after each use to prevent them from becoming clogged with metal filings.
- Store Tools Properly: Store your sharpening tools in a dry place to prevent rust.
- Inspect the Chain: Before sharpening, check your chain for any damaged teeth, bent cutters, or worn drive links. If the chain is significantly damaged or worn, it might be time for a replacement.
- Check the Bar: Ensure your guide bar is clean and lubricated. A worn or damaged bar can negatively affect the sharpening process and the saw’s performance.
- Lubrication is Key: Always ensure your chainsaw bar is properly lubricated with bar oil. This reduces friction and wear on both the chain and the bar.
Frequently Asked Questions (FAQ)
Q1: How often should I sharpen my Stihl chainsaw chain?
A: The frequency depends on usage. A good rule of thumb is to sharpen your chain every time you refuel your saw, or whenever you notice a decline in cutting performance. It’s better to sharpen a slightly dull chain than to wait until it’s completely blunt.
Q2: What is the best way to sharpen a Stihl chainsaw?
A: The best way to sharpen a Stihl chainsaw is the way that results in a sharp, efficiently cutting chain with minimal damage. For most users, hand sharpening with a quality file and guide offers the best balance of control, affordability, and effectiveness. Electric sharpeners can be faster and more consistent if used correctly.
Q3: Can I use a dremel to sharpen a Stihl chainsaw chain?
A: While some people attempt to use rotary tools like a Dremel with specialized attachments, it is generally not recommended for serious chainsaw users. It’s very easy to overheat the chain, remove too much metal, or create an inconsistent angle, which can damage the chain and compromise cutting performance and safety.
Q4: What if my Stihl chainsaw chain has multiple dull teeth?
A: If several teeth are damaged or have been sharpened unevenly over time, you might need to file them down to match the shortest tooth. This ensures all cutting teeth are at the same effective length. However, if many teeth are severely damaged or the chain is significantly worn, it’s often best to replace the entire chain.
Q5: How do I know if I’ve sharpened my Stihl chainsaw too much?
A: You’ll know if you’ve sharpened too much if the cutting teeth become very small or if you’ve removed excessive material from the depth gauges. You can also tell if the chain is wearing out too quickly. The goal is to remove only the damaged or dull metal, not to reshape the tooth significantly.
Q6: Can I sharpen a Stihl chainsaw blade myself?
A: When people refer to a “blade” on a chainsaw, they generally mean the chain. The chain is indeed sharpened. The guide bar, which the chain runs on, is not sharpened but inspected for wear and flatness.
By following these steps and tips, you can maintain a sharp Stihl chainsaw chain, making your cutting tasks easier, safer, and more efficient. Happy cutting!