
Can you make wood filler from sawdust? Yes, you absolutely can! Making your own wood filler from sawdust is a fantastic way to recycle wood scraps and save money. It’s a straightforward DIY project that’s perfect for filling small holes, cracks, and imperfections in wood. This guide will walk you through everything you need to know to create effective sawdust filler recipe and utilize it for your sawdust wood repair projects.
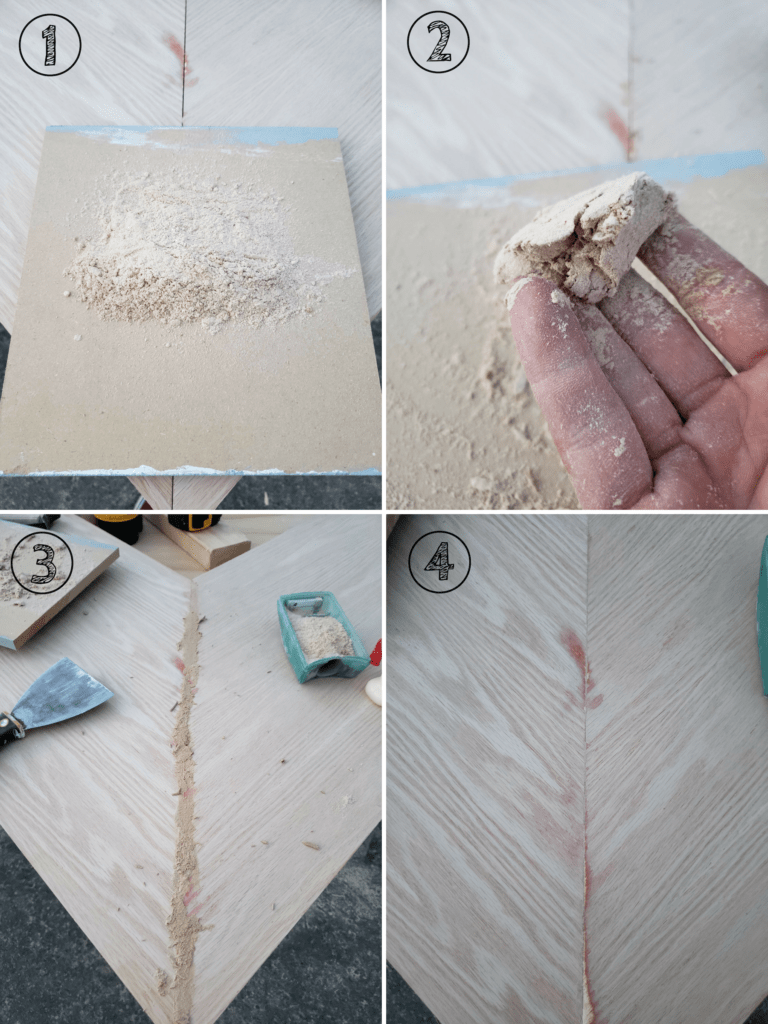
Image Source: www.thehomestud.com
Why Choose DIY Sawdust Wood Filler?
Before we dive into the “how-to,” let’s look at why making your own wood filler is such a great idea.
- Cost-Effective: Store-bought wood fillers can be expensive, especially if you need a lot of it. Using sawdust, which is often a free byproduct, dramatically reduces the cost.
- Eco-Friendly: Repurposing sawdust reduces waste. Instead of throwing it away, you’re giving it a new life, contributing to a more sustainable approach to DIY and woodworking.
- Customizable: You can tailor your homemade wood putty sawdust to match the exact shade of your wood by using sawdust from specific wood types. This means you can achieve a near-invisible repair.
- Simple Ingredients: The main ingredients – sawdust and a binder – are readily available and easy to find.
- Versatile: This filler is great for a variety of tasks, from filling nail holes and small cracks to minor surface repairs. It’s ideal for sawdust wood patching and making those easy sawdust wood repair jobs a breeze.
What You’ll Need: Essential Materials
To create your DIY wood filler sawdust, you’ll need a few key components:
1. Sawdust
This is your primary ingredient. The type of sawdust you use is important and will affect the final color and strength of your filler.
- Best Types:
- Hardwood Sawdust: Oak, maple, walnut, cherry. These tend to be denser and create a stronger filler.
- Softwood Sawdust: Pine, fir, cedar. These are softer and easier to work with but may result in a slightly weaker filler.
- What to Avoid:
- Treated Lumber Sawdust: Never use sawdust from pressure-treated wood or wood treated with chemicals. These can be toxic.
- Painted or Varnished Sawdust: Sawdust from wood that has been painted, stained, or varnished will result in a colored filler that’s unsuitable for most natural wood repairs.
- Exotic Woods: While you can use them, they might be harder to find and can be more expensive if you have to buy them.
- Preparation: Ensure your sawdust is clean and free from debris like nails, screws, or dirt.
2. Binder
The binder is what holds the sawdust together, creating a cohesive and workable filler. You have several options here, each with its own advantages:
- Wood Glue (PVA Glue): This is the most common and highly recommended binder for wood dust and glue projects. It’s strong, readily available, and dries clear or slightly amber. White or yellow wood glue works well.
- Epoxy Resin: For repairs requiring maximum strength and water resistance, epoxy resin is an excellent choice. It’s a two-part system that creates a very durable bond.
- Cyanoacrylate Glue (Super Glue): This can be used with sawdust for quick, small repairs, especially for very fine cracks. However, it can be brittle and is best used sparingly.
- Shellac: A traditional binder, shellac can be mixed with sawdust to create a filler, but it’s less common for general DIY use.
3. Optional Additives
Depending on your needs, you might want to add other ingredients:
- Wood Stain or Pigment: To perfectly match the color of your wood, you can add a small amount of compatible wood stain or artist’s pigment to the mix. Test the color on a scrap piece of wood before applying to your project.
- Fine Sand: A small amount of fine-grit sand can add strength and texture, especially for larger repairs.
Creating Your Wood Filler: Step-by-Step Guide
Now that you have your materials, let’s get to mixing sawdust for filler. The process is simple:
Step 1: Gather and Prepare Your Sawdust
- Collect sawdust from your woodworking projects or from lumberyards.
- If you’re buying sawdust, ensure it’s from the type of wood you want to repair.
- Sift the sawdust through a fine-mesh sieve or a piece of hardware cloth. This removes larger chunks and debris, ensuring a smoother filler. You’re aiming for a fine powder-like consistency.
Step 2: Choose Your Binder and Mix Proportion
The ratio of sawdust to binder is crucial for creating a workable paste. This is where your sawdust filler recipe truly takes shape.
- With Wood Glue:
- Start with a ratio of roughly 2 parts sawdust to 1 part wood glue.
- You can adjust this ratio as you mix. Add glue gradually until you reach a thick paste consistency, similar to peanut butter or toothpaste. You want it pliable but not runny.
- This wood dust and glue mixture is excellent for most common repairs.
- With Epoxy Resin:
- Follow the manufacturer’s instructions for mixing the epoxy resin.
- Gradually add sawdust to the mixed resin until you achieve a thick paste.
- Epoxy-based fillers are great for structural repairs and areas that might be exposed to moisture. They create a very strong wood dust filler binder.
- With Cyanoacrylate Glue:
- This is for very small, quick fixes.
- Apply a small amount of sawdust to the crack or hole.
- Then, carefully drip cyanoacrylate glue onto the sawdust until it’s saturated. The glue hardens the sawdust quickly.
Step 3: Mixing the Filler
- In a small, disposable container (like a plastic cup or old paint can), place your prepared sawdust.
- Slowly add your chosen binder.
- Use a small putty knife, craft stick, or even your fingers (wear gloves if using epoxy) to mix the ingredients.
- Mixing sawdust for filler requires patience. Add binder little by little until the sawdust is fully saturated and forms a thick, workable paste. It should hold its shape without being crumbly or too sticky.
- If you want to color-match, add a tiny amount of wood stain or pigment at this stage and mix thoroughly. Test the color on a scrap piece of wood.
Step 4: Testing and Adjusting
- Before using it on your project, test a small amount of the filler.
- Apply it to a scrap piece of the same wood.
- Let it dry completely. Check its color, texture, and adhesion.
- If it’s too dry and crumbly, add a little more binder.
- If it’s too wet and sticky, add a little more sawdust.
Applying Your DIY Wood Filler
Once you have a successful batch of homemade wood putty sawdust, it’s time to apply it.
Preparation of the Area
- Ensure the area you’re repairing is clean, dry, and free of dust, grease, or loose debris.
- For larger cracks or holes, you might want to slightly widen them with a utility knife or chisel to give the filler better adhesion.
Application Techniques
- Small Holes and Cracks: Use a small putty knife, a palette knife, or even a toothpick to press the filler firmly into the imperfection. Overfill slightly, as most fillers shrink a bit as they dry.
- Larger Areas: For bigger repairs, a putty knife or a small trowel works well. Apply the filler in thin layers, pressing it into the void.
- Matching Grain: If you’re trying to make the repair invisible, you can try to match the direction of the wood grain with the application of your filler.
- Sanding: Once the filler is completely dry (this can take anywhere from 30 minutes to several hours, depending on the binder and thickness), you can sand it smooth. Start with a medium-grit sandpaper (around 120-150 grit) and then move to a finer grit (220 grit or higher) for a smooth finish. Be careful not to sand away too much of the surrounding wood.
Finishing the Repair
- After sanding, wipe the area clean of dust.
- You can then stain, paint, or varnish over the repaired area to match the rest of your wood. If you didn’t color-match the filler, you might need to touch it up with stain or paint.
Types of Wood Filler from Sawdust and Their Uses
The choice of binder and sawdust significantly influences the properties of your filler. Here’s a breakdown:
1. PVA Glue-Based Sawdust Filler
- Composition: Sawdust mixed with PVA wood glue.
- Pros: Easy to make, strong for most interior applications, readily available materials, good adhesion.
- Cons: Not waterproof, can shrink slightly upon drying, not ideal for structural repairs.
- Best For: Filling nail holes, small gouges, minor cracks in furniture, trim, and cabinetry. This is your go-to for sawdust wood patching on everyday items. It’s part of many easy sawdust wood repair jobs.
2. Epoxy-Based Sawdust Filler
- Composition: Sawdust mixed with a two-part epoxy resin.
- Pros: Extremely strong, durable, waterproof, excellent adhesion, can fill larger voids, provides a robust wood dust filler binder.
- Cons: More expensive, requires precise mixing ratios, can be messier to work with, longer drying time.
- Best For: Filling larger cracks, knot holes, damaged edges, or areas that require significant strength and durability, like outdoor furniture or structural wood repairs.
3. Cyanoacrylate (Super Glue) and Sawdust Filler
- Composition: Sawdust saturated with super glue.
- Pros: Dries very quickly, good for very small, precise repairs.
- Cons: Can be brittle, not very strong for larger applications, can be difficult to sand smooth, not suitable for areas needing flexibility.
- Best For: Filling tiny pinholes, very thin cracks, or reinforcing small splintered areas.
Tips for Success with Your DIY Sawdust Filler
- Color Matching is Key: Always try to use sawdust from the same type of wood you are repairing. If that’s not possible, carefully mix in wood stain or pigments until you achieve the desired color. Test on a hidden area first.
- Work in Layers for Deep Voids: For deeper holes or cracks, don’t try to fill them in one go. Apply the filler in thin layers, allowing each layer to dry and shrink slightly before applying the next. This prevents cracking and ensures better adhesion.
- Slight Overfill: Wood filler, even DIY versions, tends to shrink slightly as it dries. It’s a good practice to slightly overfill the imperfection, then sand it flush once dry.
- Cleanliness is Crucial: Ensure your workspace, tools, and the wood surface are clean before you start. Dust and debris can compromise the strength and appearance of your repair.
- Storage: Store leftover filler in an airtight container. If using PVA glue, it will harden over time, so make only what you need for the project or be prepared to make a fresh batch. Epoxy has a limited pot life once mixed.
- Experiment with Consistency: The ideal consistency can vary slightly depending on your project. Aim for a paste that’s easy to apply but firm enough to hold its shape.
- Consider Grit Size: Finer sawdust generally creates a smoother filler, while coarser sawdust might be better for larger, structural repairs where a slight texture is acceptable.
Creating Wood Filler from Scraps: A Sustainable Approach
When you’re working on a woodworking project, you inevitably end up with wood scraps and sawdust. Creating wood filler from scraps is a perfect way to utilize these remnants. Instead of discarding that pile of shavings and fine dust, think of it as raw material for your next repair job. This is especially satisfying when you’re working with premium hardwoods; you can even create filler that perfectly matches your expensive wood by collecting its own sawdust. This sawdust wood repair method is as economical as it is environmentally responsible.
Frequently Asked Questions (FAQ)
Q1: Can I use sawdust from any type of wood?
No, it’s crucial to use sawdust only from untreated, unpainted, and unstained wood. Avoid sawdust from pressure-treated lumber or wood with chemical finishes, as these can be toxic and will ruin your repair.
Q2: What is the best binder for sawdust wood filler?
For most general DIY purposes, PVA wood glue (like Titebond) is the best binder due to its strength, ease of use, and availability. For repairs requiring high durability and water resistance, epoxy resin is a superior choice.
Q3: How long does DIY sawdust wood filler take to dry?
Drying time varies depending on the binder used, the thickness of the application, and environmental conditions (humidity and temperature). PVA glue-based fillers can take anywhere from 30 minutes to a few hours to dry enough for sanding. Epoxy fillers may take 24 hours or more to fully cure.
Q4: Can I use sawdust filler for exterior wood repairs?
While PVA glue-based fillers are suitable for interior use, they are not waterproof. For exterior repairs, an epoxy resin-based sawdust filler is highly recommended for its durability and resistance to moisture.
Q5: How do I get the color of my sawdust filler to match my wood?
The best way is to use sawdust from the same type of wood. If that’s not possible, you can add a small amount of compatible wood stain or artist’s pigments to the mixture. Always test the color on a scrap piece of wood before applying it to your project.
Q6: Can I use sawdust filler to repair structural damage?
For minor cosmetic repairs, yes. However, for significant structural damage or load-bearing applications, commercially produced wood fillers or professional wood repair techniques are recommended. Epoxy-based fillers offer the most strength among DIY options.
Q7: How do I store leftover sawdust filler?
PVA glue-based fillers will harden over time. Store any unused portion in an airtight container. If it becomes too stiff, you can try adding a tiny bit more glue. Epoxy has a limited pot life once mixed and cannot be stored.
Q8: What’s the difference between wood filler and wood putty?
While the terms are often used interchangeably, wood putty is typically more pliable and oil-based, making it suitable for exterior use and applications where it might need to be shaped. Wood filler, often water-based or resin-based, is generally harder and better for filling holes and cracks that will be sanded and finished. Our sawdust filler, especially with PVA glue, leans more towards a filler, while an epoxy version can offer putty-like durability.
Q9: What are common mistakes to avoid when making sawdust filler?
- Using sawdust from treated or finished wood.
- Not sifting the sawdust to remove debris.
- Using too much or too little binder, resulting in a mix that’s too wet or too dry.
- Trying to fill deep holes in a single application, leading to cracking.
- Not allowing the filler to dry completely before sanding.
By following these guidelines and experimenting with your sawdust wood repair projects, you can create a versatile and cost-effective filler that will help you achieve professional-looking results. Enjoy creating wood filler from scraps and giving your wooden items a new lease on life!