
Can you measure your ring size with a tape measure at home? Yes, you absolutely can! Measuring your ring size at home with a tape measure is a straightforward and accurate method for finding the correct ring size without needing a professional sizer. This guide will walk you through the process step-by-step, helping you achieve an accurate ring size measurement and avoid common ring size mistakes.
Finding your ring size is crucial for a comfortable and secure fit, whether you’re buying a special gift or treating yourself to a new piece of jewelry. While professional jewelers have specialized tools, you can achieve surprisingly precise results using everyday items like a tape measure. This DIY ring sizing approach is perfect for those moments when you need to know your ring size urgently or prefer the convenience of doing it yourself. We’ll cover everything from how to measure finger circumference accurately to understanding international ring size conversion.
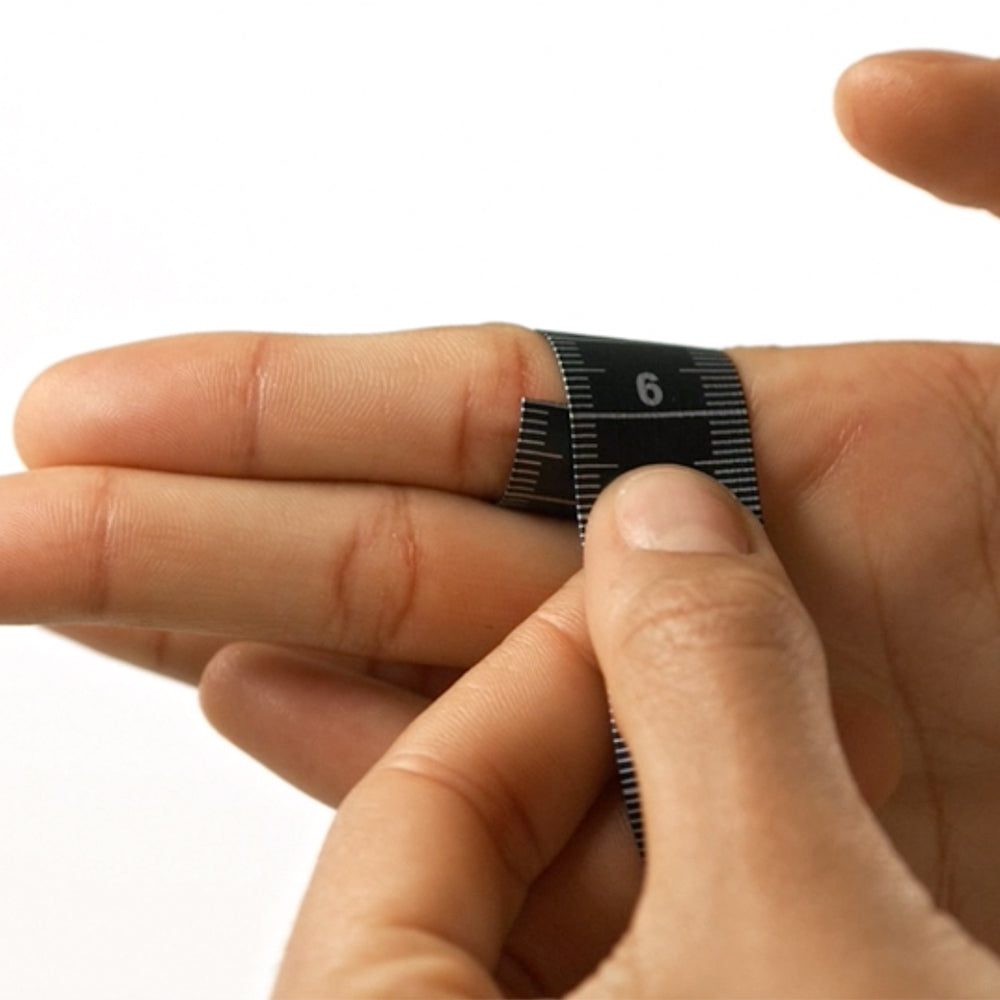
Image Source: us.danielwellington.com
The Importance of an Accurate Ring Size
Why bother with getting your ring size just right? A ring that’s too tight can be uncomfortable, potentially cut off circulation, and be difficult to remove. Conversely, a ring that’s too loose risks slipping off your finger, leading to loss or damage. The correct ring size ensures your precious jewelry stays safely on your finger and feels like a natural extension of yourself. This is especially important when purchasing engagement rings or other significant pieces where a perfect fit is non-negotiable.
Tools You’ll Need for DIY Ring Sizing
You don’t need a specialized jeweler’s kit to measure your ring size. For this DIY method, you’ll primarily need:
- A Flexible Tape Measure: A soft, fabric measuring tape, like those used for sewing, is ideal. If you only have a metal tape measure, be extra careful not to pinch your skin.
- A Pen or Pencil: To mark the measurement.
- A Piece of Paper: To record your measurements.
- A Ring Size Chart: This is essential for converting your finger circumference into a standard ring size. We’ll discuss this further.
- A Mirror (Optional but helpful): To help you see your finger clearly while measuring.
Step-by-Step Guide to Measuring Your Ring Size
Let’s get down to business! Follow these simple steps for measuring ring size at home.
Step 1: Choose the Right Finger and Location
- Identify the Finger: Decide which finger you want to measure. Remember that your fingers can vary in size. For example, your left ring finger is typically smaller than your right ring finger, and your middle fingers are usually larger than your index fingers.
- Measure at the Widest Part: The best place to measure is the knuckle, as this is usually the widest part of your finger. A ring needs to pass over your knuckle to fit comfortably. If your knuckle is significantly larger than the base of your finger, you’ll need to account for this.
Step 2: Measure Your Finger Circumference
This is where your tape measure comes in handy.
Method A: Using a Flexible Tape Measure Directly
- Wrap the Tape Measure: Gently wrap the flexible tape measure around the base of your chosen finger. Position it where the ring will sit.
- Tighten Snugly: Pull the tape measure taut enough to feel snug against your skin, but not so tight that it constricts your finger or leaves an indentation. It should feel like a comfortable ring fit.
- Mark the Overlap: Where the end of the tape measure overlaps the rest of the tape, make a clear mark with your pen or pencil.
- Read the Measurement: Lay the tape measure flat and measure the length from the starting end to the mark you made. This measurement is your finger’s circumference in millimeters or centimeters.
Method B: Using a Paper Strip and Tape Measure (If a flexible tape measure isn’t available)
- Cut a Paper Strip: Cut a thin strip of paper, about 1/4 inch (or 0.5 cm) wide. Ensure it’s long enough to wrap around your finger.
- Wrap the Paper: Wrap the paper strip around the base of your finger, where the ring will sit.
- Mark the Overlap: Just like with the tape measure, pull the paper snugly and mark the point where the end of the strip overlaps.
- Measure the Marked Paper: Lay the paper strip flat and use your tape measure (or a ruler if you don’t have a flexible tape measure) to measure the length from the beginning of the strip to the mark you made. This measurement is your finger’s circumference.
Step 3: Convert Circumference to Ring Size
Once you have your finger’s circumference in millimeters (mm) or centimeters (cm), you’ll need to consult a ring size chart. Most international ring size conversion charts use circumference.
How to Use a Ring Size Chart
- Find a Reliable Chart: Search online for a “ring size chart” or “international ring size conversion.” Many reputable jewelry websites and sizing guides provide these charts.
- Locate Your Circumference: Find your measured circumference in millimeters on the chart.
- Identify Your Ring Size: The chart will correspond your circumference to a specific ring size. These sizes can vary by country (e.g., US, UK, European sizing). It’s best to use a chart that provides multiple sizing systems if you’re unsure which one to use.
Example:
- If your finger circumference measures 55 mm, you might find that it corresponds to a US size 7.25 or a UK size O.
What if your measurement falls between sizes?
If your circumference falls between two sizes on the chart, it’s generally advisable to size up. This is because it’s easier to size down a ring if it’s slightly too large than to size up a ring that’s too small.
Step 4: Consider Temperature and Time of Day
Your finger size can fluctuate throughout the day and with changes in temperature.
- Time of Day: Fingers tend to be slightly larger in the afternoon or evening compared to the morning.
- Temperature: Fingers swell in warm weather and contract in cold weather.
For the most accurate ring size measurement:
- Measure your finger at the end of the day.
- Try to measure when your hands are at a normal body temperature, avoiding extremes of heat or cold.
Advanced Tips for Accurate Ring Sizing
To further refine your DIY ring sizing, consider these extra tips:
Measuring Your Knuckle
If your knuckle is noticeably larger than the base of your finger, you need to measure your knuckle as well.
- Measure the Knuckle Circumference: Use the same tape measure or paper strip method to measure the circumference of your knuckle.
- Compare Measurements: Compare the knuckle measurement to the base-of-finger measurement.
- Use the Larger Measurement: When consulting the ring size chart, use the larger of the two measurements (knuckle or base of finger) to ensure the ring can pass over your knuckle. You might need to go up a half or full size depending on the difference.
Measuring a Ring You Already Own
If you’re trying to find the size of a ring you already own, you can use your tape measure to measure its inner diameter.
- Place the Ring Flat: Lay the ring on a flat surface.
- Measure the Inner Diameter: Use your tape measure (or a ruler) to measure the distance across the inside of the ring, from one edge to the opposite edge, through the center.
- Convert Diameter to Size: Ring size charts also often include diameter measurements. Compare your measured inner diameter to the chart to find the corresponding ring size. This method is often more accurate for finding the size of an existing ring than measuring your finger.
Common Ring Size Mistakes to Avoid
Even with the best intentions, some common mistakes can lead to an inaccurate ring size. Be aware of these pitfalls:
- Measuring Too Loosely: Not pulling the tape measure or paper strip snugly enough can result in a size that’s too large.
- Measuring Too Tightly: Pulling too hard can give you a size that’s too small, making it difficult to get the ring on.
- Ignoring the Knuckle: Failing to account for a larger knuckle can lead to a ring that won’t fit over it.
- Not Considering Temperature: Measuring when your fingers are particularly cold or hot can skew the results.
- Measuring Only Once: Your finger size can fluctuate. It’s best to measure a few times at different points during the day for a more reliable average.
- Confusing Circumference and Diameter: Always double-check if the ring size chart you are using is based on circumference or diameter.
- Using a Stiff Material: A rigid ruler or tape measure can be harder to wrap accurately around a curved finger compared to a flexible tape measure or paper strip.
Interpreting International Ring Size Conversion
Ring sizing can be confusing because different countries use different systems. Here’s a brief look at common systems:
- US/Canada: Uses numbers, often with half sizes (e.g., 6, 6.5, 7).
- UK/Australia: Uses letters (e.g., L, M, N).
- Europe: Uses millimeter measurements, but typically as a numerical scale (e.g., 52, 54, 56).
A typical ring size chart will often include conversions for all these systems. Always check which system you are using to ensure you order the correct size. For instance, a US size 7 is equivalent to a UK size O and a European size 54.
Example Table: Ring Size Conversion (Circumference in mm)
| US/Canada Size | UK/Australia Size | Europe Size | Finger Circumference (mm) |
|---|---|---|---|
| 4 | I | 47 | 47.1 |
| 4.5 | J | 48 | 48.0 |
| 5 | K | 49 | 49.0 |
| 5.5 | L | 50 | 50.3 |
| 6 | M | 52 | 51.5 |
| 6.5 | N | 53 | 52.8 |
| 7 | O | 54 | 54.0 |
| 7.5 | P | 56 | 55.3 |
| 8 | Q | 57 | 56.6 |
| 8.5 | R | 58 | 57.8 |
| 9 | S | 60 | 59.1 |
| 9.5 | T | 61 | 60.3 |
| 10 | U | 62 | 61.6 |
Note: These are approximate conversions and can vary slightly between manufacturers.
FAQs About Measuring Ring Size with a Tape Measure
Here are answers to some common questions about finding your ring size at home:
Q1: Is measuring with a tape measure really accurate enough?
A1: Yes, measuring with a flexible tape measure or a marked paper strip can be very accurate if done carefully. It’s a reliable method for DIY ring sizing when you don’t have a professional sizer.
Q2: Can I use any tape measure?
A2: A soft, flexible tape measure is best. If you must use a metal tape measure, be extremely cautious not to pinch your skin. A paper strip measured with a ruler is also a good alternative.
Q3: What if my finger size changes based on temperature?
A3: It’s best to measure when your hands are at a normal temperature, not too cold or too hot. Measuring at the end of the day is often recommended as fingers can be slightly larger then.
Q4: How do I know if my ring size is correct if I can’t try it on?
A4: The goal is for the ring to slide over your knuckle comfortably and fit snugly on your finger without being too tight or too loose. If you’re between sizes, it’s generally better to size up slightly.
Q5: What is the difference between circumference and diameter for ring sizes?
A5: Circumference is the distance around your finger. Diameter is the distance across the inside of the ring band. Most DIY measurements will give you circumference, which you then convert using a ring size chart. Some methods of measuring an existing ring might give you the diameter.
Q6: How do I find my correct ring size measurement if I don’t have a sizer?
A6: You can accurately find your correct ring size measurement by using a flexible tape measure or a paper strip to determine your finger’s circumference and then consulting a ring size chart.
Q7: What if I need to find my ring size without a sizer and without a tape measure?
A7: While a tape measure is ideal, you can also use a piece of string or a thin strip of paper. Wrap it around your finger, mark the overlap, and then measure the length of the marked section using a ruler. This is a key part of finding your ring size without a sizer.
Conclusion
Mastering the art of measuring your ring size with a tape measure is a valuable skill for any jewelry enthusiast. By following these detailed steps, paying attention to the nuances of finger measurement, and using a reliable ring size chart, you can confidently determine your correct ring size at home. This DIY ring sizing approach empowers you to make informed purchasing decisions and ensures your rings fit beautifully and comfortably. Happy measuring!