
What is the most important measurement of a band saw blade? The length is crucial, as a blade that is too long or too short won’t work correctly. Can I measure a band saw blade without removing it? Yes, there are ways to get a close estimate without removal, but for true accuracy, removal is best.
Getting the right band saw blade for your machine is essential for safe and efficient operation. A blade that’s too long or too short won’t fit properly, leading to poor cutting performance, potential damage to your saw, and even safety hazards. This guide will walk you through how to measure a band saw blade so you can always choose the correct replacement. We’ll cover all the key band saw blade dimensions and explain why each is important.
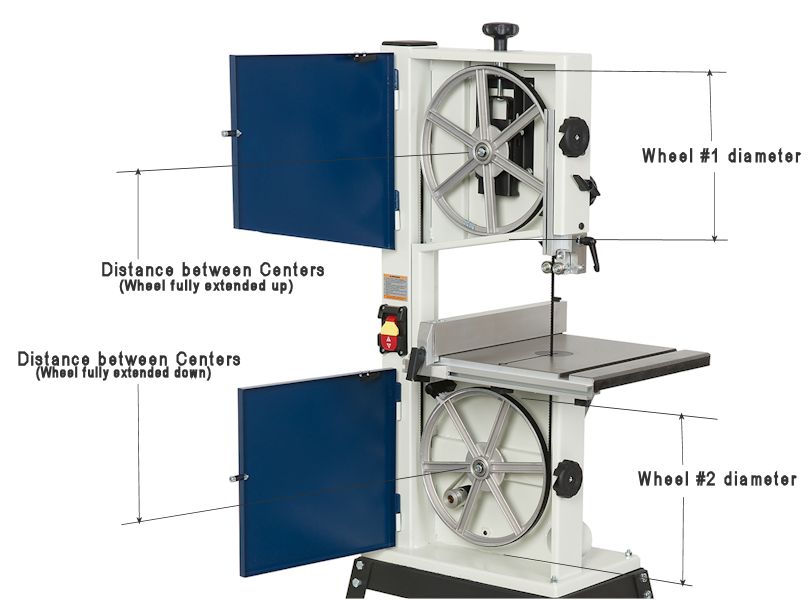
Image Source: www.bandsawbladecenter.com
Why Precise Band Saw Blade Measurement Matters
Before diving into the “how,” let’s understand the “why.”
- Correct Fit: Band saws have specific tensioning mechanisms. A blade of the wrong length will either be too loose (and likely to jump off the wheels) or too tight (straining the drive mechanism and potentially breaking the blade).
- Cutting Performance: The width and tooth configuration directly impact the type of cuts you can make. Using the wrong blade can lead to rough cuts, blade deflection, and inability to achieve desired results.
- Machine Longevity: An improperly fitted blade can cause undue stress on your band saw’s wheels, bearings, and frame, leading to premature wear and tear.
- Safety: A blade that is not correctly tensioned or is the wrong size poses a significant safety risk. Blades can snap, fly off, or cause kickback.
Essential Band Saw Blade Measurements: A Comprehensive Breakdown
There are several key measurements you need to take when measuring band saw blade for a replacement. Let’s look at each one in detail.
1. Band Saw Blade Length: The Most Critical Dimension
The band saw blade length is arguably the most important measurement. It determines whether the blade can even be installed on your saw.
How to Measure Band Saw Blade Length:
There are two primary methods for determining the correct band saw blade length:
Method 1: Measuring the Old Blade (Recommended)
This is the most accurate way to get your band saw blade size.
- Safety First: Ensure the band saw is unplugged.
- Remove the Blade: Carefully unbolt or release the tension on your current blade and remove it from the saw.
- Lay it Flat: Find a long, flat surface – a workbench, a floor, or even a long ruler or tape measure. Lay the old blade out in a straight line without any kinks or curves.
- Measure End-to-End: Use a reliable tape measure or a long ruler. Place the end of the tape measure at one tip of the blade and extend it all the way to the other tip. Read the measurement.
- Record the Measurement: Write down the length, usually in inches or millimeters.
Important Considerations for Length:
- Don’t Measure Around the Wheel: Never try to measure the circumference of your band saw’s wheels. This will give you an incorrect measurement. You need to measure the actual length of the blade itself when laid flat.
- Account for Tooth Height: While measuring, ensure the tape measure is running along the back edge of the blade, not over the teeth.
- Precision is Key: Even a small difference in length can prevent the blade from fitting correctly.
Method 2: Calculating Length from Your Band Saw (If No Old Blade Available)
If you don’t have an old blade to measure, you can calculate the required length. This method requires knowing your band saw’s specific model and consulting its manual.
- Consult Your Band Saw Manual: Look for the band saw blade specifications section. This is the most reliable way to find the correct length for your machine.
- Manufacturer’s Website: If you don’t have the manual, visit the manufacturer’s website. Search for your specific band saw model, and you should be able to find the technical specifications, including the required blade length.
- Formula (General Approach): For some machines, the length can be approximated using a formula related to wheel circumference and distance between wheel centers, but this is complex and prone to error. It’s far safer to rely on the manufacturer’s stated requirement.
Example Band Saw Blade Lengths (Common Types):
| Band Saw Type | Typical Blade Length Range (Inches) | Typical Blade Length Range (mm) |
|---|---|---|
| Benchtop/Small | 56 ½ to 72 | 1435 to 1829 |
| Cabinet/Mid-size | 92 ½ to 105 ½ | 2350 to 2680 |
| Large Industrial | 138 to 150+ | 3505 to 3810+ |
Note: These are general ranges and can vary significantly by manufacturer and model.
2. Band Saw Blade Width: Impact on Cutting Style
The band saw blade width dictates the types of cuts your saw can perform. Wider blades are for straight cuts, while narrower blades are for curves.
How to Measure Band Saw Blade Width:
- Safety First: Ensure the band saw is unplugged.
- Remove the Blade: As with length, it’s best to remove the blade for accurate measurement.
- Lay it Flat: Lay the blade flat on your workbench.
- Measure Across the Back: Use a ruler or calipers. Measure the width of the blade from one edge to the other, across the flat, non-toothed side.
- Record the Measurement: Note the width, usually in inches or millimeters. Common widths include 1/8″, 1/4″, 3/8″, 1/2″, and 3/4″.
Relationship Between Width and Cut Type:
- Narrow Blades (e.g., 1/8″ to 3/8″): Ideal for intricate curves, scroll work, and tight radius cuts.
- Medium Blades (e.g., 1/4″ to 1/2″): Versatile for general-purpose cutting, including moderate curves and straight cuts.
- Wide Blades (e.g., 1/2″ to 3/4″ and wider): Best for straight ripping, resawing (cutting thick lumber into thinner boards), and creating smooth, straight edges.
3. Band Saw Blade Thickness: Strength and Durability
The band saw blade thickness (often referred to as gauge) affects the blade’s rigidity and durability. Thicker blades are generally stronger and less prone to deflection, making them suitable for heavier cuts.
How to Measure Band Saw Blade Thickness:
- Safety First: Ensure the band saw is unplugged.
- Remove the Blade: Removal is necessary for accurate thickness measurement.
- Use Calipers: The most accurate way to measure thickness is with a pair of calipers (vernier or digital).
- Measure the Back Edge: Place the jaws of the calipers on the flat, non-toothed edge of the blade and close them gently until they make firm contact.
- Record the Measurement: Note the thickness, typically in thousandths of an inch (e.g., .025″) or millimeters.
Impact of Thickness:
- Thinner Blades: More flexible, suitable for tighter curves, but can deflect more under pressure.
- Thicker Blades: More rigid, better for straight cuts and resawing, but less flexible for curves.
4. Teeth Per Inch (TPI): The Cutting Edge Detail
While not a physical dimension you “measure” in the same way as length or width, the Teeth Per Inch (TPI) is a critical specification that dictates the cutting action.
Determining TPI:
- Check the Old Blade: TPI is usually stamped or printed on the old blade itself, often near the end or on the non-toothed edge.
- Consult the Manual or Manufacturer: If not visible, refer to your band saw’s manual or the manufacturer’s specifications.
TPI Guidelines:
- Low TPI (2-3 TPI): Coarse teeth for fast cutting of thick, hard materials and rough cuts. Good for general lumber.
- Medium TPI (4-6 TPI): A good balance for most wood cutting, including hardwoods and softwoods, offering a reasonable cut speed and finish.
- High TPI (8-14 TPI): Fine teeth for smoother finishes on thinner materials, plastics, and non-ferrous metals. Higher TPI results in a cleaner cut but slower feed rate.
5. Tooth Configuration (Hook, Rake, and Set)
These are more technical aspects, but they are part of the overall band saw blade specifications and influence cutting. You typically don’t measure these yourself but select them based on the intended material.
- Hook Angle: The angle of the tooth face. A higher hook angle (e.g., 10-14 degrees) provides aggressive cutting, ideal for softwoods and general lumber. Lower hook angles are better for harder materials.
- Rake Angle: The angle of the tooth relative to the direction of cut. Usually, hook teeth have a positive rake angle.
- Set: The outward bend of the teeth.
- Wavy Set: Teeth are bent alternately left and right in a wavy pattern. Good for thin materials and those with minimal thickness variation, preventing the blade from wandering.
- Straight Set (or Pin Set): Teeth are bent alternately left and right in a straight line. Used for metals and plastics.
- Group Set (or Skip Tooth): Teeth have a wider gap between them, with groups of teeth followed by a space. Good for faster cutting and clearing chips, especially in softer woods.
6. Blade Material
The material of the blade affects its durability and cutting ability. Common materials include:
- Carbon Steel: Affordable and good for general woodworking, but wears out faster.
- Bi-Metal: Combines a flexible carbon steel back with hard, wear-resistant teeth (often high-speed steel or cobalt). Offers better durability and heat resistance.
- Carbide-Tipped: Teeth are tipped with carbide for superior hardness and longevity, ideal for cutting abrasive materials or very hard woods.
The Importance of Blade Kerf
The band saw blade kerf is the width of the material removed by the saw blade as it cuts. This is directly related to the blade’s width and its set.
- Thinner Kerf: Generally achieved with narrower blades and less tooth set. This results in less material waste, which is particularly important when cutting expensive woods or when making many cuts from a single board.
- Wider Kerf: Typically from wider blades with more aggressive tooth set. This can help prevent the blade from binding in the cut, especially in thicker materials, but leads to more material loss.
When selecting a blade, consider the kerf in relation to the material you’re cutting and your desire to minimize waste.
A Band Saw Blade Measurement Guide: Step-by-Step Process
Let’s consolidate the process into a clear band saw blade measurement guide.
Step 1: Safety Check
- ALWAYS unplug your band saw before attempting to measure or remove a blade.
- Wear appropriate personal protective equipment (PPE), including safety glasses and gloves.
Step 2: Remove the Old Blade
- If your blade is still on the saw, you’ll need to remove it.
- Release the tension on the blade by turning the tensioning wheel (usually at the top of the saw).
- Carefully guide the blade off the upper and lower wheels.
- Slowly maneuver the blade out of the saw housing.
Step 3: Measure the Band Saw Blade Length
- Lay the blade flat on a clean, level surface.
- Use a reliable tape measure or ruler.
- Measure from the tip of one tooth to the tip of the opposite tooth along the longest possible straight line.
- Record this measurement accurately.
Step 4: Measure the Band Saw Blade Width
- With the blade still laid flat, use a ruler or calipers.
- Measure the width of the blade across its back edge (the non-toothed side).
- Record this measurement.
Step 5: Measure the Band Saw Blade Thickness (Optional but Recommended)
- Use calipers to measure the thickness of the blade along its back edge.
- Record this measurement.
Step 6: Determine the TPI
- Inspect the old blade for markings.
- If no markings are visible, consult your band saw’s manual or the manufacturer’s website for the recommended TPI range for your machine and intended materials.
Step 7: Note the Blade Material and Tooth Configuration
- Identify the material of your current blade (carbon steel, bi-metal, carbide).
- Consider the tooth set (wavy, straight, skip tooth) and hook angle based on your typical cutting needs.
Step 8: Record All Specifications
- Create a clear record of all the measurements and specifications:
- Length
- Width
- Thickness
- TPI
- Material
- Tooth Configuration
This detailed record will make purchasing the correct replacement blade straightforward.
Tools You’ll Need for Accurate Measurement
- Tape Measure: A good quality metal tape measure is essential for length.
- Ruler: A sturdy metal ruler can be useful for width measurements, especially on narrower blades.
- Calipers: Digital or vernier calipers provide the most accurate measurement for blade thickness and are also helpful for precise width measurements.
- Safety Glasses: Protect your eyes.
- Work Gloves: Protect your hands from sharp teeth.
- Pen and Paper (or Digital Note): To record your measurements.
How to Determine Band Saw Blade Size: A Quick Checklist
When you need to determine band saw blade size, use this quick checklist:
- Length: Is it correct for my saw’s wheel diameter and distance between centers? (Measure old blade or check manual).
- Width: Is it suitable for the type of cuts I make (curves vs. straight cuts)?
- TPI: Will it provide the desired cut speed and finish for the material I’m cutting?
- Material: Is it durable enough for my workload?
- Tooth Configuration: Does it match my cutting needs (hook, set)?
Common Pitfalls to Avoid
- Guessing: Never guess the blade size. Always measure or consult your manual.
- Measuring the Wheel: As mentioned, don’t try to calculate length from the wheel circumference.
- Ignoring TPI: Using a blade with the wrong TPI can lead to poor results and blade damage.
- Using a Worn-Out Blade: A blade that is difficult to measure because it’s broken or severely damaged means you definitely need to check your manual for specifications.
- Not Considering Blade Width: Trying to cut curves with a wide blade or rip with a narrow one will lead to frustration and poor cuts.
Maintaining Your Band Saw Blades
Proper measurement is key to using the right blade, but maintaining them will extend their life:
- Proper Tension: Regularly check and adjust blade tension.
- Coolant (for Metal Cutting): Use appropriate coolant when cutting metal.
- Keep Teeth Sharp: Replace blades when they become dull to avoid straining the saw and getting poor cuts.
- Clean the Blade: Remove sawdust and pitch buildup.
Frequently Asked Questions (FAQ)
Q: What happens if I use a band saw blade that is too short?
A: A blade that is too short will not reach the drive wheels properly, or it will be under excessive tension. This can cause it to jump off the wheels, break, or damage the saw’s tensioning mechanism.
Q: What happens if I use a band saw blade that is too long?
A: A blade that is too long cannot be properly tensioned. It will be loose on the wheels, making it difficult to control, prone to wandering, and very likely to come off the wheels, which is a serious safety hazard.
Q: Can I measure the blade length without removing it?
A: You can get a rough estimate by measuring the circumference of the wheels and the distance between their centers, then using a formula. However, this is often inaccurate. The most precise method is to remove the old blade and measure it directly.
Q: How do I know what TPI to use?
A: The best TPI depends on the material you are cutting and the desired finish. For general wood cutting, 4-6 TPI is common. For smooth finishes on thinner materials, use a higher TPI (8-14). For fast cuts on thick lumber, a lower TPI (2-3) is better. Always check your band saw manual for recommended TPI ranges.
Q: Is blade thickness important?
A: Yes, blade thickness affects its rigidity. Thicker blades are less likely to deflect during cuts, making them better for straight ripping and resawing. Thinner blades offer more flexibility for curved cuts but can be more prone to bending.
By following this comprehensive band saw blade measurement guide, you can confidently select the correct band saw blade dimensions for your needs, ensuring your machine operates safely and efficiently. Remember that accurate band saw blade measurement is the first step to achieving great results with your band saw.