
Image Source: cdnassets.stihlusa.com
How To Clean A Chainsaw Properly: A Step-by-Step Guide for Performance and Safety
What is the best way to clean a chainsaw? The best way to clean a chainsaw involves a methodical approach, focusing on removing debris from all key components like the chain, bar, engine, and carburetor, ensuring optimal performance and safety.
A clean chainsaw is a happy chainsaw, and a happy chainsaw is a safe and effective chainsaw. Neglecting chainsaw maintenance, especially cleaning, can lead to reduced cutting power, premature wear, and even dangerous malfunctions. This in-depth guide will walk you through the entire process, from initial disassembly to reassembly, ensuring your chainsaw is in top-notch condition for any task. We’ll cover essential chainsaw cleaning tips, how to sharpen a chainsaw, chainsaw bar and chain cleaning, chainsaw engine cleaning, chainsaw carburetor cleaning, chainsaw fuel filter replacement, and all aspects of cleaning a dirty chainsaw.
Why Regular Chainsaw Cleaning is Crucial
Before we dive into the “how,” let’s briefly touch upon the “why.” Regular chainsaw cleaning isn’t just about aesthetics; it directly impacts your tool’s longevity and your safety.
- Enhanced Performance: Sawdust, wood chips, and oil residue can clog air filters, impede the chain’s movement, and reduce the efficiency of the cutting system. A clean chainsaw cuts faster and more smoothly.
- Extended Lifespan: Dirt and debris act as abrasives, wearing down critical parts like the chain, bar, sprockets, and engine components. Regular cleaning minimizes this wear and tear, prolonging your chainsaw’s life.
- Improved Safety: A clogged air filter can lead to an overheating engine, which is a fire hazard. A dull or dirty chain can cause kickback, a sudden and violent upward or backward movement of the chainsaw, which can result in serious injury.
- Easier Troubleshooting: When your chainsaw isn’t performing as it should, a clean machine makes it much easier to identify the root cause of the problem.
Essential Tools and Supplies for Chainsaw Cleaning
Gathering the right tools and supplies before you start will make the cleaning process smoother and more efficient.
- Safety Gear:
- Gloves (heavy-duty, cut-resistant)
- Safety glasses or goggles
- Hearing protection (if running the engine briefly for testing)
- Dust mask (especially when dealing with dry debris)
- Cleaning Tools:
- Wire brush (stiff bristles)
- Compressed air or a small blower
- Shop rags or clean cloths (lint-free is best)
- Denatured alcohol or a specialized chainsaw cleaner spray
- Small brush or toothbrush
- Toothpicks or thin wire (for tight crevices)
- Bar groove cleaner tool
- Screwdriver or hex wrench (appropriate size for your chainsaw)
- Bucket or container
- Oil can or spray bottle for lubricant
- Maintenance Supplies:
- Bar and chain oil
- Fresh fuel/oil mixture (if applicable)
- Air filter cleaner (if applicable)
- New air filter (if yours is beyond cleaning)
- New fuel filter (if applicable)
- Spark plug wrench
- New spark plug (optional, but good to have on hand)
Step-by-Step Guide to Cleaning Your Chainsaw
This guide assumes you have a gasoline-powered chainsaw. Electric chainsaws have fewer components and a simpler cleaning process, primarily focusing on the chain, bar, and motor housing.
Step 1: Safety First! Disconnect Power and Allow to Cool
Before you do anything else, ensure your chainsaw is completely safe to handle.
- Turn off the engine.
- Engage the chain brake. This prevents accidental chain movement.
- Allow the chainsaw to cool down completely. The engine and muffler can be extremely hot.
- Disconnect the spark plug wire. This is a critical safety step to prevent the engine from accidentally starting while you’re working on it. Gently pull the boot off the spark plug.
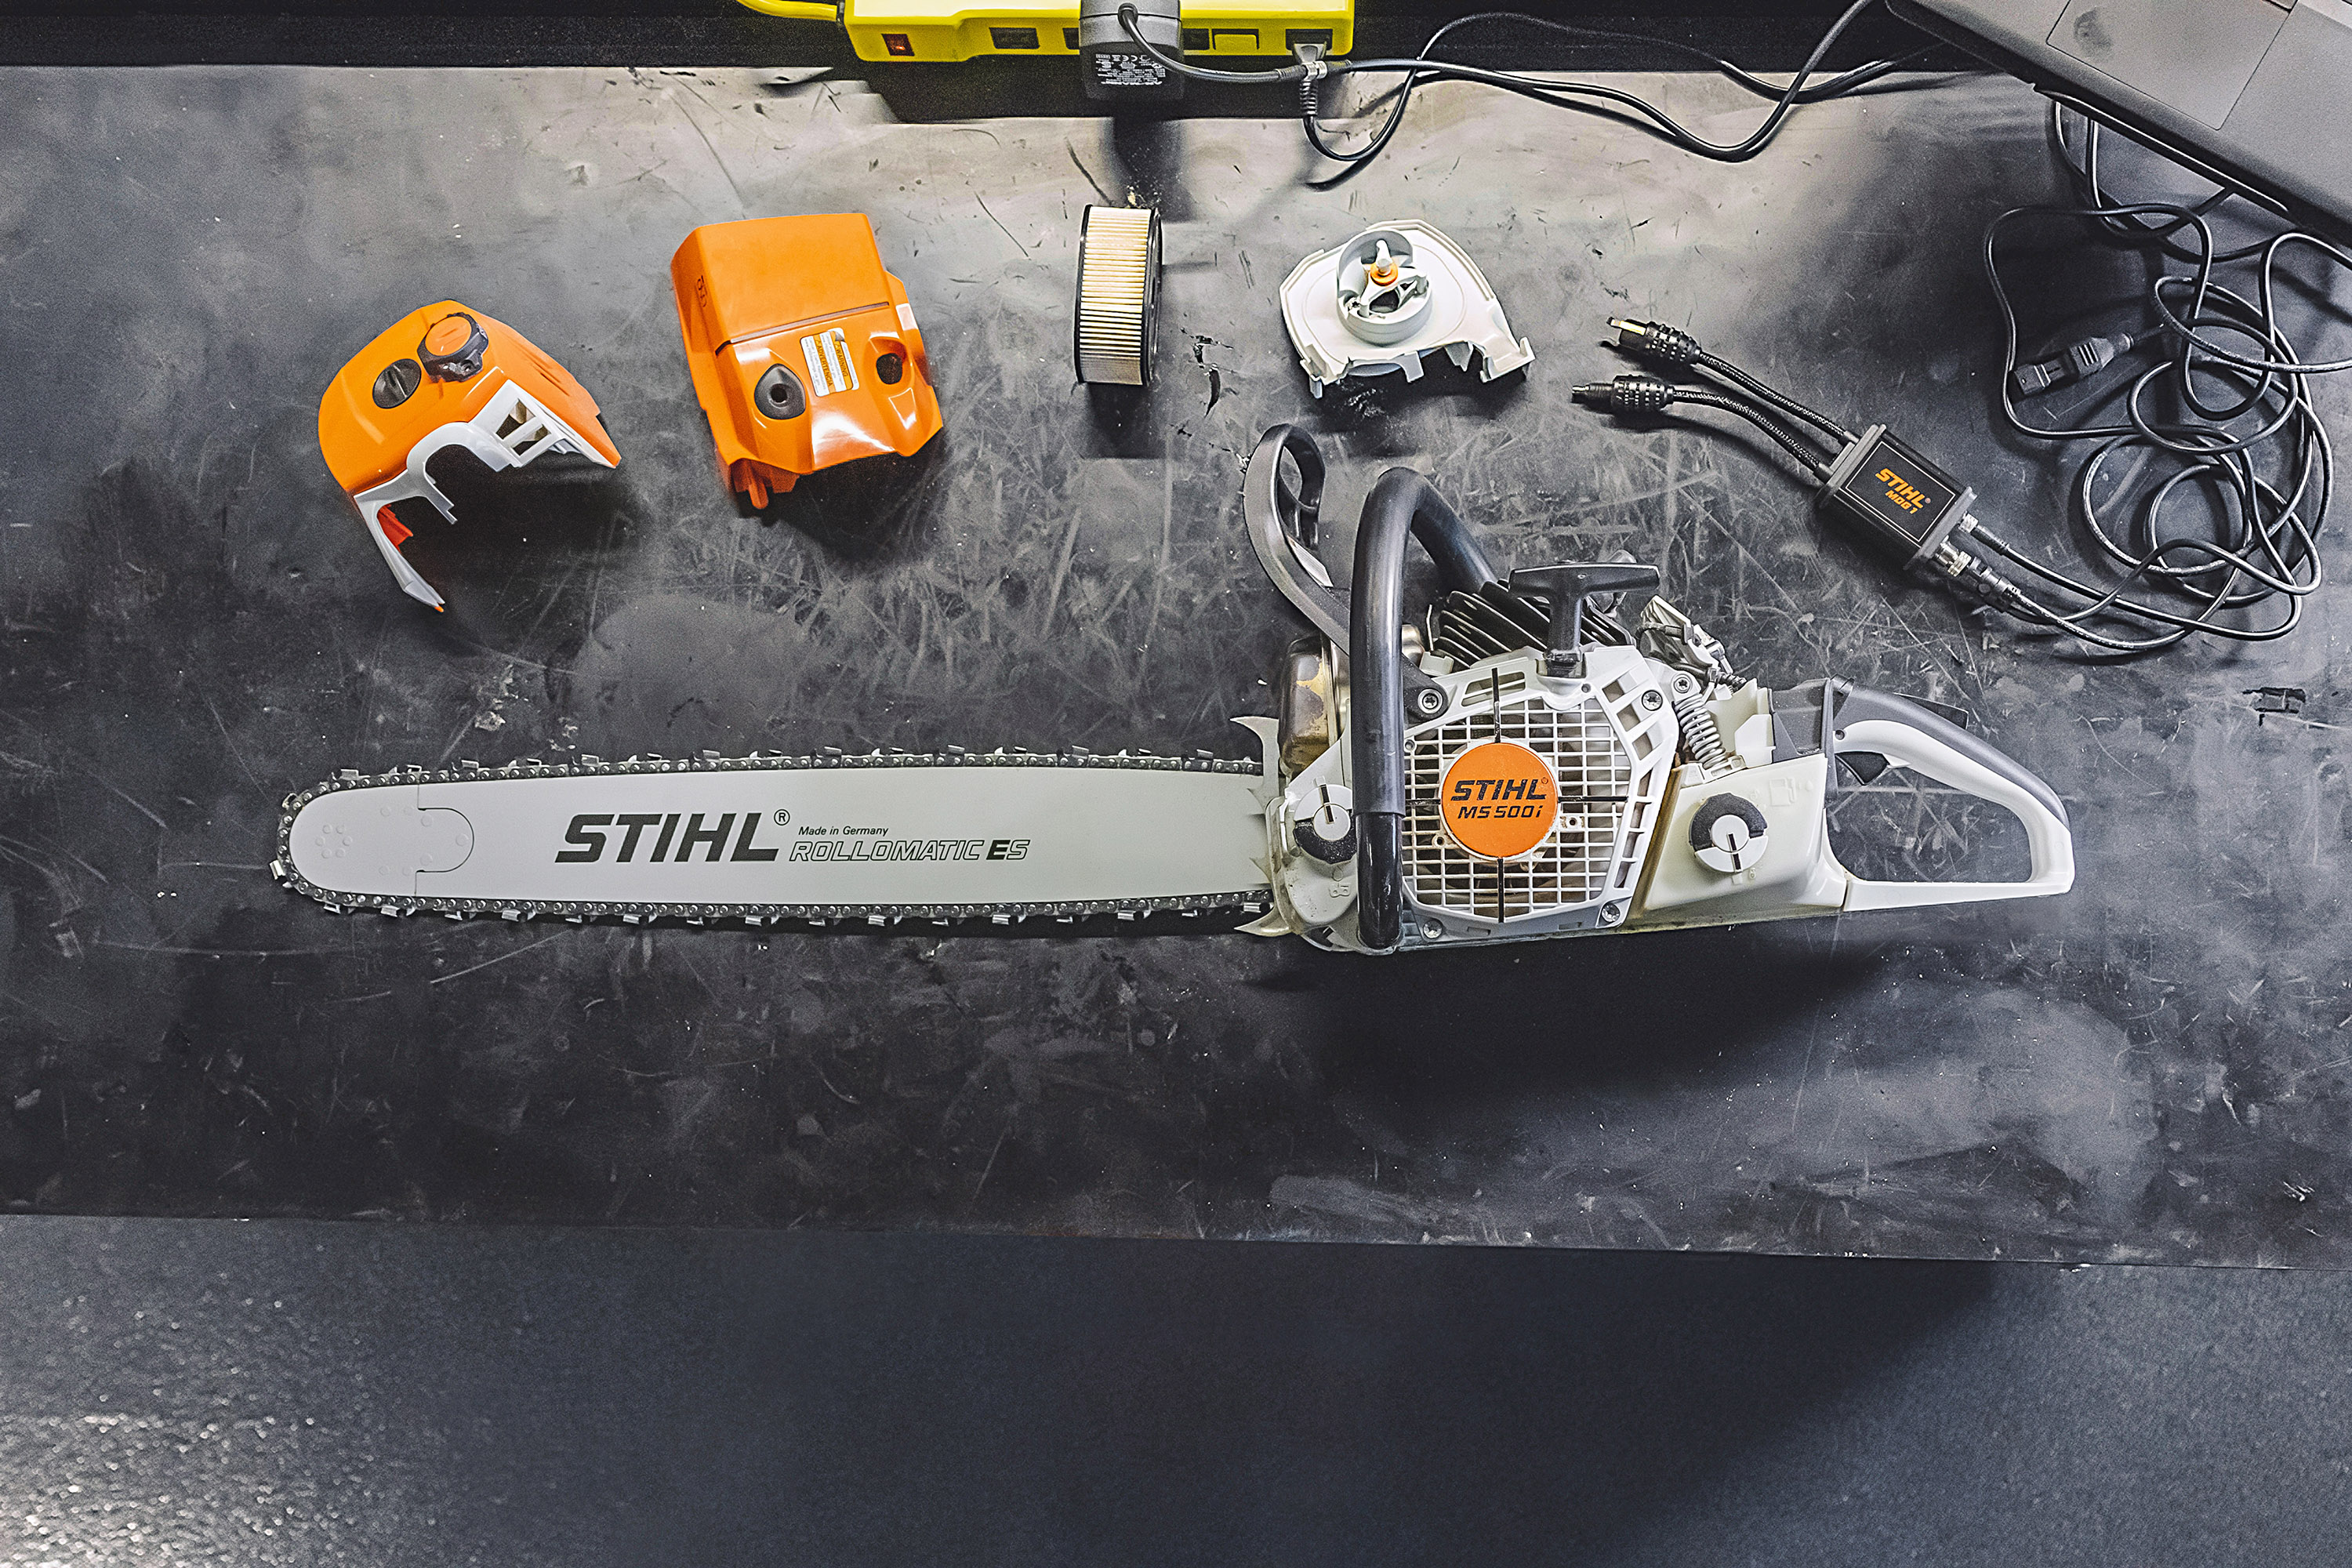
Step 2: Disassembling Key Components
To effectively clean your chainsaw, you’ll need to remove the side cover and often the chain and bar.
- Remove the chain brake cover. This is usually secured by a clip or screw.
- Remove the clutch cover/side housing. This is typically held in place by one or two large nuts or knobs. Loosen these and carefully slide or lift the cover off. Be mindful of any tension on the chain tensioner mechanism.
- Remove the chain and bar. Loosen the bar nuts (the nuts holding the bar to the chainsaw body). Then, release the chain tension by turning the tensioning screw counter-clockwise. Once the chain is loose, you can lift the bar and chain off. Keep them together for now.
Step 3: Chainsaw Bar and Chain Cleaning
The bar and chain are the workhorses of your chainsaw and are constantly exposed to dirt, sawdust, and chain oil.
- Inspect the bar groove: This is the channel where the chain runs. Sawdust and oil residue can build up here, impeding the chain’s movement. Use your bar groove cleaner tool or a thin wire to meticulously remove all debris from the groove.
- Clean the oiler holes: Locate the small oiler holes on the bar, which supply lubrication to the chain. Use a thin wire or a toothpick to clear any blockages. A clogged oiler hole is a major cause of premature bar and chain wear.
- Clean the chain: Lay the chain flat on a clean surface. Use a stiff wire brush to scrub away any embedded sawdust, wood fibers, and old oil. For stubborn grime, you can soak the chain in a bucket of denatured alcohol or a specialized chainsaw cleaner for a short period, then scrub and rinse thoroughly with clean water. Crucially, ensure the chain is completely dry before reassembly. You can air dry it or wipe it down with a clean rag.
- Lubricate the chain: Once dry, lightly coat the chain with fresh bar and chain oil. This protects it from rust and ensures smooth operation.
Table: Chainsaw Bar and Chain Cleaning Best Practices
| Component | Cleaning Method | Frequency |
|---|---|---|
| Bar Groove | Bar groove cleaner tool, thin wire, compressed air | After each significant use |
| Oiler Holes | Thin wire, toothpick | After each significant use |
| Chain | Wire brush, denatured alcohol/cleaner soak (optional), thorough drying, lubrication | After each significant use |
| Sprocket (on bar) | Wire brush | While bar is off |
Step 4: Chainsaw Engine Cleaning
The engine housing and surrounding areas collect a significant amount of sawdust and oil.
- Exterior Cleaning: Use a wire brush to remove loose debris from the engine housing, cooling fins, and starter recoil housing.
- Compressed Air Blast: With the spark plug wire disconnected, use compressed air to blow away accumulated sawdust and debris from the engine casing, around the cylinder, and in any crevices. Pay special attention to the cooling fins; clogged fins reduce the engine’s ability to dissipate heat, leading to overheating.
- Air Filter Housing: Remove the air filter cover (usually a snap-on or screw-on component). Gently tap the air filter to remove loose debris. If it’s a washable filter, follow the manufacturer’s instructions for cleaning (often a mild soap and water solution, followed by thorough drying). If it’s a disposable filter, inspect it for damage and clogging. If it’s heavily soiled or damaged, it’s best to replace it. Clean the inside of the air filter housing with a damp cloth.
Important Note on Chainsaw Engine Cleaning: Avoid using excessive water or solvents directly on the engine itself, especially around electrical components or the carburetor. A slightly damp cloth for wiping down the exterior is usually sufficient.
Step 5: Chainsaw Carburetor Cleaning
A dirty or clogged carburetor is a common culprit for poor engine performance, difficulty starting, or rough idling.
- Accessing the Carburetor: The carburetor is usually located under the air filter. You may need to remove the air filter housing and potentially other shrouds to get to it.
- External Cleaning: With the engine off and cool, and the spark plug wire disconnected, use a brush and compressed air to clean any visible debris from the exterior of the carburetor.
- Internal Cleaning (If Necessary): If you suspect internal blockages or the saw is running poorly, a more thorough carburetor cleaning might be needed. This often involves disassembling the carburetor.
- Caution: Carburetor disassembly can be complex. If you’re not comfortable with this, it’s best to have a professional do it or consult your chainsaw’s manual for specific instructions.
- General Process: Typically, you’ll remove the carburetor from the engine. Then, carefully remove the fuel lines and the air filter adapter. You may need to remove the adjustment screws and the diaphragm. Use a specialized carburetor cleaner spray and compressed air to clean all passages, jets, and openings. Never use a wire or toothpick to clean the jets, as this can enlarge them and disrupt the fuel-air mixture.
- Reassembly: Reassemble the carburetor carefully, ensuring all gaskets and diaphragms are correctly seated. Reattach it to the engine.
Step 6: Chainsaw Fuel Filter Replacement
A clogged fuel filter can restrict fuel flow to the engine, causing it to run poorly or not at all. This is a relatively simple but vital maintenance task.
- Locate the Fuel Filter: The fuel filter is typically located inside the fuel tank, attached to the end of the fuel line. You might need to remove the fuel cap and use a hook or needle-nose pliers to pull the fuel line out of the tank.
- Remove the Old Filter: Carefully pull the old filter off the fuel line. Note its orientation.
- Install the New Filter: Attach the new fuel filter to the fuel line, ensuring it’s securely in place and oriented correctly.
- Replace Fuel Cap: Ensure the fuel cap is securely fastened.
Step 7: Cleaning a Dirty Chainsaw – Other Important Areas
Don’t forget these often-overlooked parts of your chainsaw.
- Spark Plug: While the spark plug wire is disconnected, you can remove the spark plug using a spark plug wrench. Inspect it for fouling (carbon buildup, oil residue). Clean it with a wire brush or replace it if it’s heavily fouled or worn. Ensure the gap is set correctly according to your chainsaw’s manual. Reinstall it snugly.
- Chain Brake Mechanism: Inspect the chain brake mechanism for accumulated sawdust and debris. Use a brush and compressed air to clean it. Ensure the brake band moves freely.
- Handlebars and Controls: Wipe down the handlebars, throttle trigger, and any other controls with a clean, damp cloth to remove grime and oil.
- Exhaust Port/Muffler: Sawdust can accumulate around the muffler. Carefully brush away any debris. Be cautious as the muffler can get very hot.
Step 8: Reassembly and Final Checks
Once all parts are clean and dry, it’s time to put your chainsaw back together.
- Reinstall the Bar and Chain: Place the bar back onto the mounting studs. Slip the chain onto the bar, ensuring it’s running in the correct direction (the cutting teeth should face forward on the top of the bar).
- Tension the Chain: Use the chain tensioning screw to take up the slack in the chain. Adjust it until the chain is snug but still can be pulled around the bar by hand. There should be a slight sag in the chain on the underside of the bar.
- Reinstall the Clutch Cover/Side Housing: Carefully slide the cover back into place. Ensure the chain is properly seated in the clutch drum. Tighten the bar nuts securely, but don’t overtighten them yet.
- Adjust Chain Tension (Final): With the cover on, you can fine-tune the chain tension. Lift the tip of the bar slightly and tighten the bar nuts fully. The chain should be snug against the bar but still rotate freely by hand. When you lift the bar, the chain should stay in place, with no sag on the underside of the bar. A chain that is too tight will cause excessive wear; a chain that is too loose can fly off.
- Reinstall the Chain Brake Cover.
- Reconnect the Spark Plug Wire.
Step 9: Post-Cleaning Test Run
- Start your chainsaw as you normally would.
- Let it idle for a minute to ensure smooth operation.
- Briefly run the chain and check that the chain oiler is working correctly by aiming the tip of the bar at a piece of scrap wood and running the chain. You should see a fine spray of oil on the wood.
- Check chain tension again after a short run, as chains can stretch slightly when new or after being cleaned and re-lubricated.
Frequently Asked Questions (FAQ)
-
How often should I clean my chainsaw?
Ideally, you should perform a basic cleaning after every use, focusing on removing sawdust and debris from the chain, bar, and around the engine. A more thorough cleaning and maintenance check should be done at least annually, or more frequently if you use your chainsaw extensively. -
Can I use a regular degreaser to clean my chainsaw?
It’s generally not recommended to use harsh degreasers on all parts of a chainsaw. Denatured alcohol or specialized chainsaw cleaners are safer for the bar and chain. For the engine, a brush and compressed air are usually sufficient. Always refer to your chainsaw’s manual for specific cleaning recommendations. -
What should I do if I can’t remove a clogged part?
If you encounter a stubborn blockage or are unsure how to proceed with disassembly, it’s best to consult your chainsaw’s owner’s manual or seek assistance from a qualified service center. Forcing parts can lead to damage. -
How do I know when it’s time to sharpen my chainsaw?
A dull chainsaw will produce fine sawdust instead of larger wood chips, cut slowly, and may wander or pull to one side. If you have to force the saw to cut, it’s time to sharpen. Knowing how to sharpen a chainsaw is a crucial skill for any chainsaw owner. -
Can I clean my chainsaw with water?
While a damp cloth can be used for wiping down exteriors, avoid soaking the chainsaw or using a high-pressure washer, as this can force water into sensitive components like the engine, carburetor, and electrical parts, potentially causing corrosion or damage. Ensure all parts are thoroughly dry after any water contact.
By following these detailed steps and incorporating regular chainsaw maintenance into your routine, you’ll ensure your chainsaw operates at peak performance, lasts longer, and most importantly, remains a safe tool to use for all your cutting needs. Remember, a little effort in cleaning goes a long way in preventing costly repairs and potential accidents.